
 Lessons: 67Length: 8.9 hours
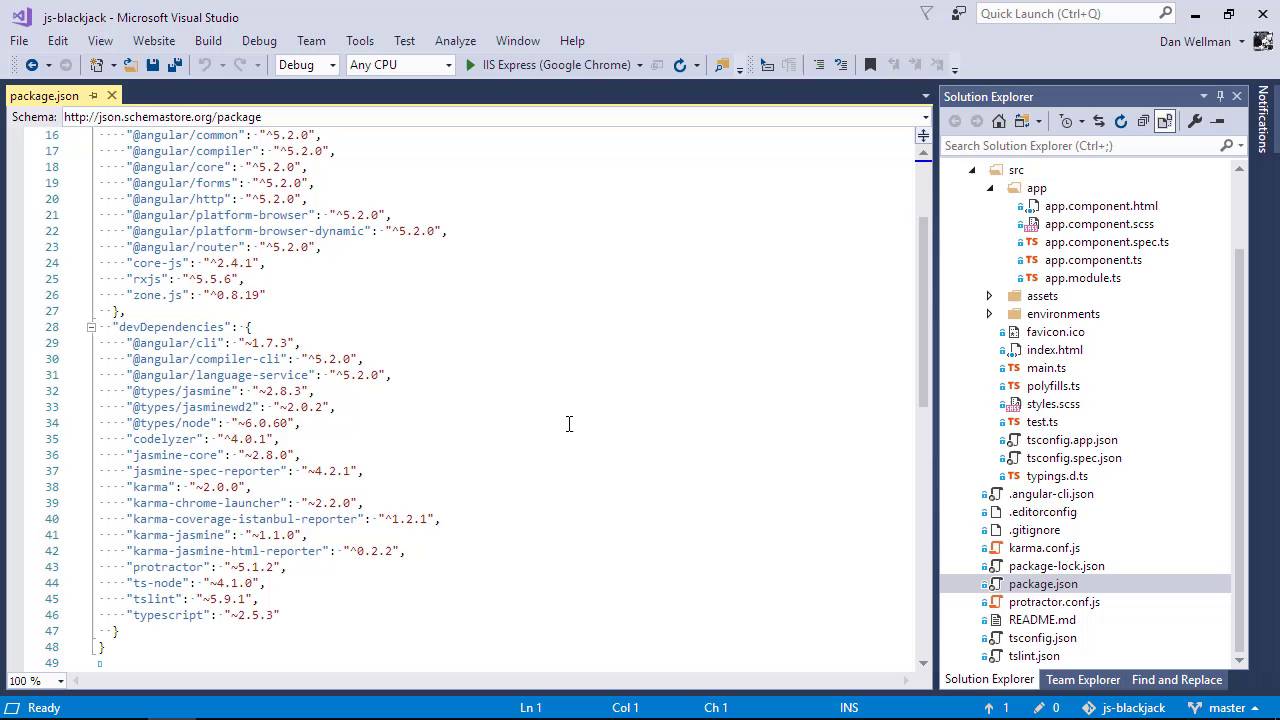
- Overview
- Transcript
1.5 Angular Modules From the CLI
In this lesson we'll take a look at which Angular modules get installed when scaffolding an app using Angular-CLI. Angular is modular, so we don't automatically get the entire library.
1.Introduction
1.1Introduction00:48
1.2Get Started With Angular-CLI11:09
1.3Developing With Angular-CLI13:17
1.4TypeScript vs. JavaScript06:54
1.5Angular Modules From the CLI04:31
1.6CLI Options05:21
2.Get Started With Angular
2.1Bootstrapping the Application04:30
2.2The Application Module04:15
2.3The Application Component08:06
2.4Component Styling03:06
2.5Global Styling05:11
2.6Creating a Component With the CLI09:34
2.7Creating a Service With the CLI07:56
3.Core Concepts
3.1Component Trees06:20
3.2Dependency Injection06:52
3.3Content Projection05:38
3.4Component and Directive Lifecycle Methods06:31
3.5Component-Only Lifecycle Methods05:28
3.6Decorators07:36
3.7Models16:55
4.Template Deep Dive
4.1Basic Data Binding With Interpolation05:35
4.2Property Bindings07:07
4.3Attribute Bindings03:29
4.4Event Bindings08:16
4.5Class and Style Bindings05:44
4.6The `NgClass` and `NgStyle` Directives05:04
4.7The `*ngIf` Directive04:41
4.8The `*ngFor` Directive09:29
4.9Inputs05:33
4.10Using Pipes in a Template07:31
4.11Using Pipes in a Class08:27
5.Forms
5.1Handling User Input With Template Reference Variables07:06
5.2Template-Driven Forms11:10
5.3Template-Driven Forms: Validation and Submission14:00
5.4Reactive Forms11:26
5.5Using a `FormBuilder`08:01
5.6Reactive Validation With Built-in Validators14:53
5.7Creating Custom Validators for Template-Driven Forms12:18
5.8Creating Custom Validators for Reactive Forms08:26
5.9Observing Form State Changes12:40
5.10Working With the `@HostListener` Decorator05:41
6.Routing
6.1Defining and Configuring Routes07:53
6.2Rendering Components With Router Outlets10:14
6.3Using Router Links for Navigation05:25
6.4Navigating Routes Using the Router06:24
6.5Determining the Active Route Using an Activated Route07:16
6.6Working With Route Parameters10:42
6.7Using Route Guards07:36
6.8Observing Router Events10:55
6.9Adding Child Routes08:45
7.Using the HTTP Client
7.1Sending an HTTP Request10:52
7.2Handling an HTTP Response11:22
7.3Setting Request Headers12:33
7.4Intercepting Requests09:04
7.5Finishing the Example Application12:33
8.Testing
8.1Service Unit Test Preparation10:45
8.2Unit Testing Services13:24
8.3Component Unit Test Preparation12:35
8.4Unit Testing Components07:27
8.5Unit Testing Component Templates06:58
8.6Unit Testing Pipes04:41
8.7Unit Testing Directives04:56
8.8Unit Testing Validators04:48
8.9Unit Testing Observables11:37
8.10Unit Testing HTTP Interceptors06:16
9.Building for Production
9.1Building for Production03:40
10.Conclusion
10.1Conclusion01:32
1.5 Angular Modules From the CLI
Hi folks, in this lesson we're gonna take a quick look at the different Angular modules that the CLI installed for us when we created our application. Unlike the 1.x versions of Angular, the newer 2 plus versions of Angular including Angular 5 which we're using in this course, are completely modular. This is great because instead of installing a single huge monolithic framework that includes everything, we can just install and use only the parts that we want to actually use. So lets see which modules we get by default. Lets open up the package.json file. This file contains meta information about our projects. In the dependency section, we can see that there are a number of common modules. All of the angular ones are prefixed with @angular. And we can see that we get the animations module, the common module, he compiler, the core module, the forms module, the http module, platform browser and platform browser dynamic, and the router modules. So these are all Angular modules that we're going to make use of in the application, and which we'll need to form part of the actual finished application. So that's why they're in the dependencies section. If we scroll down a bit, we can see that there are also some dev dependencies. So these are dependencies that we're going to be making use of while we're building the application, but which won't actually need to be served with the application when it gets deployed for end users to make use of. And as well as the Angular dependencies, there are also a couple of non-Angular dependencies which are created by third parties, but which Angular itself makes use of. So these are the core-js, rxjs, and zone.js files. Now, throughout the course as we use bits of those dependencies, we will take a look at them, but we're not gonna focus on them because, as I said, they are third party. So now in the devDependencies section, we can see that we have a number of Angular dependencies once again. We get the CLI and the compiler CLI. So we're going to be using those as we use the Angular CLI to develop the application. We also get a file called language service, and that is what provides some of the services that the IDE makes use of, so some of the TypeScript things. And we also get Jasmine and some types. And they provide information to TypeScript. So there's a couple there for Jasmine, and there's one for Node. And as well as these, we also get some Jasmine utilities, we'll need these for writing our unit tests. And we get some comma dependencies and again, we'll use those for unit tests. But they're more for actually running the unit tests than they are for creating them. And we also get some TypeScript files, we get TSLint. We get TypeScript itself and TypeScript for Node. And the protractor dependency there is used for running the end-to-end tests. So, I just want to point out that the types files that we get here are kind of default ones that we're using because we're using Jasmine in this application. If we're using any other third party dependencies, like if you wanted to use jQuery, for example. Not that you'd need to because Angular does everything that jQuery can do much, much more. But if you did want to use that, you could install the types file for jQuery. And that would tell TypeScript about the different types the jQuery provided. And it would stop us getting things like compiler warnings when we try to do a production build because TypeScript didn't know what a particular thing was. So we aren't going to be using any third party dependencies. We won't need to install any additional types. But depending on the application that you're building, you might wanna do that. And if you do want to do that, there are many, many types for many, many common third party libraries that can be installed. And they would go into this devDependency section here. So in this lesson, we looked at exactly which parts of the Angular framework get installed by default when we scaffold out an application using the Angular CLI. Thanks for watching.


