
 Lessons: 67Length: 8.9 hours
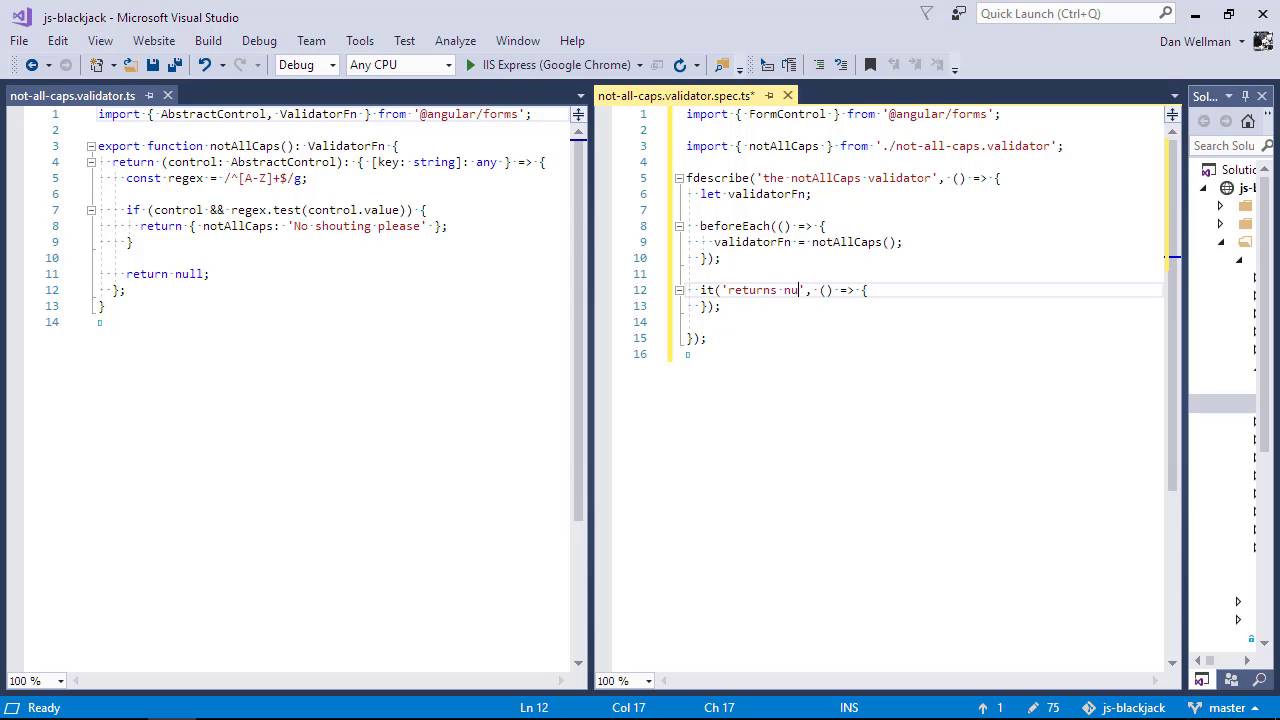
- Overview
- Transcript
8.8 Unit Testing Validators
In this lesson I'll show you how to test a custom validator.
1.Introduction
1.1Introduction00:48
1.2Get Started With Angular-CLI11:09
1.3Developing With Angular-CLI13:17
1.4TypeScript vs. JavaScript06:54
1.5Angular Modules From the CLI04:31
1.6CLI Options05:21
2.Get Started With Angular
2.1Bootstrapping the Application04:30
2.2The Application Module04:15
2.3The Application Component08:06
2.4Component Styling03:06
2.5Global Styling05:11
2.6Creating a Component With the CLI09:34
2.7Creating a Service With the CLI07:56
3.Core Concepts
3.1Component Trees06:20
3.2Dependency Injection06:52
3.3Content Projection05:38
3.4Component and Directive Lifecycle Methods06:31
3.5Component-Only Lifecycle Methods05:28
3.6Decorators07:36
3.7Models16:55
4.Template Deep Dive
4.1Basic Data Binding With Interpolation05:35
4.2Property Bindings07:07
4.3Attribute Bindings03:29
4.4Event Bindings08:16
4.5Class and Style Bindings05:44
4.6The `NgClass` and `NgStyle` Directives05:04
4.7The `*ngIf` Directive04:41
4.8The `*ngFor` Directive09:29
4.9Inputs05:33
4.10Using Pipes in a Template07:31
4.11Using Pipes in a Class08:27
5.Forms
5.1Handling User Input With Template Reference Variables07:06
5.2Template-Driven Forms11:10
5.3Template-Driven Forms: Validation and Submission14:00
5.4Reactive Forms11:26
5.5Using a `FormBuilder`08:01
5.6Reactive Validation With Built-in Validators14:53
5.7Creating Custom Validators for Template-Driven Forms12:18
5.8Creating Custom Validators for Reactive Forms08:26
5.9Observing Form State Changes12:40
5.10Working With the `@HostListener` Decorator05:41
6.Routing
6.1Defining and Configuring Routes07:53
6.2Rendering Components With Router Outlets10:14
6.3Using Router Links for Navigation05:25
6.4Navigating Routes Using the Router06:24
6.5Determining the Active Route Using an Activated Route07:16
6.6Working With Route Parameters10:42
6.7Using Route Guards07:36
6.8Observing Router Events10:55
6.9Adding Child Routes08:45
7.Using the HTTP Client
7.1Sending an HTTP Request10:52
7.2Handling an HTTP Response11:22
7.3Setting Request Headers12:33
7.4Intercepting Requests09:04
7.5Finishing the Example Application12:33
8.Testing
8.1Service Unit Test Preparation10:45
8.2Unit Testing Services13:24
8.3Component Unit Test Preparation12:35
8.4Unit Testing Components07:27
8.5Unit Testing Component Templates06:58
8.6Unit Testing Pipes04:41
8.7Unit Testing Directives04:56
8.8Unit Testing Validators04:48
8.9Unit Testing Observables11:37
8.10Unit Testing HTTP Interceptors06:16
9.Building for Production
9.1Building for Production03:40
10.Conclusion
10.1Conclusion01:32
8.8 Unit Testing Validators
Hi Folks. In this lesson we can take a look at unit testing validators. Validators are another generally small self-contained bit of an angular application, usually with a single purpose. This makes them very easy to test. We do have a validator that we added to the application, the not all caps validator, which validates the value of the form control is not entirely uppercase. We created this file ourselves manually, so we'll need to create the spec file ourselves, manually, too. Let's do that first of all. So we have an _validators directory. This contains the validator. So this is where we'll be adding the spec file. So let's deal with the imports. First of all, we'll need to bring in the formControl class from angular, because the validator validates a form control. And we'll also need to import the validator itself so that we can test it. So now let's add an outer describe. And we've fdescribed it, so that only the tests inside this describe method will run. The validator itself is a function, but it doesn't actually return a value. Instead, it returns another function, and it is this function that is invoked to perform the actual validation. We'll need to invoke the function and keep a reference to the return function so that we can invoke it in our tests. We should probably do this in a beforeEach. Okay, so now let's add a test. So, what does the validator actually do? Well, let's test the null return first of all, because again that's the esiest thing to test. So for this test, we're going to need to create a new form control instance and set its value to a lowercase string. So we create a new FormControl instance. We use the setValue method to set it's value to a lowercase string, we then pass this control to the function returned by the validator, and we then assert that the result is null. So let's check whether the test runs and passes, and we can see that it does. So now we need to test the opposite condition. The validator function should return an object containing an error message if the value of the control is entirely uppercase So this time we set the value of the control to an uppercase string, and this time in the assertion we are checking that the result equals an object that has a key called notAllCaps, and that the value of that key is a string that says 'No shouting please'. So let's go back to the browser. And we can see that the second test is passing as well. So in this lesson, we saw how easy it is to unit test validators in angular. Validators are usually small and self-contained, and this makes them very easy to test. Validators do generally follow a very similar pattern, returning a function, which actually performs the validation, when it's passed to form control. We saw that to test a validator we just need to get a reference to the function it returns, invoke the function with a form control, and then check the value that gets returned by the validator function. Thanks for watching.


