
 Lessons: 67Length: 8.9 hours
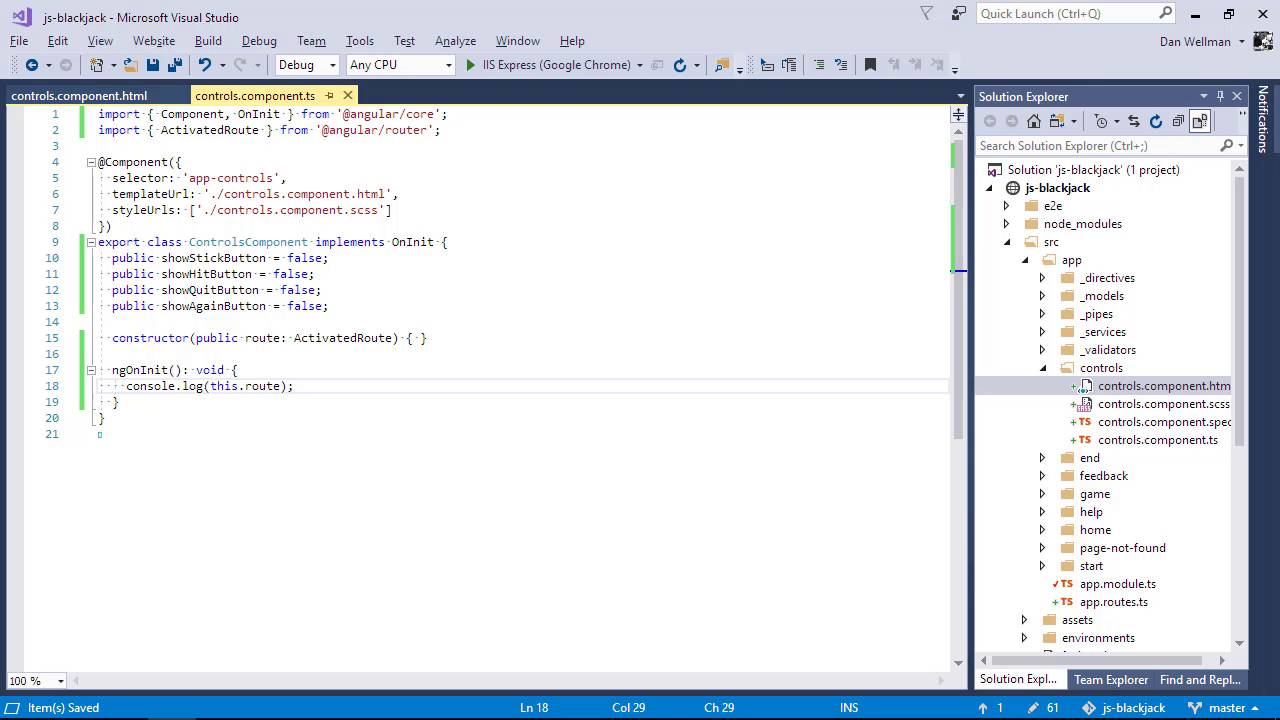
- Overview
- Transcript
6.5 Determining the Active Route Using an Activated Route
In this lesson you'll learn how to tell which route is activated when we are inside a component. This is useful if we need to know which components are rendered to the screen.
1.Introduction
1.1Introduction00:48
1.2Get Started With Angular-CLI11:09
1.3Developing With Angular-CLI13:17
1.4TypeScript vs. JavaScript06:54
1.5Angular Modules From the CLI04:31
1.6CLI Options05:21
2.Get Started With Angular
2.1Bootstrapping the Application04:30
2.2The Application Module04:15
2.3The Application Component08:06
2.4Component Styling03:06
2.5Global Styling05:11
2.6Creating a Component With the CLI09:34
2.7Creating a Service With the CLI07:56
3.Core Concepts
3.1Component Trees06:20
3.2Dependency Injection06:52
3.3Content Projection05:38
3.4Component and Directive Lifecycle Methods06:31
3.5Component-Only Lifecycle Methods05:28
3.6Decorators07:36
3.7Models16:55
4.Template Deep Dive
4.1Basic Data Binding With Interpolation05:35
4.2Property Bindings07:07
4.3Attribute Bindings03:29
4.4Event Bindings08:16
4.5Class and Style Bindings05:44
4.6The `NgClass` and `NgStyle` Directives05:04
4.7The `*ngIf` Directive04:41
4.8The `*ngFor` Directive09:29
4.9Inputs05:33
4.10Using Pipes in a Template07:31
4.11Using Pipes in a Class08:27
5.Forms
5.1Handling User Input With Template Reference Variables07:06
5.2Template-Driven Forms11:10
5.3Template-Driven Forms: Validation and Submission14:00
5.4Reactive Forms11:26
5.5Using a `FormBuilder`08:01
5.6Reactive Validation With Built-in Validators14:53
5.7Creating Custom Validators for Template-Driven Forms12:18
5.8Creating Custom Validators for Reactive Forms08:26
5.9Observing Form State Changes12:40
5.10Working With the `@HostListener` Decorator05:41
6.Routing
6.1Defining and Configuring Routes07:53
6.2Rendering Components With Router Outlets10:14
6.3Using Router Links for Navigation05:25
6.4Navigating Routes Using the Router06:24
6.5Determining the Active Route Using an Activated Route07:16
6.6Working With Route Parameters10:42
6.7Using Route Guards07:36
6.8Observing Router Events10:55
6.9Adding Child Routes08:45
7.Using the HTTP Client
7.1Sending an HTTP Request10:52
7.2Handling an HTTP Response11:22
7.3Setting Request Headers12:33
7.4Intercepting Requests09:04
7.5Finishing the Example Application12:33
8.Testing
8.1Service Unit Test Preparation10:45
8.2Unit Testing Services13:24
8.3Component Unit Test Preparation12:35
8.4Unit Testing Components07:27
8.5Unit Testing Component Templates06:58
8.6Unit Testing Pipes04:41
8.7Unit Testing Directives04:56
8.8Unit Testing Validators04:48
8.9Unit Testing Observables11:37
8.10Unit Testing HTTP Interceptors06:16
9.Building for Production
9.1Building for Production03:40
10.Conclusion
10.1Conclusion01:32
6.5 Determining the Active Route Using an Activated Route
Hi folks, in this lesson we're going to learn how we can determine which route is active when we're inside a different component. For example, a child component which might be in the template for more than one routed component. In this scenario, how will we know which component is rendered in the route outlet? Angular provides the activated route class for exactly this kind of thing. And provides extensive access to the current routes, as well as a host of other information. In the example app, we do have such a child component, which is rendered into more than one routed component. This is the controls component. Which is part of the template for both the start and end components. In the controls component, we will want to show or hide different bonds depending on whether the game or end component is active. We can use activated root in the controls component to determine that. We haven't done much at all with this component yet, so it's pretty bare inside. Let's import activated route and the ng, on any interface first of all. Then we can add on in it as an interface which this class implements. Great, so to control which buttons are visible, we can add some properties to the components. So we've added four properties, one for each button. So now let's add some ngIf bindings in the template for this component. So now, let's go back to the class for this component. One more thing that we need to do actually before we can use the routes is to inject the activated route into the constructor. So now we should be able to access just the routes, so let's log that to the console and see what it contains. And let's go to the browser now. So we see nothing in the console at this point, because this doesn't have the controls component inside it. But as soon as we hit one of the components that does contain the controls component, we see this activated route object in the console. And has a number of different properties, and several interesting ones actually are URL and snapshots. So we'll learn a bit more about this in just a moment. One thing is that the buttons are all disabled at this point. And they're not present in the control at all because of the ngIf bindings that we just added. So take if the current path of the root which will reveal which component is active, we can use the URL property of the activated root. The URL property contains an observable that we can subscribe to. The arrow function will be past a URL segment, which is an array containing different components of the URL. In this case it contains just the single objects as there is only a single part of the route which is the path. We can use a switch statement to show the appropriate buttons depending on that route. We can switch on the path name of the first item in the URL segment array. So now let's go back to the browser again. And let's close the console. So let's start again And we find we have the Stick and Hit me!, buttons. Using the observable in the URL proxy is one way to handle this, but in some cases it may be overkill. Like, in our case, we don't need to subscribe to URL changes, because the URL won't change until the game ends. And at that point a new instance at the controls component will be loaded. Plus we should really handle the subscription carefully and dispose of it once we're done. So instead, there's another property of the activated route the we can use called snapshot. Which is a single static snapshot of the route and any data or route parameters or anything else like that. It should be perfect for our requirements so let's use that instead. So we don't need to subscribe anymore. And we just need to switch on a different part of the route now. So we're still looking at the path property of a URL segment, but this time it's a static segment. Now it does mean that we have to reach quite deeply into the complex nested structure of the route objects. But I think in this case, given that it means our component can be much simpler, I think that's an acceptable trade-off. So let's just go back to the browser, And it looks like everything is working as before. So in this lesson, we saw a couple of different techniques that we can use to determine the currently activated route. And we saw that there was also a lot of other information about the route that we can get a hold of if we need to. We saw how to subscribe to changes in the URL so that we can determine what the new URL is when any part of it changes by subscribing to the URL observable. Or we saw that if this a little overkill, like it would be for us, we can use the static snapshot of the route instead. Which also contains a lot of information about the routes, but won't notify us in case any aspect of it changes. Thanks for watching


