
 Lessons: 67Length: 8.9 hours
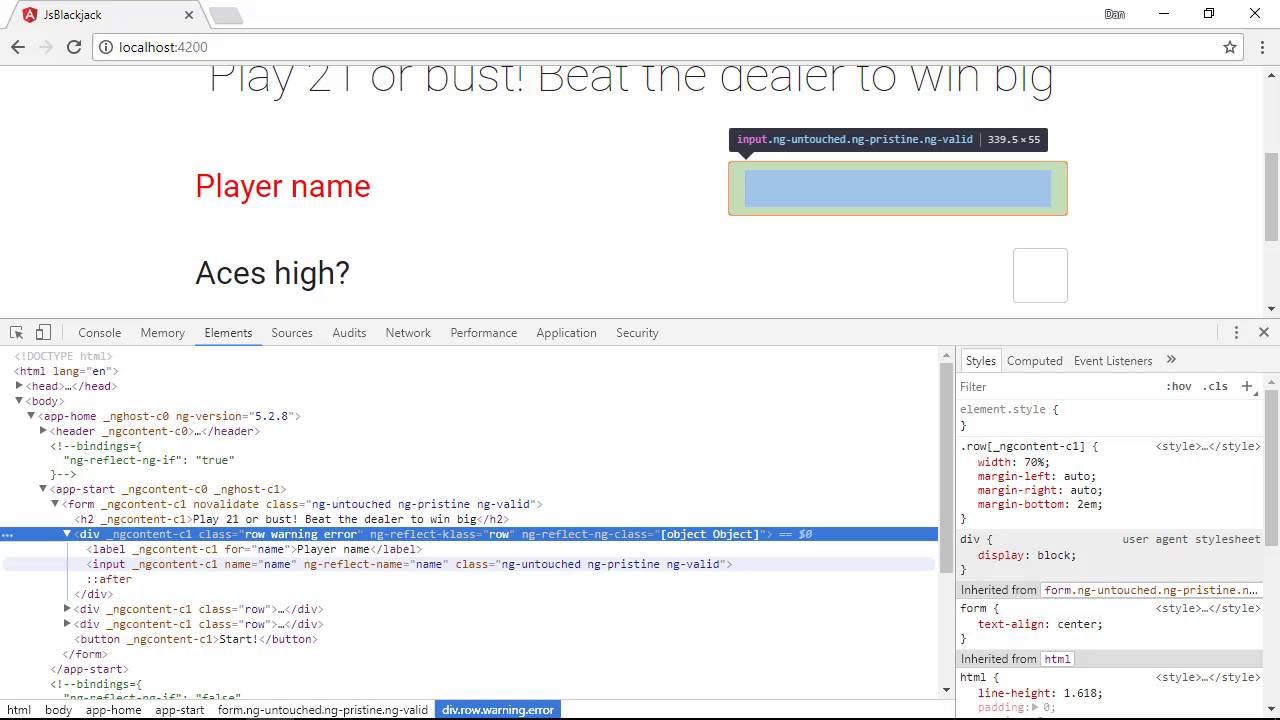
- Overview
- Transcript
5.2 Template-Driven Forms
In this lesson we'll see how to build a template-driven form, and we'll look at some of the features that this gives us. We'll also see how to import Angular's FormModule and some of the form-specific directives that this gives us access to.
1.Introduction
1.1Introduction00:48
1.2Get Started With Angular-CLI11:09
1.3Developing With Angular-CLI13:17
1.4TypeScript vs. JavaScript06:54
1.5Angular Modules From the CLI04:31
1.6CLI Options05:21
2.Get Started With Angular
2.1Bootstrapping the Application04:30
2.2The Application Module04:15
2.3The Application Component08:06
2.4Component Styling03:06
2.5Global Styling05:11
2.6Creating a Component With the CLI09:34
2.7Creating a Service With the CLI07:56
3.Core Concepts
3.1Component Trees06:20
3.2Dependency Injection06:52
3.3Content Projection05:38
3.4Component and Directive Lifecycle Methods06:31
3.5Component-Only Lifecycle Methods05:28
3.6Decorators07:36
3.7Models16:55
4.Template Deep Dive
4.1Basic Data Binding With Interpolation05:35
4.2Property Bindings07:07
4.3Attribute Bindings03:29
4.4Event Bindings08:16
4.5Class and Style Bindings05:44
4.6The `NgClass` and `NgStyle` Directives05:04
4.7The `*ngIf` Directive04:41
4.8The `*ngFor` Directive09:29
4.9Inputs05:33
4.10Using Pipes in a Template07:31
4.11Using Pipes in a Class08:27
5.Forms
5.1Handling User Input With Template Reference Variables07:06
5.2Template-Driven Forms11:10
5.3Template-Driven Forms: Validation and Submission14:00
5.4Reactive Forms11:26
5.5Using a `FormBuilder`08:01
5.6Reactive Validation With Built-in Validators14:53
5.7Creating Custom Validators for Template-Driven Forms12:18
5.8Creating Custom Validators for Reactive Forms08:26
5.9Observing Form State Changes12:40
5.10Working With the `@HostListener` Decorator05:41
6.Routing
6.1Defining and Configuring Routes07:53
6.2Rendering Components With Router Outlets10:14
6.3Using Router Links for Navigation05:25
6.4Navigating Routes Using the Router06:24
6.5Determining the Active Route Using an Activated Route07:16
6.6Working With Route Parameters10:42
6.7Using Route Guards07:36
6.8Observing Router Events10:55
6.9Adding Child Routes08:45
7.Using the HTTP Client
7.1Sending an HTTP Request10:52
7.2Handling an HTTP Response11:22
7.3Setting Request Headers12:33
7.4Intercepting Requests09:04
7.5Finishing the Example Application12:33
8.Testing
8.1Service Unit Test Preparation10:45
8.2Unit Testing Services13:24
8.3Component Unit Test Preparation12:35
8.4Unit Testing Components07:27
8.5Unit Testing Component Templates06:58
8.6Unit Testing Pipes04:41
8.7Unit Testing Directives04:56
8.8Unit Testing Validators04:48
8.9Unit Testing Observables11:37
8.10Unit Testing HTTP Interceptors06:16
9.Building for Production
9.1Building for Production03:40
10.Conclusion
10.1Conclusion01:32
5.2 Template-Driven Forms
Hi folks. In this lesson we're going to look at how we can make use of some of Angular's built in form functionality. As the framework has a ton of features that can make building and using forms a breeze. There are a number of different ways that we can build forms using Angular. There are template driven forms, reactive forms and dynamic forms. In this lesson, we're going to focus on template-driven forms. A template-driven form is a form that is created in the template using regular form controls, but enhanced with a few form-specific directives. The example application does have a few form controls, but I wouldn't necessarily class it as a full form. Nevertheless, this is what we're going to use. First of all then, in order to use any of the form specific directives, we'll need to import the forms module into our app module so that it is available to all of our components. Then we need to add it to the imports array. So the form that we're working on is in the start component The input in the form currently has a template reference variable, which is used to pass the value of the input back to the component class. We can get rid of this, as well as the change handler. One of the benefits of using the Angular Forms Module, is that it can manage this kind of thing for us automatically. We will still need a template reference variable, just not on the inputs. We need to add it on the form instead. We choose a name for the template variable, player form, in this case, and set this to the value ngform. So Angular will create a model of the form for us back in the component class using this player form identifier. We'll make use of that in just a moment. Let's go back to the browser briefly and just inspect the form element. We can see that Angular has added the no validate attribute for us, and it's also added some class names. Currently the form has the classes, ng-untouched ng-pristine and ng-valid. These classes mean different things, ng-untouched means that the form has not been interacted with at all yet, ng-pristine means that none of the controls within the form have changed their value yet and ng-valid means that the form is considered valid. This classes will change as we interact with the form but they won't do anything at this point. Even if we click on the input to focus it and then click away from it again the classes on the form element will not change. Even though we know the form contains a control, the text input, Angular doesn't know about it yet. Now we need to tell Angular about the input, specifically, which property of our component we want to bind it to. We can do that by using an ng model binding on the input itself. One point to note is that the input already has a name attribute, Angular needs this to create a name for the control and it's internal representation of the form. So a named attribute is required when we're using template driven forms. If we take this off, we'll see an error message in the console So it's tells us that ng model is used within a form tag, either the name attribute must be set or the form control must be defined as standalone in ng model options and we aren't using ng model options so really, we need to have that name match to be The binding syntax. The binding syntax that we've used here is different from any of the bindings that we've looked at so far. This binding is like a cross between a regular one way data binding for data going into something and an event binding for data coming back out and it looks like a combination of these two things, because that's exactly what it is. This is the binding syntax that we use for two way data binding. If the view changes, the data will be passed back to the model. But if the model changes, the change data will be passed back to the view and get displayed. This two way binding can be expensive in terms of performance, however, and for this reason it is generally used very sparingly. Forms are usually the only place that I personally ever use two way data binding. So let's go back to the browser again and let's inspect the page once more So we can see our form has the classes on it from before. And we see also now that's the input has the same classes, ng-untouched, ng-pristine, and ng-valid. So now Angular should recognize when the input gets focused, or if its value changes So you can see that something is changed already, And if we click away from the input after having clicked it, we can see that the ng-pristine class and the ng-valid classes remain but the ng-untouched class has been taken out of the form and replaced with ng-touched and that's the same for the input as well. So now let's type something into the input. So now we can see that both the form and the input have changed the classes again. The ng pristine class has gone from the form and the inputs and it's been replaced with ngdirty in both places. The ng valid class will stay at this point though because there are no requirements for the state at the input, like it must have a value or something like that. So as far as Angular is concerned, it's completely valid whether we've added any text to it or not. We'll look at validation in much more detail later on. So we've bound the ng model directive to a property of the class called player name. This property already exists, if we give this property a value in the class, we should see that this is added to the inputs. And we can see that Angular now reads the binding and populates the form control. So that's the two-way event binding in action. We can prove that the data flows in both ways using a simple interpolation binding after the label. Just as an example. So it starts off with the initial value, and let's just update that. And we can see that as we type the binding changes. So that proves the data is flowing both into the component and back out of it again via that two-way binding. So I also mentioned that Angular will create its own model for the form. So we can access the data in another way as well. So, let's change this binding from player name, which is a direct property of the class that we added our self, and let's use Angular's own internal representation of the form instead. So we know that the form itself is called player form, because that's the template reference variable that we added to the form ourselves so we start there. So all Angular forms will have a collection of controls. We've given our input a name attribute of name. So within this name controls object, which contains all of the controls in the form, there should be a control called name. And we want to get the value of that control. So, let's go back to the browser once again. So, we can see that it's still displaying the initial property, and let's just change it again, and we can see that the binding is working just as well so even though it is working, we've now got some areas in the console. Let's just have a quick look. And it's saying that it can't read the property value of undefined. And the reason why we're seeing that is because when the page initially loads Angular won't yet have created it's own internal representation of the form. So the template will be passed and it will come across this player form.controls.name.valuebinding and it won't exist yet. So we could fix that pretty easily using an ng if binding. So we'll just say if the playerform.controls.name object exists, then we'll try and get its value. And the error is now gone. And it should still work in the same way as before. And you can see that it does. But this is just an example, anyway we don't actually want to use that binding. So let's get rid of it completely. But this actually reveals one of the main weaknesses of template driven forms. There can be timing issues between when the form is visible on the page and when it is actually usable. So in this this lesson, we've seen how to start using some of Angular's form features by creating a simple, template-driven form. We saw that to make use of any of Angular's form features, we need to import the form's module into our own module. We did that in the app module. We then saw that we can have Angular create a representation of the form internally using the ngform directive which we placed on to a form element along with a template reference variable for the form itself. We also saw that we can add individual control bindings to input elements using the ng model to a binding directive. And we saw the CSS classes that angular adds and maintains on form elements. And the scenarios that result in changes to those classes. Thanks for watching.


