
 Lessons: 67Length: 8.9 hours
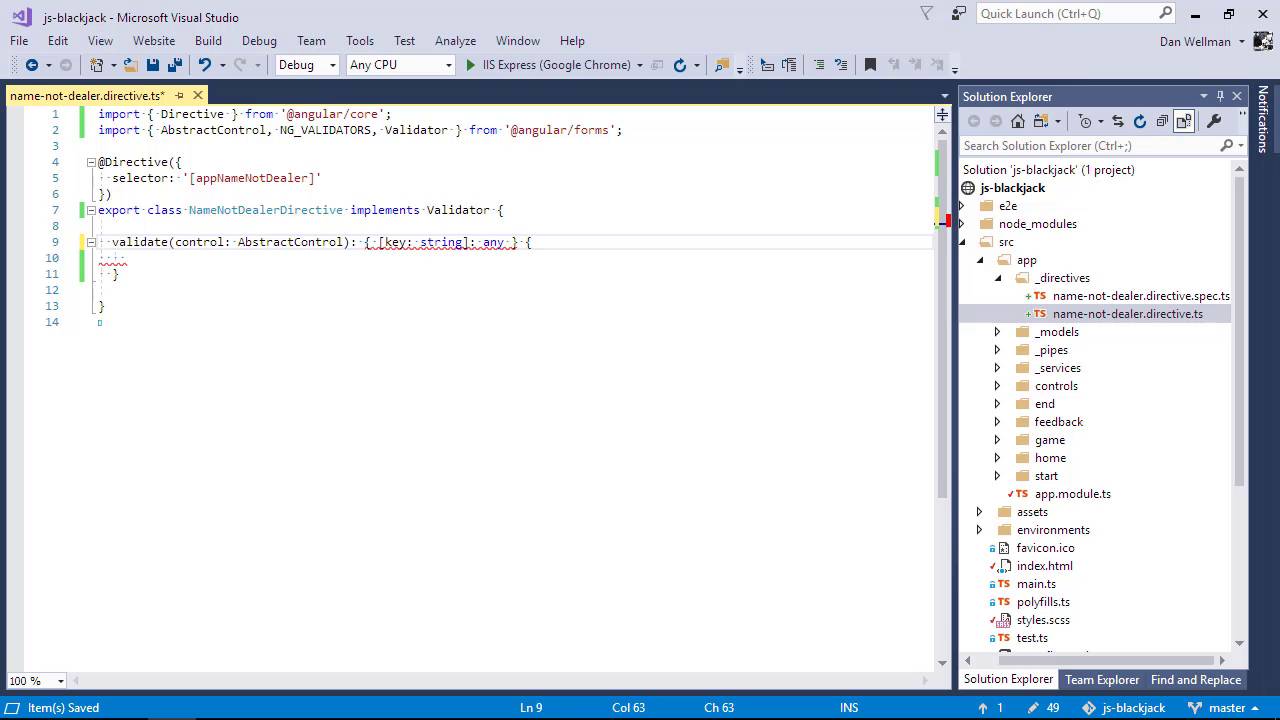
- Overview
- Transcript
5.7 Creating Custom Validators for Template-Driven Forms
In this lesson I'll show you how to create both a directive and a validator that we can use to provide custom validation to a template-driven form.
1.Introduction
1.1Introduction00:48
1.2Get Started With Angular-CLI11:09
1.3Developing With Angular-CLI13:17
1.4TypeScript vs. JavaScript06:54
1.5Angular Modules From the CLI04:31
1.6CLI Options05:21
2.Get Started With Angular
2.1Bootstrapping the Application04:30
2.2The Application Module04:15
2.3The Application Component08:06
2.4Component Styling03:06
2.5Global Styling05:11
2.6Creating a Component With the CLI09:34
2.7Creating a Service With the CLI07:56
3.Core Concepts
3.1Component Trees06:20
3.2Dependency Injection06:52
3.3Content Projection05:38
3.4Component and Directive Lifecycle Methods06:31
3.5Component-Only Lifecycle Methods05:28
3.6Decorators07:36
3.7Models16:55
4.Template Deep Dive
4.1Basic Data Binding With Interpolation05:35
4.2Property Bindings07:07
4.3Attribute Bindings03:29
4.4Event Bindings08:16
4.5Class and Style Bindings05:44
4.6The `NgClass` and `NgStyle` Directives05:04
4.7The `*ngIf` Directive04:41
4.8The `*ngFor` Directive09:29
4.9Inputs05:33
4.10Using Pipes in a Template07:31
4.11Using Pipes in a Class08:27
5.Forms
5.1Handling User Input With Template Reference Variables07:06
5.2Template-Driven Forms11:10
5.3Template-Driven Forms: Validation and Submission14:00
5.4Reactive Forms11:26
5.5Using a `FormBuilder`08:01
5.6Reactive Validation With Built-in Validators14:53
5.7Creating Custom Validators for Template-Driven Forms12:18
5.8Creating Custom Validators for Reactive Forms08:26
5.9Observing Form State Changes12:40
5.10Working With the `@HostListener` Decorator05:41
6.Routing
6.1Defining and Configuring Routes07:53
6.2Rendering Components With Router Outlets10:14
6.3Using Router Links for Navigation05:25
6.4Navigating Routes Using the Router06:24
6.5Determining the Active Route Using an Activated Route07:16
6.6Working With Route Parameters10:42
6.7Using Route Guards07:36
6.8Observing Router Events10:55
6.9Adding Child Routes08:45
7.Using the HTTP Client
7.1Sending an HTTP Request10:52
7.2Handling an HTTP Response11:22
7.3Setting Request Headers12:33
7.4Intercepting Requests09:04
7.5Finishing the Example Application12:33
8.Testing
8.1Service Unit Test Preparation10:45
8.2Unit Testing Services13:24
8.3Component Unit Test Preparation12:35
8.4Unit Testing Components07:27
8.5Unit Testing Component Templates06:58
8.6Unit Testing Pipes04:41
8.7Unit Testing Directives04:56
8.8Unit Testing Validators04:48
8.9Unit Testing Observables11:37
8.10Unit Testing HTTP Interceptors06:16
9.Building for Production
9.1Building for Production03:40
10.Conclusion
10.1Conclusion01:32
5.7 Creating Custom Validators for Template-Driven Forms
Hi, folks. In this lesson, we're gonna see how we can create custom validators and use them with template-driven forms. We can also use custom validators for reactive forms but the process is slightly different. So we'll come back and look at that in a different lesson. So this is another area in which reactive forms may be considered superior. Creating and using custom validators is actually easier when working with reactive forms. So Angular has built-in validators for any of the HTML5 validation attributes, but what if our validation is more complex and is not covered by the built-in ones? In this case, we'll need to write our own custom validator. Thankfully, Angular makes this as easy as possible for us. For template-driven forms, we actually need to create two things. We need the custom validator itself, but we also need some way to attach this validator to an element. This is what a directive is for. It allows us to define a custom attribute that we can apply to HTML elements. And that's exactly what we need. Our start component has the form where the player can enter their name. But one name we don't want them to add is dealer, because there already is a player called dealer by default in every game and having two dealer players would be weird. Our validator will make sure the player doesn't try to call themselves dealer. So first of all let's create a new directive. We can use the CLI for this. But to avoid it creating a folder with the wrong name, let's just create the folder manually ourselves first. Directives are super generic and we should be able to use them in lots of different places all over the application. And that's why I've chosen to create an _directives folder to keep our directive in because it's completely generic. So now let's use the CLI to generate our new directive. So the CLI has generated the directive and the spec file, and it's also updated the module. But I've just noticed that I've spelled the name dealer incorrectly, so I'll have to go and fix that quickly. So Angular did manage to put the new directive in the correct folder even though we used an underscore, so let's just fix the name quickly. And there's one more place that we need to fix it and that's in the app module. Perfect. So we now have the skeleton file for the directive. And let's just see what we get out of the box. So we import the directive decorator from the Angular core module. The decorator is used to specify the selector. So that is what we will actually be adding to an element to apply this directive to it. And the selector, again, just like component selectors, starts with app and that's pretty much what we get. We get the class and we get an empty constructor and that's it. So directives and components are actually very, very, similar. In fact, components are a type of directive. They're just a specialized directive that have a template and a style sheet. Directives don't have a template, so the meta objects we passed to the directive decorator doesn't support a template property. So as we're building a validator, there's some other stuff that we need to import as well. So we've brought in the abstract control class, NG_VALIDATORS, which is a collection of validators. And I did want to bring something in called Validator, but I've spelled it incorrectly. And Validator is actually an interface. And we want our directive to implement that interface So we should now get some intellisense to tell us that the class is not implementing the Validator interface correctly. And in order to implement this Validator interface correctly, our class must expose a method called validate. So we won't need a constructor, let's get rid of that. But let's add a validate method. The underlining is still there at this point, because the method's signature isn't quite right yet. All validators are passed the control being validated automatically by Angular when it checks the validity of the control. So our validate method should be passed this also. So we can add an argument called control, and we specify that it will be of the type AbstractControl. We should also provide the return type for the method. For it to be like other validators, it should return an object with the name of the error and some value, which could be a simple message or it could be a Boolean. So we're saying here that the method will return an object and that object will have strings as keys, and the value will be of the type any. So now the red underlining under the class name should go away because we're implementing the validator correctly. But we do still have this underlining under the return type because the method isn't returning anything. So what we need to do inside the validate function is check that the value of the control, which will be the name control, doesn't equal dealer. So if the control has a value, and the value of the control is equal to the string dealer, then we return this error object with the name of the error as the key and in this case just the string message that the name is not valid. We can also put the name to lowercase when we test it because it's easier than checking for different casing versions of the name. So if the control does have a value, and the value does not equal dealer, we can just return null. And that will mean that the value of the control is valid. So that's all the validation logic that we need. But we need to update the directive part of it if we want Angular to use it like it uses other validators. We need to add a providers key to the decorator meta object. So the value of this is an array, just like it is in the NG module decorator. So we pass an object to the providers array. And that object has three keys, provide, useExisting and multi. So what we're saying in this expression basically is wherever NG_VALIDATORS is provided it should use this directive as well. And we set multi to true, because there will be multiple validators inside NG_VALIDATORS. So this is why we imported NG_VALIDATORS, just to use here. Okay, great. So we should be able to make use of our custom validation directive now. We can add the attribute for the directive to the input for the player's name in the start component template. We just add it after the required attribute. And it doesn't need any special value, just the directive name is fine. So now, let's test it out So if we try to add the name dealer, we should see some kind of error styling. So it says the name is required, but essentially that validation directive is working. So as soon as we change from dealer to something else, the error styling goes away. So let's just fix the message part. I say just, it's actually a bit of a pain because we can't use any of the nice convenience methods like get or has error that we can when we're using a reactive form. So that means we're gonna have to check everything ourselves manually. So we're gonna need to change the first one as well. So first we need to check that the playerForm controls object has a control inside it called name. Then we need to check that this name control has an errors object. And then we need to check whether the errors object contains the key, required. And we also want to make sure the form itself has been touched. So now let's add the error message for if they try to use the name dealer. So that's a lot of checking that we're doing here. In this second one, remember that the name that gets added to the errors objects will be nameNotDealer. And we can at least get the message that the validator passes back. And we'll display that instead of hard-coding a generic error. So let's go back to the browser now. And let's try to add the name dealer. And it tells us that we cannot use that name, perfect. And now if we get rid of the name altogether, then we'll see the other error that the name is required. So in this lesson we saw a how to create a custom validator that can be used with template-driven forms. And because it's used with template-driven forms, we saw that we had to define the validator as a directive and we need to apply it in the template. So actually we saw how to create both a directive and a validator in this lesson. We saw that to create a validating directive we need to make sure it is provided in NG_VALIDATORS and that it should be a multi-provider. We saw that to create a validator we should implement the Validator interface, which means adding a validate method to the class, which accepts a form control and then does something with the value of that control. In this case, we just checked that the value was not equal to the string dealer. Thanks for watching.


