- Overview
- Transcript
6.8 Observing Router Events
In this lesson, I'll show you how to subscribe to events that the router emits when navigation occurs, and you'll learn which events you can use. You'll also see how we can use RxJS to filter these events so that we limit our response to only the events we are interested in.
1.Introduction6 lessons, 42:00
1.1Introduction00:48
1.2Get Started With Angular-CLI11:09
1.3Developing With Angular-CLI13:17
1.4TypeScript vs. JavaScript06:54
1.5Angular Modules From the CLI04:31
1.6CLI Options05:21
2.Get Started With Angular7 lessons, 42:38
2.1Bootstrapping the Application04:30
2.2The Application Module04:15
2.3The Application Component08:06
2.4Component Styling03:06
2.5Global Styling05:11
2.6Creating a Component With the CLI09:34
2.7Creating a Service With the CLI07:56
3.Core Concepts7 lessons, 55:20
3.1Component Trees06:20
3.2Dependency Injection06:52
3.3Content Projection05:38
3.4Component and Directive Lifecycle Methods06:31
3.5Component-Only Lifecycle Methods05:28
3.6Decorators07:36
3.7Models16:55
4.Template Deep Dive11 lessons, 1:10:56
4.1Basic Data Binding With Interpolation05:35
4.2Property Bindings07:07
4.3Attribute Bindings03:29
4.4Event Bindings08:16
4.5Class and Style Bindings05:44
4.6The `NgClass` and `NgStyle` Directives05:04
4.7The `*ngIf` Directive04:41
4.8The `*ngFor` Directive09:29
4.9Inputs05:33
4.10Using Pipes in a Template07:31
4.11Using Pipes in a Class08:27
5.Forms10 lessons, 1:45:41
5.1Handling User Input With Template Reference Variables07:06
5.2Template-Driven Forms11:10
5.3Template-Driven Forms: Validation and Submission14:00
5.4Reactive Forms11:26
5.5Using a `FormBuilder`08:01
5.6Reactive Validation With Built-in Validators14:53
5.7Creating Custom Validators for Template-Driven Forms12:18
5.8Creating Custom Validators for Reactive Forms08:26
5.9Observing Form State Changes12:40
5.10Working With the `@HostListener` Decorator05:41
6.Routing9 lessons, 1:15:10
6.1Defining and Configuring Routes07:53
6.2Rendering Components With Router Outlets10:14
6.3Using Router Links for Navigation05:25
6.4Navigating Routes Using the Router06:24
6.5Determining the Active Route Using an Activated Route07:16
6.6Working With Route Parameters10:42
6.7Using Route Guards07:36
6.8Observing Router Events10:55
6.9Adding Child Routes08:45
7.Using the HTTP Client5 lessons, 56:24
7.1Sending an HTTP Request10:52
7.2Handling an HTTP Response11:22
7.3Setting Request Headers12:33
7.4Intercepting Requests09:04
7.5Finishing the Example Application12:33
8.Testing10 lessons, 1:23:27
8.1Service Unit Test Preparation10:45
8.2Unit Testing Services13:24
8.3Component Unit Test Preparation12:35
8.4Unit Testing Components07:27
8.5Unit Testing Component Templates06:58
8.6Unit Testing Pipes04:41
8.7Unit Testing Directives04:56
8.8Unit Testing Validators04:48
8.9Unit Testing Observables11:37
8.10Unit Testing HTTP Interceptors06:16
9.Building for Production1 lesson, 03:40
9.1Building for Production03:40
10.Conclusion1 lesson, 01:32
10.1Conclusion01:32
6.8 Observing Router Events
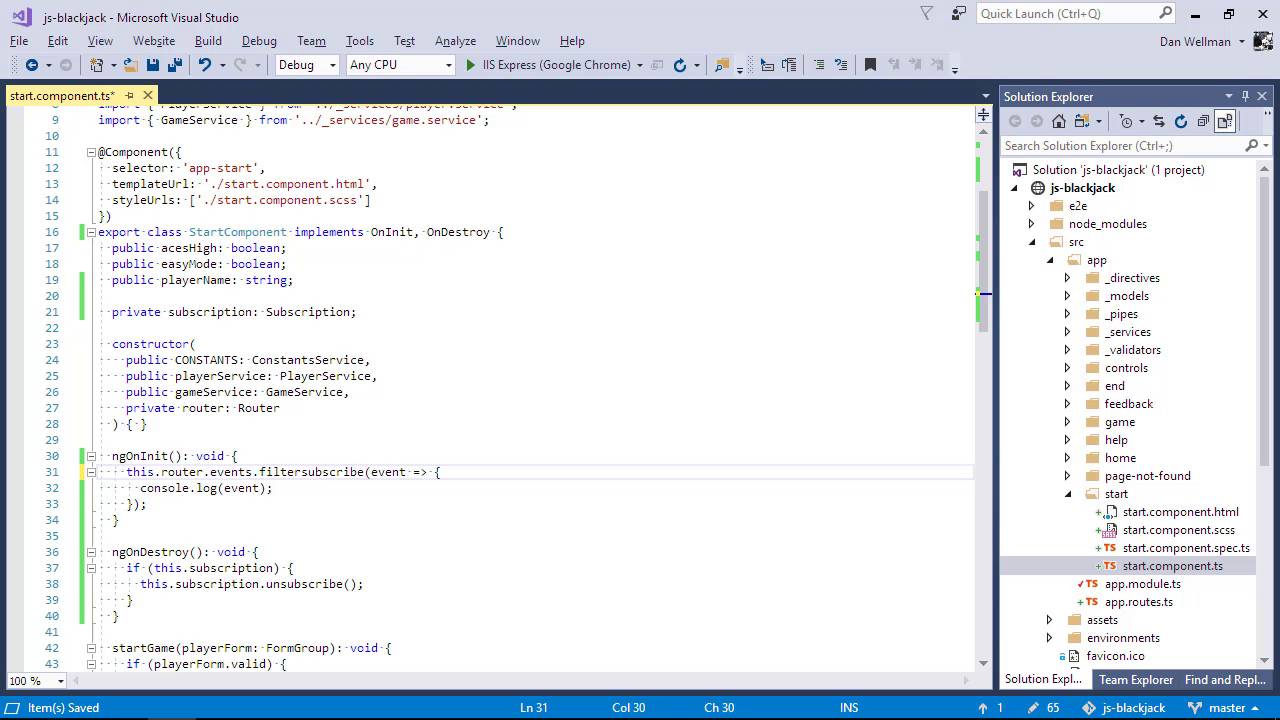
Hi folks. In this lesson we're going to take a look at Router events. Angular router handles route requests for the application and ensures that the right components are loaded based on the url or application states. Any time it doesn't think important, like navigating to a new route It emits an event. We can hook into these events to handle things like navigation beginning or ending, or more. In the example application, we've got a niggling little issue that we can fix using router events. If we're on the start screen and we enter a name into the player name field. But then, instead of hitting the start button, if we go to the help screen, we're navigated to the help component. All good so far, but now if we go back to the start screen, the name that we entered has gone. It's not a huge issue, but it's slightly annoying, and it's not a fantastic user experience, let's fix it. So first of all let's just subscribe to all of the routers event. Let's open up the start component. And in the NG on in it method, which is currently empty, let's subscribe to the router's events. And to start with, let's just log the event out. So theRouter has a property called events, which is an observable, so we can call the subscribe method on it, and pass it a callback function, and whenever an event occurs, the event will be passed to callback function, and in this case we'll just log it first of all So let's go back to the browser again. And we've got the console open so let's just navigate to the help component. So we can see that a number of events have been logged. So just navigating to a simple route we see that there are 11 different events that get dispatched navigation start. RoutesRecognized, GuardsCheckStart, ChildActivationStart, ActivationStart, GuardsCheckEnd, ResolveStart, ResolveEnd, ActivationEnd, ChildActivationAnd and finally NavigationEnd. And let's open one of these up. So we can see that typically an event will have an id and a url property. Most of the events have the same properties, some of them have other properties as well. So when a route gets recognized there is also this state object and it tells us the url after any redirects. And there's some further information here. We can access the root component if we need, and we get the URL once again in here. All of the information is related in some way to either the root or the navigation, so the only event that we are actually interested in is the navigation start event which occurs when navigation begins. We can use this to see if the player name property, or either of the game options have been set, and if so, we can store them somewhere temporarily So, what we can do is filter the events and only respond to the event that we're interested in. We need to import a few things to do this. So, let's bring in the undestroy unit face for the core component, first of all. And then we'll need to bring in the navigation start class. And we get that from the router. And we can also import a couple of things from the third party library RXJS. So the class will need to implement the on destroy interface that we built in So let's add that to the implements list. We'll need somewhere that we can store the subscriptions so that we can dispose of it correctly. And we'll need to add an on destroy method which disposes these subscription. Great. So, that's the boiler plate. Now let's implement a filter on the events we are observing from the router. We just need to add a call to the filter method, which we get from our extra s. So, we can add the filter method from rxjs directly after the events observable and directly before the subscribe method of the observable and we passed that a call out function. In this case it's an arrow function and this function will receive an event and we can just check that the event is an instance of the navigation start event. So if this callback returns true, the event will be logged to the console. But if the arrow function returns false, in which case we know the event is not an instance of NavigationStart, then the event will not be logged we'll just ignore it. So now we just need to store the subscription in the property that we set up. Great. So let's remove the consol dialouge and do something with any values the user might have selected in the start screen. Let's add a very simple cash to the player service, which can temporarily store the state to the start component. Whenever navigation begins, let's open up the player service. So we can add a private property of the classcode_cash which will be an array. And now let's add some getters and setters for this cache. So the getter pops any item in the cache and returns it, and the setter just pushes a new state object into the underscore cache array. Conceptually, it's A little like a last in, first out stack. And we could use it like that, but for us, our cash or stack will only ever contain a single item at most. So back in the start component then, inside our subscription call back, we can check whether any of the properties from before were set and if any of them are, we can just cache the state of all three of them. We don't particularly care which one is set. If any of them are, we'll just save all of them. We set the cache property to an object containing values for each of the player name, ECI and easy mode properties. This will trigger the setter that we added in the player service which will push the object into the underscore cache array. Now after we subscribe to the router events in the ngOnInit method, we can get the object from the cache and set the properties in the start component. We can read the cash proxy from the player service. Which will trigger the getter in the player service. And that will pop the object that might have been set out of the array and pass it back. >> So we then check whether an object has been passed back, and if it has, again, we don't care which properties in the cash object are set, we can just set all three of the properties that we're interested in, playerName, acesHigh, and easyMode, to the values from the state object. And if any of those properties offsets, the two-way bindings for the form items will pick up and display the values on the screen. If the cache array is empty, we do nothing. The form controls will be in their virgin states. So let's go back to the browser now and see if this is working. So we're still on the Help screen. Let's just go back to the Start screen, and let's give that a refresh. And the values that we specified have now been preserved. So in this lesson, we saw how we can subscribe to route events which are emitted by the route as navigation around the application occurs. We saw how to subscribe to all events and how to all events and how to use RXJS to filter out the events that we aren't interested in. Thanks for watching.


