
 Lessons: 67Length: 8.9 hours
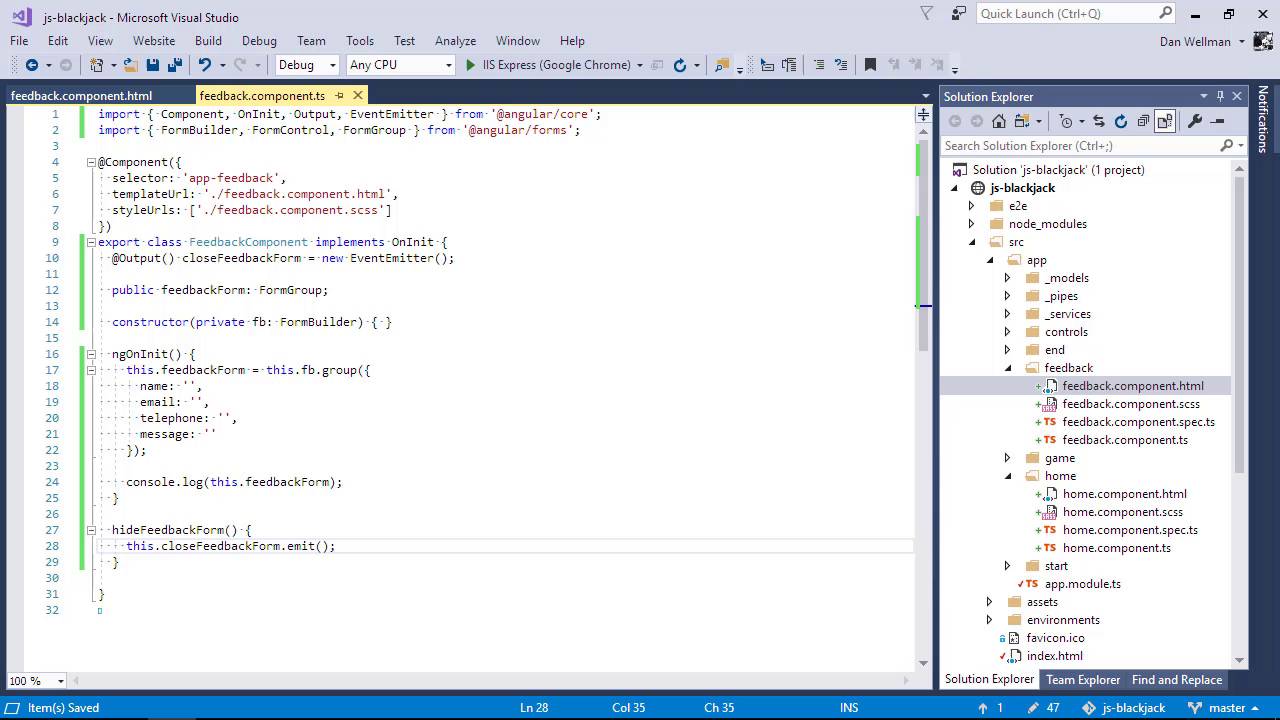
- Overview
- Transcript
5.5 Using a `FormBuilder`
In this lesson, we'll look at the FormBuilder class. This utility is provided by Angular to make creating reactive forms less repetitive.
1.Introduction
1.1Introduction00:48
1.2Get Started With Angular-CLI11:09
1.3Developing With Angular-CLI13:17
1.4TypeScript vs. JavaScript06:54
1.5Angular Modules From the CLI04:31
1.6CLI Options05:21
2.Get Started With Angular
2.1Bootstrapping the Application04:30
2.2The Application Module04:15
2.3The Application Component08:06
2.4Component Styling03:06
2.5Global Styling05:11
2.6Creating a Component With the CLI09:34
2.7Creating a Service With the CLI07:56
3.Core Concepts
3.1Component Trees06:20
3.2Dependency Injection06:52
3.3Content Projection05:38
3.4Component and Directive Lifecycle Methods06:31
3.5Component-Only Lifecycle Methods05:28
3.6Decorators07:36
3.7Models16:55
4.Template Deep Dive
4.1Basic Data Binding With Interpolation05:35
4.2Property Bindings07:07
4.3Attribute Bindings03:29
4.4Event Bindings08:16
4.5Class and Style Bindings05:44
4.6The `NgClass` and `NgStyle` Directives05:04
4.7The `*ngIf` Directive04:41
4.8The `*ngFor` Directive09:29
4.9Inputs05:33
4.10Using Pipes in a Template07:31
4.11Using Pipes in a Class08:27
5.Forms
5.1Handling User Input With Template Reference Variables07:06
5.2Template-Driven Forms11:10
5.3Template-Driven Forms: Validation and Submission14:00
5.4Reactive Forms11:26
5.5Using a `FormBuilder`08:01
5.6Reactive Validation With Built-in Validators14:53
5.7Creating Custom Validators for Template-Driven Forms12:18
5.8Creating Custom Validators for Reactive Forms08:26
5.9Observing Form State Changes12:40
5.10Working With the `@HostListener` Decorator05:41
6.Routing
6.1Defining and Configuring Routes07:53
6.2Rendering Components With Router Outlets10:14
6.3Using Router Links for Navigation05:25
6.4Navigating Routes Using the Router06:24
6.5Determining the Active Route Using an Activated Route07:16
6.6Working With Route Parameters10:42
6.7Using Route Guards07:36
6.8Observing Router Events10:55
6.9Adding Child Routes08:45
7.Using the HTTP Client
7.1Sending an HTTP Request10:52
7.2Handling an HTTP Response11:22
7.3Setting Request Headers12:33
7.4Intercepting Requests09:04
7.5Finishing the Example Application12:33
8.Testing
8.1Service Unit Test Preparation10:45
8.2Unit Testing Services13:24
8.3Component Unit Test Preparation12:35
8.4Unit Testing Components07:27
8.5Unit Testing Component Templates06:58
8.6Unit Testing Pipes04:41
8.7Unit Testing Directives04:56
8.8Unit Testing Validators04:48
8.9Unit Testing Observables11:37
8.10Unit Testing HTTP Interceptors06:16
9.Building for Production
9.1Building for Production03:40
10.Conclusion
10.1Conclusion01:32
5.5 Using a `FormBuilder`
Hello folks, in this lesson we're gonna see how we can use a special FormBuilder class to make creating reactive forms less repetitive and manual. FormBuilder isn't required and for our simple feedback form, is not even necessary. But as forms get bigger and have more complex requirements, using a FormBuilder is definitely recommended. So first of all then, we'll need to bring the FormBuilder class into the component. The FormBuilder class also comes from the forms module. So now we'll need to inject the FormBuilder into the constructor. We won't need to use the FormBuilder in the template, so we can mark it as private, and Angular will manage the instance and the property of the class for us, great. So now, instead of creating a form group and individual form controls manually, we can use the FormBuilder. The FormBuilder has a method called group, which we can get from the instance that we injected into the constructor. This method also takes an object literal, and the keys in the object will still refer to form controls. We just don't need to create these form control instances manually. Instead, we can pass empty strings. And these refer to the initial values for the form controls. So, all of the controls will be empty to start with, which is what we want. Let's go back to the browser at this point. And we'll open up the feedback form, and we can see that everything looks exactly the same as it did before. It still looks hideous, but it's working in the same way that it did before. So now, we'll also want to add a button that can be clicked to actually send the feedback, and a way to cancel out and close the form again. So let's add these to the bottom of the template. We can use the disabled binding on the send button and we'll keep it disabled until the form is valid. And notice that we can bind directly from the feedback form from the template here, even though we don't have a template reference variable. And that's useful. We've also added this hide feedback form method to the span to close the form. The problem we have is that the logic to show the form is in the home component. But the button to close the form is in the feedback component. But it's not really a problem. You might guess how we can do it, as we looked at it briefly earlier. We can use a custom event to signal from the form to the home component that it should close the form. We'll need to add the Output and EventEmitter objects to our imports, first of all. And then we need to define the output event using the output decorator. Then we can add the hide feedback form event handler and have it emit our new custom event. Great, so that's nice and simple. So now we can bind to this closedFeedbackForm event in the home components template. So, the event is closedFeedbackForm, which in the left hand side of the expression. And the method that we'll use to handle that event is called hideFeedbackForm. So, we can add this method in the home components class now. We just set the property controlling whether the form is included in the DOM to false. So at this point now, we should be able to both show and hide the feedback form. So the form still looks terrible at this point. Why don't we have some styling for that quickly, just so that we can tidy that up. So we've added a new control, first of all, the text area and that hasn't used anywhere else. But we want this to have pretty much the same styling as a regular input, so in form CSS, let's just add a selector for text areas alongside the selector for inputs. And let's add some positioning and layout styling for the feedback form itself in app.sess. So let's just add it to the bottom. So it's pretty basic stuff that just positions the form under the feedback link as if it were a dropdown menu. We're keeping the styling light to match the site, and I don't want to get into it too deeply as this isn't a CSS tutorial. So, let's just go back and see how the form looks now. So, not too bad. It looks like there's something wrong with the padding on the outer container div. Nice, okay, so it's not the best looking form in the world, but it's tidy and it matches the rest of the site. So, I'm happy enough with that. So in this lesson we saw how to use Angular's FormBuilder to make creating a reactive form easier and less repetitive. We saw that we use the group method of the FormBuilder to create the form group that represents the form. And we passed an object to this, which specifies the controls that we want to create. We used empty strings with our controls so that the controls don't have any initial value. And we saw that we don't have to create instances now of either the form group or form control objects, which is really the main purpose of the FormBuilder. Thanks for watching.


