
 Lessons: 67Length: 8.9 hours
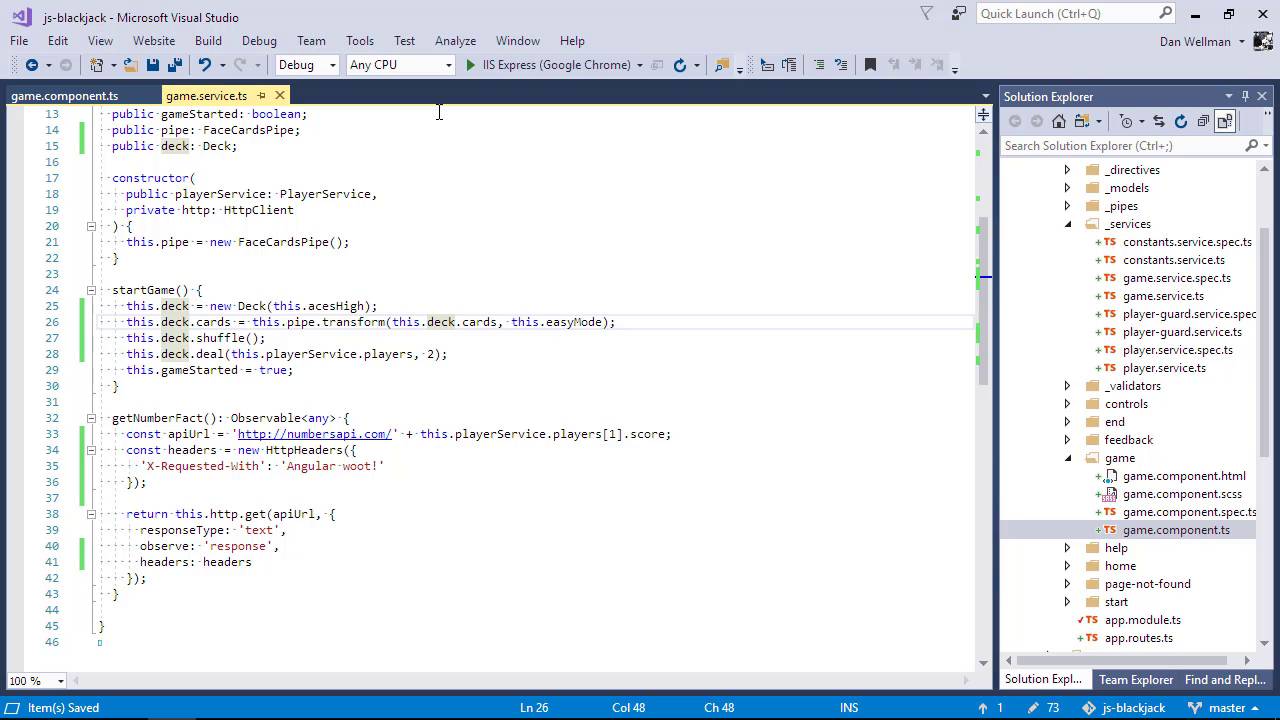
- Overview
- Transcript
7.3 Setting Request Headers
In this lesson you'll see how to add headers to HTTP requests. You'll also learn how to work with the headers object, which will let us add new headers to an existing headers object.
1.Introduction
1.1Introduction00:48
1.2Get Started With Angular-CLI11:09
1.3Developing With Angular-CLI13:17
1.4TypeScript vs. JavaScript06:54
1.5Angular Modules From the CLI04:31
1.6CLI Options05:21
2.Get Started With Angular
2.1Bootstrapping the Application04:30
2.2The Application Module04:15
2.3The Application Component08:06
2.4Component Styling03:06
2.5Global Styling05:11
2.6Creating a Component With the CLI09:34
2.7Creating a Service With the CLI07:56
3.Core Concepts
3.1Component Trees06:20
3.2Dependency Injection06:52
3.3Content Projection05:38
3.4Component and Directive Lifecycle Methods06:31
3.5Component-Only Lifecycle Methods05:28
3.6Decorators07:36
3.7Models16:55
4.Template Deep Dive
4.1Basic Data Binding With Interpolation05:35
4.2Property Bindings07:07
4.3Attribute Bindings03:29
4.4Event Bindings08:16
4.5Class and Style Bindings05:44
4.6The `NgClass` and `NgStyle` Directives05:04
4.7The `*ngIf` Directive04:41
4.8The `*ngFor` Directive09:29
4.9Inputs05:33
4.10Using Pipes in a Template07:31
4.11Using Pipes in a Class08:27
5.Forms
5.1Handling User Input With Template Reference Variables07:06
5.2Template-Driven Forms11:10
5.3Template-Driven Forms: Validation and Submission14:00
5.4Reactive Forms11:26
5.5Using a `FormBuilder`08:01
5.6Reactive Validation With Built-in Validators14:53
5.7Creating Custom Validators for Template-Driven Forms12:18
5.8Creating Custom Validators for Reactive Forms08:26
5.9Observing Form State Changes12:40
5.10Working With the `@HostListener` Decorator05:41
6.Routing
6.1Defining and Configuring Routes07:53
6.2Rendering Components With Router Outlets10:14
6.3Using Router Links for Navigation05:25
6.4Navigating Routes Using the Router06:24
6.5Determining the Active Route Using an Activated Route07:16
6.6Working With Route Parameters10:42
6.7Using Route Guards07:36
6.8Observing Router Events10:55
6.9Adding Child Routes08:45
7.Using the HTTP Client
7.1Sending an HTTP Request10:52
7.2Handling an HTTP Response11:22
7.3Setting Request Headers12:33
7.4Intercepting Requests09:04
7.5Finishing the Example Application12:33
8.Testing
8.1Service Unit Test Preparation10:45
8.2Unit Testing Services13:24
8.3Component Unit Test Preparation12:35
8.4Unit Testing Components07:27
8.5Unit Testing Component Templates06:58
8.6Unit Testing Pipes04:41
8.7Unit Testing Directives04:56
8.8Unit Testing Validators04:48
8.9Unit Testing Observables11:37
8.10Unit Testing HTTP Interceptors06:16
9.Building for Production
9.1Building for Production03:40
10.Conclusion
10.1Conclusion01:32
7.3 Setting Request Headers
Hi, folks! In this lesson, we're gonna take a look at how we can set requests headers when making HTTP requests. This is a fairly common requirement when making HTTP requests, and Angular makes it very easy for us to do. So let's open up the game service where the HTTP request is being made. And in order to set HTTP headers, we'll need to bring in the HttpClass from Angular. We're somewhat limited as to the headers we can actually set, because we rely on the external API accepting them. One header that the external API that we're using, the numbers API, does support is the x requested with header, which is a common header used in AJAX requests. We can set this header using the HttpHeaders class that we just imported. We create a new instance of the HttpHeaders class using the constructor. And passing in an object containing the headers that we want to set as the key names, and the values for those headers as the values. To include the headers in the request, we use the headers option of the configuration object, passed to the get method. And it's not HttpClass, it's HttpHeaders. And it looks like Visual Studio has tried to help things again by automatically adding this import down at the bottom here. And we'll need the console open for this, and let's go to the Network panel. There are two requests. One is an options request, which is used to find out what the external API supports. That one gets sent automatically, and the second one should be the actual request that we are making, and let's take a look at the headers And on the Request Headers section, right down at the bottom, we can see X-Requested-With: Angular w00t, which is the header that we set, perfect. So one point to note at this stage is that the header's variable contains an instance of the HttpHeaders class, but this variable is actually an immutable object. So once it's been created like this, we can't modify it. We can modify the headers, we just need to do it in a special way. The HttpHeaders class provides a method called set, which we can use to set a new header. But if we just try to invoke it, we won't be able to see the new header. Let's take a look at the object that we've logged to the console, which is an instance of the HttpHeaders class, and let's take a look at the headers map. So we can see that it only contains a single item and that is the x-requested-with header that we said originally. So the headers.set method, where we tried to set a custom from header, has just been completely ignored. So at the moment, the headers is still a const. Let's see if we can fix the issue by changing that to a variable declared with let. And we can see that that hasn't fixed it. Headers is still an array containing only one item, and that is the original X-Requested-With header. So what's happening is the new header is actually being set, but because the object is immutable, we need to capture the return from the set, which will contain a new HttpHeaders object containing both of the headers. So we're getting an error back from the original options request now because the external API doesn't support the from header that we've tried to add. But let's open up the ttpHeaders object that we're logging to the console, and we can see this time that the headers map does contain two items. So if you want to invoke the set method on an existing headers object, you need to capture the return from this method in order to have access to the new header that's been set. So this was just a demonstration. We don't actually need to set that header and, in fact, we can't set that header because that breaks the request to the external API, so let's just put things back how they were. In the last lesson, we added a couple of methods to the game component for the Stick and Hit buttons, but these are currently empty. Before we finish up this lesson, let's wire one of them up. How about the doHit method? This method should be pretty straightforward to implement. So, first of all, we want to deal the player a new card, and we can use the gameService to do this. So at the moment, in the startGame method, the deck is a local variable within that method. Let's change that to be a property of the class instead. And now we need to save the deck to this property instead of it being a variable in the startGame method. And now, let's add a new method called player turn back in the game component. So let's invoke a new method of the gameService in the doHit method. So the new method will be called playerTurn, and now let's go back to the gameService and add this new method. And here, we just invoke the deal method of the deck. This method expects an array of players to deal to. So we can pass an array containing just the human player, and the second argument is the number of cards to deal. And in this case, it's just one card. So now let's go back to the browser and test things out. So now we should be able to click the Hit me button and see a new card in the player's hand. Perfect, we just need a bit more logic now. If the player's score goes over 21, such as it has in this case, the game is lost. So we just need to check whether this is the case, and if so, we can send the user to the end game screen and display a message that they lost. So we'll do this back in the doHit method, and that's in the game component. And we'll need to import the router, so that we can redirect the user to the end game component. And now let's update the doHit's method. So we call the playerTurn method, as we were doing before, but then we check whether the player's score has gone over 21. We could get the player from the playerService, but we already did that in the ngOnInit method, and we saved the local reference to the player, so we can use that. If the player's score is over 21, they've lost. So we can set the end message property of the gameService, and then use the router to navigate to the end route. The gameService doesn't currently have this end-message property, so let's just add that quickly. The template for the end game component does have a h2 in the template ready to display the message, but it doesn't have any bindings yet, so let's just add that quickly as well. We haven't really done much with the end component at all yet, so we're still not ready to actually use this endMessage property from the gameService. Let's just open up the end component class file. It's pretty empty so far, so we'll need to import the player and gameServices. And let's update ngOnInit to set the dealer property, which already exists, to the first player from the playerService. So this should be all we need to do. Let's go back to the browser and just test that everything's working. So we have been redirected to the end screen. There's currently an error there, and it's saying that it can't read the player's property of undefined, so we should be getting that from the playerService. And we just need to inject the playerService and the gameService into the constructor. So let's go back to the browser one more time. And I'll just close the console, and you can see the end message is now being displayed on the end screen. So in this lesson, we saw how we can set headers on an HTTP request using Angular's HttpHeaders class. We saw that we can create the headers initially by passing an object of key:value pairs, where the key is the name of the header and the value is the value for the header, to the HttpHeaders constructor. We also saw that the instance the constructor returns is immutable, but that we can add new headers by using the set method and capturing the return value of this method. We also saw how to add headers to the request using the configuration object we passed to the get method. Thanks for watching.


