
 Lessons: 67Length: 8.9 hours
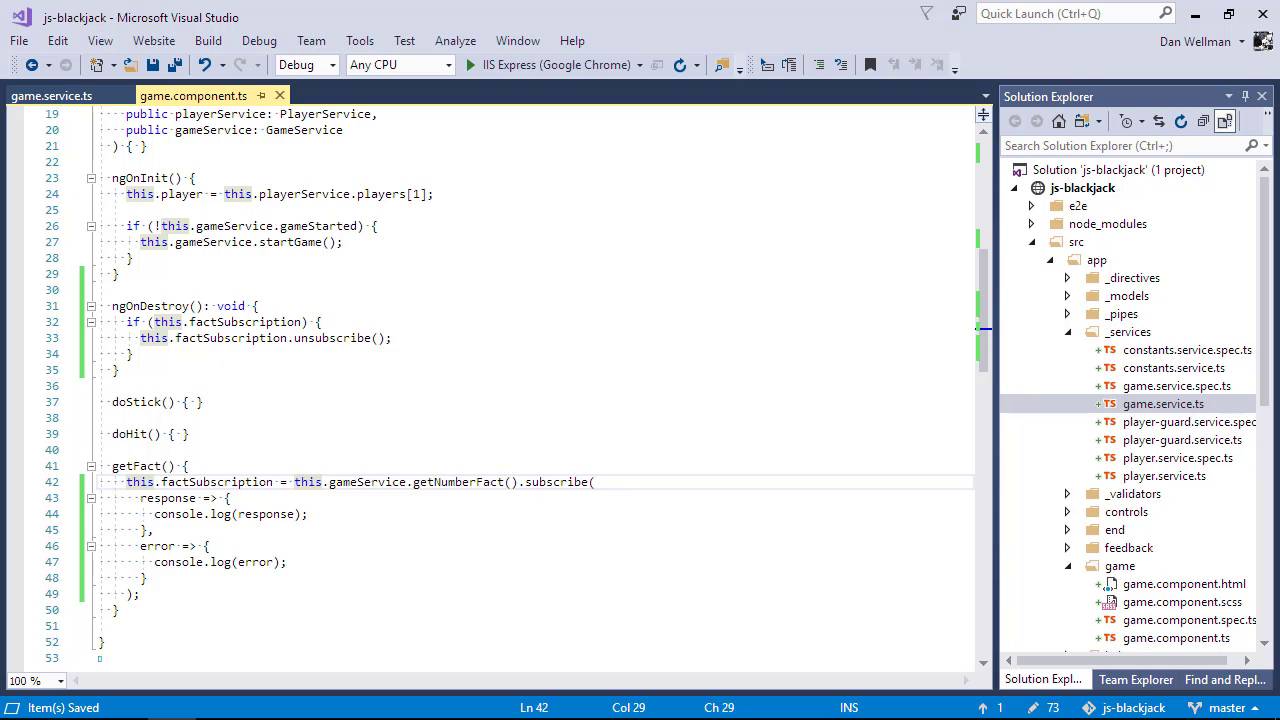
- Overview
- Transcript
7.2 Handling an HTTP Response
Building on the previous lesson, let's look at how to handle the response from an HTTP request and how Angular handles the response itself.
1.Introduction
1.1Introduction00:48
1.2Get Started With Angular-CLI11:09
1.3Developing With Angular-CLI13:17
1.4TypeScript vs. JavaScript06:54
1.5Angular Modules From the CLI04:31
1.6CLI Options05:21
2.Get Started With Angular
2.1Bootstrapping the Application04:30
2.2The Application Module04:15
2.3The Application Component08:06
2.4Component Styling03:06
2.5Global Styling05:11
2.6Creating a Component With the CLI09:34
2.7Creating a Service With the CLI07:56
3.Core Concepts
3.1Component Trees06:20
3.2Dependency Injection06:52
3.3Content Projection05:38
3.4Component and Directive Lifecycle Methods06:31
3.5Component-Only Lifecycle Methods05:28
3.6Decorators07:36
3.7Models16:55
4.Template Deep Dive
4.1Basic Data Binding With Interpolation05:35
4.2Property Bindings07:07
4.3Attribute Bindings03:29
4.4Event Bindings08:16
4.5Class and Style Bindings05:44
4.6The `NgClass` and `NgStyle` Directives05:04
4.7The `*ngIf` Directive04:41
4.8The `*ngFor` Directive09:29
4.9Inputs05:33
4.10Using Pipes in a Template07:31
4.11Using Pipes in a Class08:27
5.Forms
5.1Handling User Input With Template Reference Variables07:06
5.2Template-Driven Forms11:10
5.3Template-Driven Forms: Validation and Submission14:00
5.4Reactive Forms11:26
5.5Using a `FormBuilder`08:01
5.6Reactive Validation With Built-in Validators14:53
5.7Creating Custom Validators for Template-Driven Forms12:18
5.8Creating Custom Validators for Reactive Forms08:26
5.9Observing Form State Changes12:40
5.10Working With the `@HostListener` Decorator05:41
6.Routing
6.1Defining and Configuring Routes07:53
6.2Rendering Components With Router Outlets10:14
6.3Using Router Links for Navigation05:25
6.4Navigating Routes Using the Router06:24
6.5Determining the Active Route Using an Activated Route07:16
6.6Working With Route Parameters10:42
6.7Using Route Guards07:36
6.8Observing Router Events10:55
6.9Adding Child Routes08:45
7.Using the HTTP Client
7.1Sending an HTTP Request10:52
7.2Handling an HTTP Response11:22
7.3Setting Request Headers12:33
7.4Intercepting Requests09:04
7.5Finishing the Example Application12:33
8.Testing
8.1Service Unit Test Preparation10:45
8.2Unit Testing Services13:24
8.3Component Unit Test Preparation12:35
8.4Unit Testing Components07:27
8.5Unit Testing Component Templates06:58
8.6Unit Testing Pipes04:41
8.7Unit Testing Directives04:56
8.8Unit Testing Validators04:48
8.9Unit Testing Observables11:37
8.10Unit Testing HTTP Interceptors06:16
9.Building for Production
9.1Building for Production03:40
10.Conclusion
10.1Conclusion01:32
7.2 Handling an HTTP Response
Hi, folks. In the last lesson, we made an HTTP request to an external API, the numbers API. In this lesson, we can see how to handle the response. The get method that we used to make the request, and indeed all of the HTTP methods returns an observable. And we, in turn, returns this observable from the service method that makes the actual HTTP request. We then used the subscribe method to initiate the request. And as you can probably guess, that's what we'll use to handle the response. The response to the Ajax request that we made is a simple text response and we don't need to do anything special for that. Let's just display the message, first of all, in the console. And let's go to the browser. And we can see that the text response is being locked to the console. The response is passed to the call back that we passed to the subscribed method. One point to note at this stage is that we see only the actual text response from the server. We don't see any of the other information like the status code or anything like that. We can get access to all of this if we need it. We do this using another configuration property in the object passed as the second argument to the get method in the game service. We can use the observe property to tell Angular that we want to observe the entire response. So now, let's go back to the browser again And this time, we see the whole response in the console, not just the text response. And this has got all of the usual HTTP information. We've got the body of the response. We've got the headers there and the status. The first callback function function we passed to the subscribe method is a success handler. But, we can also pass an error handler as the second argument to handle any errors that may occur as a result of the request. Let's add an error handler after the success handler. The second callback you'll receive an error object containing information about the error. In order to see the error callback in action we can remove the second argument of the get method back in the game service. And let's get back to the browser now. And this time we see the HttpErrorResponse. And we can see within this object that we get a message that tells us exactly what the error was, and we also get some other information, like the status of the request. And we can see in this case, actually, that the status indicates that the request itself was successful. It is Angular's handling of the response. Because we've taken away the configuration objects that tells Angular that it is a text response. So by default, it will try to pause your response as JSON. And that's exactly what we can see in this error object right over the top of the response. So one point to know as well is that now that we're handling the error, the error doesn't bubble up to the console. If we were to remove the error handler at this stage, Then this time we see a regular console error. So let's add the error handler back in again. And we can just keep logging in to the console. But now let's go back to the game service and just put back the configuration objects that tells Angular that it's playing tags did not JSON that it's coming back. So back in the game component then, we should handle the HTTP subscription like we would in other subscription and make sure that we dispose of it correctly. We've done this a number of times now in previous lessons in the course. If you'd like you can pause the video at this stage, and see if you can handle disposing the subscription by yourself. So first of all then we'll need to import some new things to handle the subscription and dispose of it correctly. Great, so that should take care of the subscription. Did you manage to vamp that by yourself? If not, don't worry to much about it. I'm sure you'll be able to give yourself plenty of opportunities to practice once you finish the course. So, now instead of just logging the response to the console, we should probably display the response somewhere in the browser so that the user can see it. We can add a couple of new properties to the game component class for this. And then in the response handler, we can set these properties. And now let's update the template to make use of these new properties. The containing dev uses ngIf to only show the dev if the show fact property is true. And inside, we can just render the fact using a simple data interpolation binding. We've also added a little button that can close the fact again. We'll need a few new styles for this new dev. Let's add these quickly in the game.component.sess file. So, let's go back to the browser now. And we can see that the fact has been displayed on the screen there and we can use the button to close it. So there's one more callback that we can pass to the subscribed method. As well as the success and error callbacks, we can also pass an always callback, which will be invoked whenever either the success or error handlers have been invoked. So we have this as the third argument after the error callback. So let's just add a simple console log, first of all. This is very similar to the response and error callbacks, except that this doesn't receive any arguments, and so it just has an empty set of parenthesis at the start of the arrow function. So let's go back to the browser once again. And we see the message, this will always be displayed. The fact is hidden by the buttons, but you can just see the closed button there, so that's still working as expected. We would also see the this will always be displayed message if there was an error with the request or response as well. But one thing to note is that the success and error handlers will never both be called after the same request. It's either one or the other. But the always one will always be called regardless of whether it was successful or not. So rather than logging a message to the console, after each request, whether it was successful or not, let's use that to close the fact message after five seconds. So, we can just set the show fact property back to false after five seconds have passed. It doesn't matter whether the response or error callbacks were invoked previously. We're just setting the show facts property to false. It doesn't matter if it's already false or if it's true and we set it to false. It shouldn't cause any errors. But now we should find, when we go back to the browser, that the message is automatically closed after five seconds. Let's test it out. So we'll close the console this time, because it's pushing the buttons up over the message, which is kind of annoying. And after five seconds the message is closed. Excellent. So in this lesson we saw that we can handle the response from the HTTP request by passing the subscribe method a callback function. This function will be invoked if the response is successful and will be passed the body of the response by default. We learned that we can get the whole response from the server by setting the observe configuration property to the string response. We also learned that we can pass a second callback function to the subscribe method. This is an error handler, which will be invoked if the HTTP request results in an error. In this case, the function will be passed an error object containing information about the error that occurred. Lastly, we saw that we can pass an always handler as the third callback to the subscribe method. And that this third handler will be invoked after either the success or error handlers, whichever one actually gets invoked. Thanks for watching.


