
 Lessons: 67Length: 8.9 hours
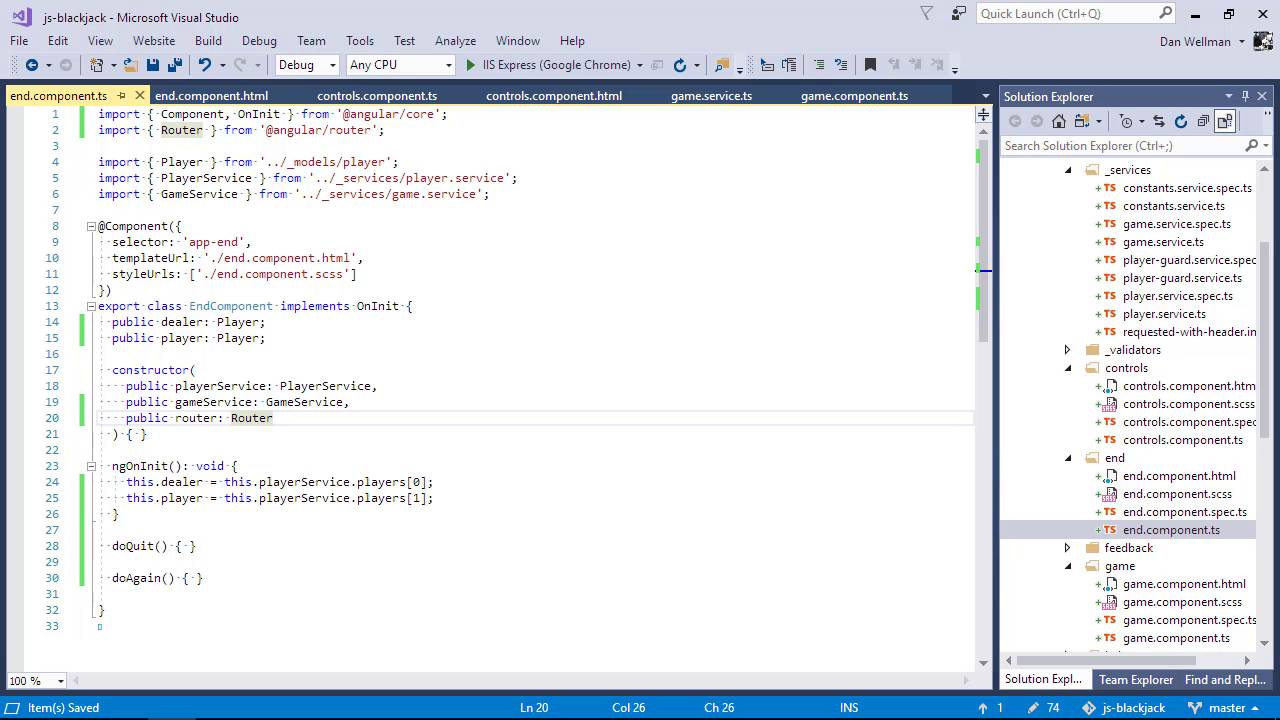
- Overview
- Transcript
7.5 Finishing the Example Application
As we bring this chapter of the course to a close, our example app is almost complete. We'll implement the remaining functionality in this lesson and get ready for testing!
1.Introduction
1.1Introduction00:48
1.2Get Started With Angular-CLI11:09
1.3Developing With Angular-CLI13:17
1.4TypeScript vs. JavaScript06:54
1.5Angular Modules From the CLI04:31
1.6CLI Options05:21
2.Get Started With Angular
2.1Bootstrapping the Application04:30
2.2The Application Module04:15
2.3The Application Component08:06
2.4Component Styling03:06
2.5Global Styling05:11
2.6Creating a Component With the CLI09:34
2.7Creating a Service With the CLI07:56
3.Core Concepts
3.1Component Trees06:20
3.2Dependency Injection06:52
3.3Content Projection05:38
3.4Component and Directive Lifecycle Methods06:31
3.5Component-Only Lifecycle Methods05:28
3.6Decorators07:36
3.7Models16:55
4.Template Deep Dive
4.1Basic Data Binding With Interpolation05:35
4.2Property Bindings07:07
4.3Attribute Bindings03:29
4.4Event Bindings08:16
4.5Class and Style Bindings05:44
4.6The `NgClass` and `NgStyle` Directives05:04
4.7The `*ngIf` Directive04:41
4.8The `*ngFor` Directive09:29
4.9Inputs05:33
4.10Using Pipes in a Template07:31
4.11Using Pipes in a Class08:27
5.Forms
5.1Handling User Input With Template Reference Variables07:06
5.2Template-Driven Forms11:10
5.3Template-Driven Forms: Validation and Submission14:00
5.4Reactive Forms11:26
5.5Using a `FormBuilder`08:01
5.6Reactive Validation With Built-in Validators14:53
5.7Creating Custom Validators for Template-Driven Forms12:18
5.8Creating Custom Validators for Reactive Forms08:26
5.9Observing Form State Changes12:40
5.10Working With the `@HostListener` Decorator05:41
6.Routing
6.1Defining and Configuring Routes07:53
6.2Rendering Components With Router Outlets10:14
6.3Using Router Links for Navigation05:25
6.4Navigating Routes Using the Router06:24
6.5Determining the Active Route Using an Activated Route07:16
6.6Working With Route Parameters10:42
6.7Using Route Guards07:36
6.8Observing Router Events10:55
6.9Adding Child Routes08:45
7.Using the HTTP Client
7.1Sending an HTTP Request10:52
7.2Handling an HTTP Response11:22
7.3Setting Request Headers12:33
7.4Intercepting Requests09:04
7.5Finishing the Example Application12:33
8.Testing
8.1Service Unit Test Preparation10:45
8.2Unit Testing Services13:24
8.3Component Unit Test Preparation12:35
8.4Unit Testing Components07:27
8.5Unit Testing Component Templates06:58
8.6Unit Testing Pipes04:41
8.7Unit Testing Directives04:56
8.8Unit Testing Validators04:48
8.9Unit Testing Observables11:37
8.10Unit Testing HTTP Interceptors06:16
9.Building for Production
9.1Building for Production03:40
10.Conclusion
10.1Conclusion01:32
7.5 Finishing the Example Application
Hi folks, in this lesson, we're just gonna finish up wiring up the example application so that it completely works and a full game can be played. We're about to move on to the testing section of the course, and as we haven't done TDD for this course, the least we can do is start testing with a fully working app. So, what's left to do? Well, in the game component we need wire up the do stick button. This button effectively ends the player's turn, and play moves on to the dealer. First of all, let's add a new convenience method to the GameService. We'll call this one dealer turn, so this will be very similar to the player turn method that we added in the last lesson. This basically does the same as the player turn method above it. It just deals a new card, but this time to the first player in the players array, which will always be the dealer. So, back in the game component then, let's update the doStick method. So typically in Blackjack, if the dealer has a score of less than 17, they will always draw another card. So we can keep invoking the new dealer turn method that we just added all the time the dealer score is less than 17. We've already got a reference to the player saved locally, so let's just do the same for the dealer as well just to make accessing it slightly easier. And let's set this property as well in the NG on in it. And now let's use this back in the doStick method That just makes things a bit tidier. Okay, so once the dealer's score goes over 17 we can see whether the dealer won or lost, set an appropriate end message and navigate to the end game component. So there's a few different things that we need to check. If the dealer has a score over 21, they've gone bust and have lost instantly results. If the list score is less than 21, but also less than the player's score, the player has gotten closer to 21, and has therefore won. If the dealer and the player's score are the same, well, in a casino that would be neither win nor a lose. The player would get their stake back, but we aren't in a casino and there aren't any stakes, so we'll just say the player won, yay. Lastly, if none of the above conditions are met, it means the player has lost, too bad. In each case, we set the end message property of the game service and navigate to the end route. The end component itself is pretty simple, this time, we show the dealer's hand so the player knows no cheating has occurred. And there are two bands again, this time they are quit and play again buttons. So, we need to add some bindings to this buttons because we didn't do that earlier on. So first of all, let's open up the controls components and add the bindings there. And now we can bind to these events in the host of the controls-components, which in this case is the end component. Now we can add these do quit and do again methods to the end component class. And we can set that in the NG on init, after where we set the local dealer property. Great, so now we're gonna need to make use of the router, so let's import that and inject it into the constructor. We'll come back and thin out the do quits and do again methods in just a moment. We need to reset a bunch of properties in the game service first of all. We could do all that from here but it makes more sense to do it in the game service. So let's add a method there called, resetGame We just need to set the game started property to false and the end message, aces high, and easy mode properties to undefined. So, now we can call this reset method from the do quick method in the end component. So now we need to delete the player and reset some properties of the dealer. We can add methods for this in the player service. So let's add a removePlayer method. We can pop both the player from the players array as well as any cache object that might exist in our cache. As we're in the player service, we can use the _cache property directly, now we just need to reset the dealer. We don't want to delete him fully because he gets created in the home component, but we do need to reset his hand and score. Awesome, so now we can call these methods from the end component and then navigate back to the start component. We should now be able to play a complete game, then quit, and then play a whole new game if we want. Let's just make sure that's working in the browser So I lost that one, let's quit and we should go back to the start screen and there shouldn't be any player details there and everything should have been reset. Excellent, so the final thing to do now it's fill out the do-again-method at the end component. So this will be similar to the do quite method, except that we don't need to reset everything quite so aggressively. We do need to send game started to false and we need to reset the end message, but we don't want to change the values of aces high or easy mode, or get rid of a player's name. We can keep all these the same, and the player can change them if they want to. So back in the reset game method, let's have it accept an argument, and if the argument is true, we can reset everything. But if it's false or not present, we can just reset game started and the end message. So the full reset parameter is optional, but when it is passed it will be a Boolean. And is the full reset argument is passed, we can then go ahead and set aces high and easy mode to undefined. And back in the end component then, we want to add true where we call reset game in the doQuite method. And then we can call reset game without the argument in the doAgain method. Great, so now in the doAgain method, we do want to remove the player from the player's array, because the player gets recreated in the game component. But we don't wanna clear the cache, because this will allow the start screen to remember the player's name and game options on the start screen. So we can add a parameter to the remove player method and only pop the cache if this parameter is true. And now we can add true to the call in the doQuit method, but not pass argument at all in the doAgain method. And we do want to reset the dealer and we do want to navigate back to the start component again. And with that the act should now be completed, let's just give it one last whirl. We lost that game, so let's try playing again instead of quitting this time. And it's remembered my name and I didn't set any options so that appears to be working exactly as it should do. So in this lesson, we just tied up the remaining loose ends of the application itself, and it is now functionally complete. And we're ready to move on to testing, thanks for watching.


