

- Overview
- Transcript
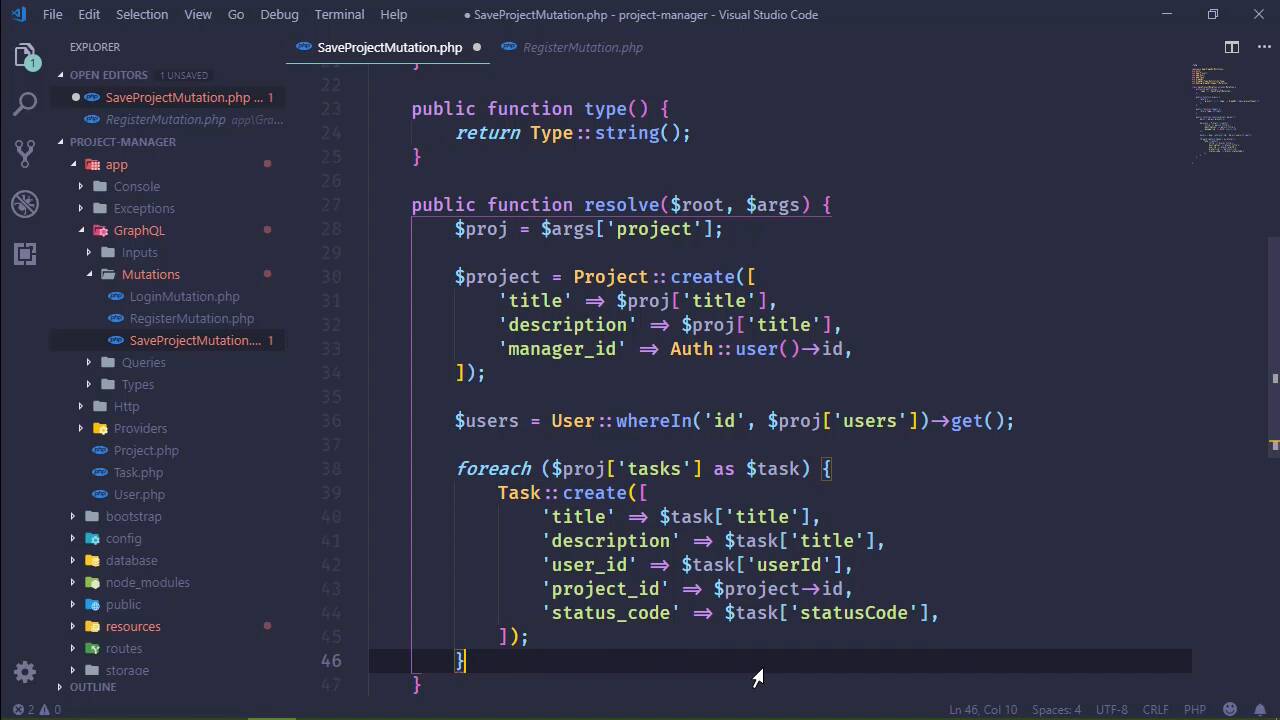
6.4 Saving the Project
Now's the time. We can finally save a project—all our hard work has paid off!
1.Introduction
1.1Introduction01:31
2.First Steps
2.1Setting Up the Project05:29
2.2Designing and Migrating the Database10:06
2.3Setting Up the Models10:48
3.Building and Querying a GraphQL API
3.1Understanding GraphQL09:42
3.2Creating and Querying Our API08:17
4.Building the Client Application
4.1Assembling the UI07:17
4.2Querying the API With JavaScript11:26
4.3Adding Arguments to Your Queries11:28
4.4Organizing Our Client-Side Queries07:53
4.5Defining Other GraphQL Types08:53
4.6Displaying Our New Data09:44
5.Incorporating Authentication
5.1Building the Login View09:42
5.2The Login Mutation11:37
5.3Authenticating the API09:17
5.4Incorporating Authentication on the Client Side09:04
5.5Displaying Auth-Appropriate Menus07:59
5.6User Registration09:33
6.Working With Complex Data
6.1Building the Project Creation UI08:31
6.2Getting a List of Users03:54
6.3Defining Input Types12:33
6.4Saving the Project09:52
7.Conclusion
7.1Conclusion01:00
6.4 Saving the Project
We are finally to the point where we can save our project. So we just need to write our mutation and then everything should work, if I typed everything correctly. So let's go to our mutations and let's add a new file. We will call this SaveProjectMutation and let's grab something to start off with. The register should be fine. So let's do that. Now as far as our using statements are concerned, we are going to need just about everything because we will need to retrieve users. We've got to save tasks and all of that stuff. So we want to use App\Project, App\User, and App\Task and we don't need the use statement for the string there, so we'll get rid of that. Let's change the name of this class to SaveProject and let's also change the name attribute there. Now as far as our args are concerned, we don't have to worry about individual pieces of information, instead we have that project type. So our type then is going to be GraphQL and we're going to use the projectInputType. So that's beauty of this, we don't have to specify the individual fields or anything like that, we have a project coming in and there it is. So as far as the return type we're gonna keep it as a string. We're not going to return anything, we're just going to return an empty string and redirect the user back to the dashboard. Now the real fun comes for the resolve because we've got to do everything. We've got to save the project, we've got to get the users associated so that we can save those with the project, and save the tasks and all of that stuff. So, the first thing that we're going to do is retrieve from the args the project. So that it's going to give us our project object and then everything else we are going to retrieve from this project object. So let's create a variable called project and this is where we will save our project. So we will create one and we are going to set the title, which is going to come from proj['title'], and the same thing is going to be done for the description and the manager_id. Well, not the manager_id, the manager_id is going to come from the authenticated user that is creating this. So all we have to do here is use our Auth, we will call user and get the ID. So that's going to give us our project and then we can use this project object whenever we create our tasks in order to create that relationship. The next thing we're going to do is retrieve all of our users, so that we could also get ready to setup the relationship between our project and the users. So we are going to use the where In because we wants to retrieve all the users that have an ID that are from our users. So we will once again use our project proj['object'], we will specify the user's key, and that is going to give us all of the users for our project. But then we need to create our tasks, so we're going to use a foreach here and a foreach proj['tasks']. There we go, as a single task, we are going to create a new task. And by this time, we have all the information that we need, so we have title and all that. Let's do some copying here. So the title is going to come from the task in this case, the same as the description. And then we need the user_id, the project_id, and the status. So user_id is simply called user_id. The project_id we get from our newly created project, so we will just grab that id value. And then finally, we have the status_code. So we will set status_code equal to the statusCode camel cased from our task. And then once that is done, we just need to setup the relationship between our project and the users. So we will do like we did with the seeder, we will say project users, and then saveMany then we will pass in our users. And then finally, we need to return something, so we will return an empty string. So let's go to our CreateProject Vue component, and let's be sure that we do something whenever we receive the response. So we make the request, no we haven't done anything, so whenever we get the response, we are simply going to go back to our dashboard. So we will use the push on our router and there we go. So if I've typed everything correctly, we should be able to save this project and everything would work just fine. So I'm gonna do a hard refresh and I'm gonna clear out everything in the network, so that, uh-oh, we've got a 500 somewhere. Let's see what we have as far as the error is concerned. Type task input not found. Well, okay, I'm glad I'd looked at that before. Let's make sure that everything is named okay. We need to go to the GraphQL config, so let's drop in to there. Let's took a look at how we defined that type. So we have projectType, I am so glad we looked at this. That would have been, well, it wouldn't have been catastrophic but we just saved some time. So let's refresh, hopefully we won't get a 500 again whenever there's a request to, wow, we got logged out. Right, so let's log back in as admin. And then we will see what we get, hopefully we get 200. So let's go to CreateProject. Once again, everything looks okay as far as our requests are concerned. So, this is a test project and this is the first from the create form. As far as the users are concerned, we want to assign Jeremy and Jim and we are gonna have two tasks. So as far as Jeremy is concerned, we are going to test the UI, the description is going to be test UI description and we will assign that to Jeremy. And the status will be open. As far as Jim is concerned, I don't know, I don't know either, and Jim there. But in this case, let's put this on hold. So if we save this, let's pull this up, if we save it hopefully everything's gonna be okay. That was good, I'll take that. Let's make sure, let's see schema is not configured for mutations. And that's because we didn't at the mutation in our config. Went there all that trouble and didn't do it. All right, so here we go, our single mutation because all of the others are in the guest schema. We have saveProject and in fact, let's just copy one of those because a lot of it's gonna be the same. The name, saveProject, and then the mutation name is saveProjectMutation, or at least the class name. All right, so with that done, we need to go back and I don't necessarily wanna type all of that again, but here we go. This is a test project, first project of UI, which I don't know if that's technically true now. Let's add some tasks, we'll say task 1, task 1 description, assigned to Jeremy, and that's open. Task 2, task 2 description, and then that was to Jim, we're gonna make that hold. Let's save the project, once again, that looked great and there is our new project. That is fantastic, so we have just written the code for saving our new project and that is wonderful. So when you need to save or work with more complex data from the client to the server, you need to create input types. And then that allows you to define those input types in your queries, which of course simplifies them as well.


