

- Overview
- Transcript
5.1 Building the Login View
Users have to be able to log in, so we'll build a login view for that purpose.
1.Introduction
1.1Introduction01:31
2.First Steps
2.1Setting Up the Project05:29
2.2Designing and Migrating the Database10:06
2.3Setting Up the Models10:48
3.Building and Querying a GraphQL API
3.1Understanding GraphQL09:42
3.2Creating and Querying Our API08:17
4.Building the Client Application
4.1Assembling the UI07:17
4.2Querying the API With JavaScript11:26
4.3Adding Arguments to Your Queries11:28
4.4Organizing Our Client-Side Queries07:53
4.5Defining Other GraphQL Types08:53
4.6Displaying Our New Data09:44
5.Incorporating Authentication
5.1Building the Login View09:42
5.2The Login Mutation11:37
5.3Authenticating the API09:17
5.4Incorporating Authentication on the Client Side09:04
5.5Displaying Auth-Appropriate Menus07:59
5.6User Registration09:33
6.Working With Complex Data
6.1Building the Project Creation UI08:31
6.2Getting a List of Users03:54
6.3Defining Input Types12:33
6.4Saving the Project09:52
7.Conclusion
7.1Conclusion01:00
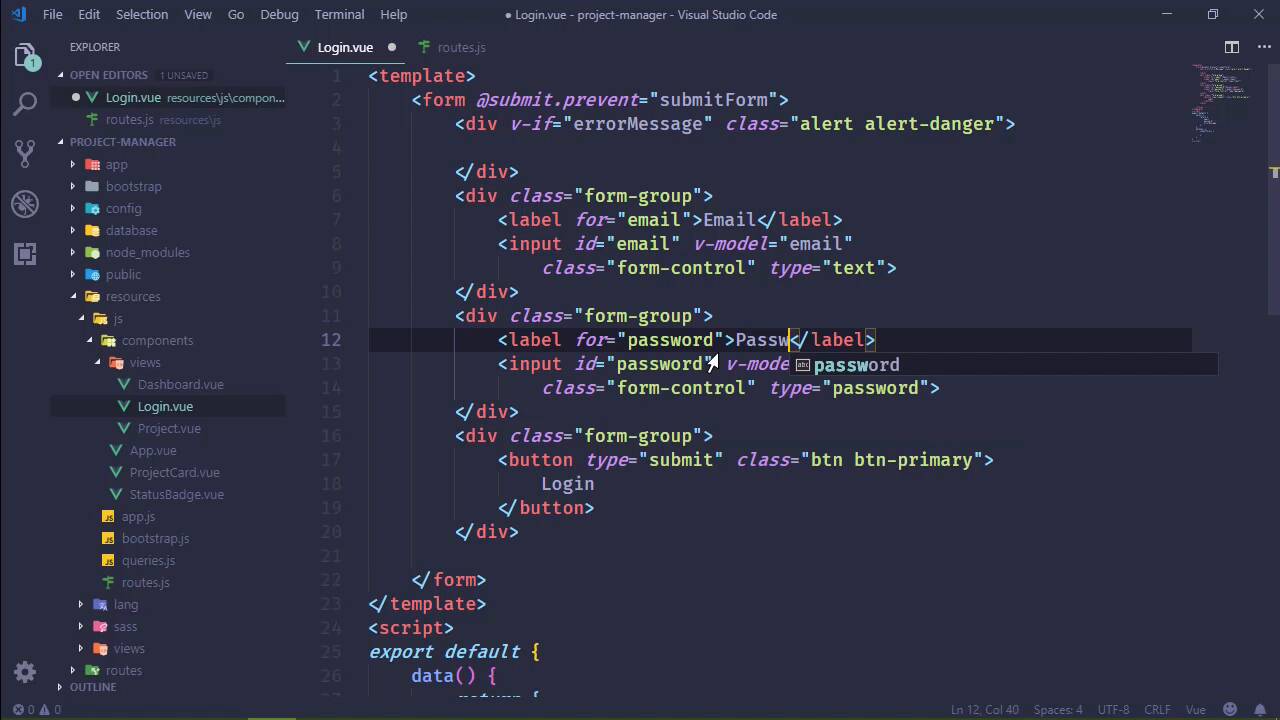
5.1 Building the Login View
I have always really dreaded authentication for web applications because there are so many parts. There is the UI, there's the code on the server, there's the code on the client. And all of that is bad enough. [LAUGH] But then we also have to take into account that in this particular project we want to be able to authenticate users based upon their email address and password, because they are going to log in. And then we also need to authenticate all of the API requests based upon the token that we assign to the user. So there are a lot of parts, and I'm kind of at a loss as to where to begin. So for the lack of a better thing, we are going to just start at the very beginning of the process of logging in, which would be the login form. So let's go to resources>js>components>views and we are going to add a new file. And we'll just call it Login.vue. And the login form is going to be very simple. We will just have two fields, one for the email address the other for the password. And then, of course, a button for submitting the request. So whenever we submit the form, let's say that we are going to call a method called submitForm, that sounds pretty okay to me. Let's go ahead and define that inside of our methods, so that I don't forget to do that later on. And inside of the form, as I mentioned, we'll just have two fields. So let's put these inside of their own form-groups, and then we will have a label, and then an input element. And let's copy this and paste it a couple of times, because the last one's going to be a button. So let's start with the button since I'm already here. Lets' give it a class of btn, and btn-primary, because this will be the primary button. The text will be login, and let's also set the type to submit. I think that's the default, but it doesn't hurt to be explicit here. Now as far as our fields, our first is going to be called email. So let's set the ID on the input element to email. Let's also set the v-model, so that will be email. And as far as this, we need the form-control class too. So, let's add that, and there we go. Let's put this on multiple lines, just so that we can see it all on screen. And then we will move onto the password. Now, the type for this needs to be password. Let's set the ID to password, let's set the v-model to password. And then we also need the form-control class, so let's add that as well. And we will organize this to be all on screen, and there we have our form, that's great. So, let's add our data properties. And we had email, we will initialize it as an empty string, the same for the password. And, this is our basic form, that's fine. We should probably have an area for any type of errors that we will want to displace, so let's go ahead and do that. Let's give it alert and alert danger. And let's also have a v-if, and we'll just set this to errorMessage. That way, if it's a network error, then we can display it here by just supplying a message as opposed to hard coding the message inside of the markup. And then having to juggle multiple message areas. Let's also add this to our data properties, it will be an empty string as well. And that's an okay start, I think. So let's go to our routes. Let's go ahead and add that here so that we can at least view it in the browser. So we want to import login from login. And the path is going to be /login, because that makes sense. And then of course, the component is login. So let's go to the browser, and let's see if this is going to work. And, it doesn't. Let's do a hard refresh, there we go. Our labels didn't show up because we didn't have any text, did we? So let's have email, Then password. And there we will have our login form. Okay, so we have accomplished at least something in this lesson. I guess the next thing we should do is think about how we are going to submit this information. Which of course means that we are going to submit a query. But, now that we are starting to talk about authentication, especially after we log in, all of our requests are going to need to include the API token. And I don't necessarily want to have to write that code every single time for every request. So I'm thinking that we might kind of rethink what we've done here. I mean, we will still have the same idea, but instead, we will just have a method called query. And then we would have the query name that we wanted to execute, and then any variables. But let's call that queryVariables, something like that. Now, of course, we can create our own axios instance. And we can provide all of the default information that we would need like the API token and all of that stuff. However, we do need some dynamic capabilities. So, we’re going to just take this route because this is easy to implement, and it will handle all of our needs. So we are going to create an options' object, where we will define the URL. So let's go ahead and set that to graphql. We'll go ahead and define the method as well because pretty much all of our requests are going to be post-requests. And then, of course, we are going to have some data because we'll at least have a query. And, so probably what we'll do is just have an object called queries. And then the property names would, of course, be the name of the query. And then, well, it's exactly like what we have, but in this case, it's not going to be globally available. Instead what we would do, is pass in dashboard or single project. And then we would set query to queries, and then we would specify the query name here. And then we could check to see if we had any query variables. And if we do, then we off course want to add that to our data, as the variables so that we can pass data along with our queries. And then we would do some checking for the API token, which we will just add a little comment there. And then we would return Axios, we would parse in the options, and there we go. And it's nice that it added that automatically, but I want a lowercase a there. And this makes it just a little bit easier. So that inside of login, now what we could do is say this, and then query. We will specify whatever query that we want to execute, which would be login. We would supply in the variables, so we would have the email set to our email data prop, same with the password. And then all we would have to do is call the then handler to do something with the response. That way we have the ability to perform our queries without having to import anything and without having to write, essentially, the same code over and over, and over, and over, and over again. So let's quickly go to dashboard and let's modify the code so that we use this new query. In this case, it was dashboard. We didn't parse in any data, so we could just call then. And then for the project, we will do essentially the same thing. We will call query, but in this case we had single project and we also had the variable data. So let's go ahead and use that there, and that should work as well. So if we wanted to make sure that that still works, let's go to the dashboard. Hopefully, we will still see our dashboard, we do. If we navigate to the project, we see that that still works, and great. So in the next lesson, we can focus a little bit on the server. We know what query that we want to execute, we call it login. We know what data that we are sending, and so we just need to implement that on the server. And we will do that in the next lesson.


