

- Overview
- Transcript
4.2 Querying the API With JavaScript
There are a few libraries available that make it easy to query GraphQL APIs. However, it's already easy to work with, so we'll just query our API with Axios. That way, it will be easy to understand how everything works.
1.Introduction
1.1Introduction01:31
2.First Steps
2.1Setting Up the Project05:29
2.2Designing and Migrating the Database10:06
2.3Setting Up the Models10:48
3.Building and Querying a GraphQL API
3.1Understanding GraphQL09:42
3.2Creating and Querying Our API08:17
4.Building the Client Application
4.1Assembling the UI07:17
4.2Querying the API With JavaScript11:26
4.3Adding Arguments to Your Queries11:28
4.4Organizing Our Client-Side Queries07:53
4.5Defining Other GraphQL Types08:53
4.6Displaying Our New Data09:44
5.Incorporating Authentication
5.1Building the Login View09:42
5.2The Login Mutation11:37
5.3Authenticating the API09:17
5.4Incorporating Authentication on the Client Side09:04
5.5Displaying Auth-Appropriate Menus07:59
5.6User Registration09:33
6.Working With Complex Data
6.1Building the Project Creation UI08:31
6.2Getting a List of Users03:54
6.3Defining Input Types12:33
6.4Saving the Project09:52
7.Conclusion
7.1Conclusion01:00
4.2 Querying the API With JavaScript
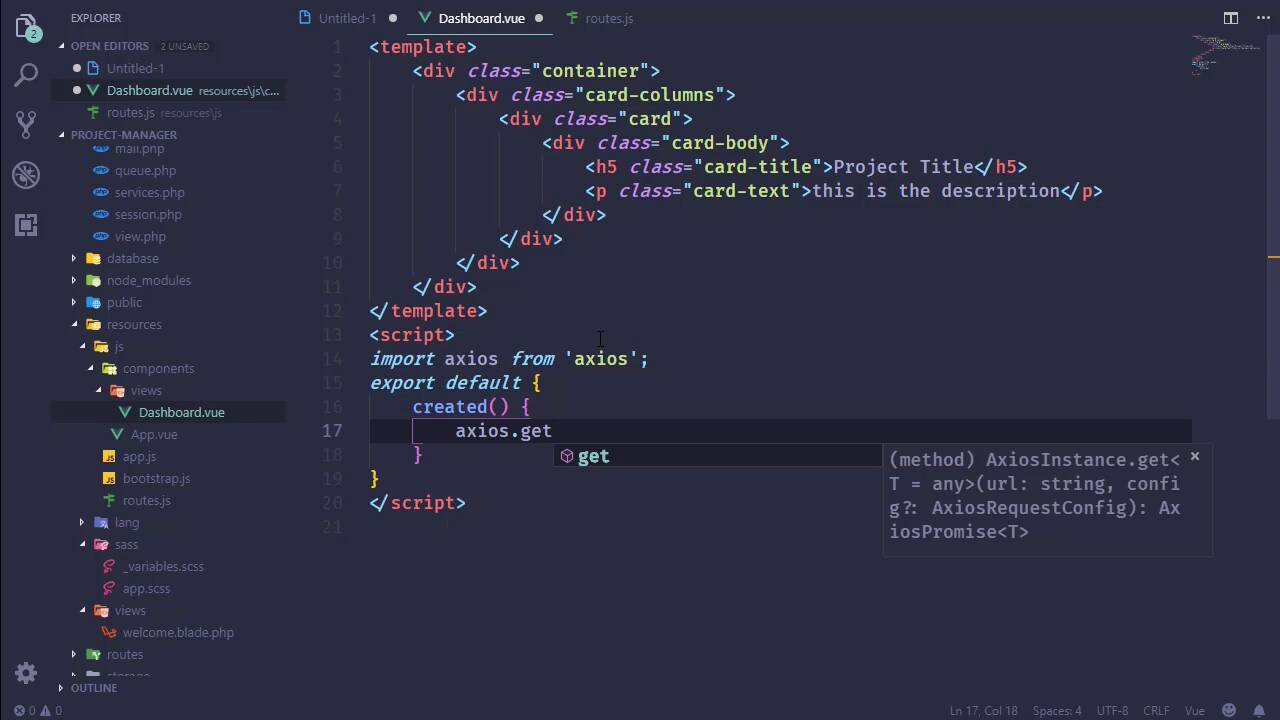
In the previous lesson we started focusing on the front end, and we cleaned up some of the files, we also have what is essentially going to be a layout. And we can see that that is working. So now what we want to do is display our dashboard. So we're going to focus on that in this lesson. So inside of the Components folder, let's add a new folder called Views. And inside of there we will add a new file called Dashboard.vue. And as far as displaying our list of projects, we could use a table, but a table's kinda boring. So instead what we could do is use cards, cards is kind of the new thing. And so we could use a card to display the information about a project. And we can use a new class in Bootstrap 4 called card-columns, so that it organizes all of the cards into columns essentially. So of course right now we just have one project, so there will be one card. But as we have more projects then this will be a good way of displaying them in the browser. So let's go ahead and let's define the HTML, let's get it to where it looks halfway decent in the browser and then we will add in the JavaScript stuff. So as far as the card itself, let’s have the card body and the card body is going to have the title and then some other information about it. So let’s use an h5 element, let’s give it a class of card title and we will just say project title here. And then we can include the description. We can make that just a normal p element, but let's also add the card text class and this is the description. Of course, this is just boilerplate stuff. We will come back and add in what we need to and we can also have the number of tasks. But we don't have a query yet for the task stuff, or at least a type for the tasks. So let's leave that alone, let's just have the title and the description. Now in order to see the dashboard, that is going to be kind of our home page. So we need to set up our routes to do that. So that it will automatically load the dashboard based upon the URL. So lets go back to js folder and let's add a new file called route.js. And we will import the dashboard here and that is, of course, from and then the path is gonna be little bit long, Components/Views and then dashboard.vue. Well, it's not that long. And then of course we want to export our route, so we will export default. And this is going to be an array where each object defines the route basically. So for just a normal route URL, we will have the component of dashboard, and it will load that for us. So, now we could import this into our app.js, so let's go ahead and do that. We'll just call it routes from and this is directly inside of this directory. So we will easily have our routes, so that we can pass them to the VueRouter. And that should make that work. So if we go back to the browser and refresh the page, we see our card, project title, and this is the description. So at least that is working and for right now I think we're done with app.js. So lets close that. Now there are several different ways that we can query a GraphQL API. We of course can use just normal HTTP request using axios or even something as simple as the fetch API. I mean, it doesn't have to be an HTTP library or anything like that. Or we can use something that is geared specifically for GraphQL, like for example, there is a library called Apollo, which is actually made up of two different clients. There is the Apollo client and then there is a client called Apollo boost which is a little bit easier to use and configure. But then there's also libraries that are built upon those Apollo clients like one is specifically for Vue. It's called Vue Apollo. And it could make our life pretty easy as far as making our requests are concerned. But we're not going to use them. I mean, yes, we could, but it does require a lot of configuration. And there's nothing wrong with that, but I think it's a good idea to at least make our own requests and then as time goes on, if we decide to use some other utility to make our life a little bit easier. Then yeah, we could do that. So in our case all we are going to do is just use Axios to make just plain ordinary HTTP requests and we will work with the responses. So we are going to import Axios, of course. And inside of the mounted and no, not the mounted. Let's do it inside of the created hook. We are going to make our request, so we will say axious and in our case, it really doesn't matter what type of HTTP request we make. We can use a get request because, after all, we are getting information. However, remember that this is not a RESTful API. In a RESTful API, of course, the type of HTTP request matters because that determines what it is that you are actually doing or at least it should matter. It doesn't technically, but as far as GraphQL is concerned, all that's out the window. We just need to make a request and for right now, all we are doing is issuing a query. Later on we will issue what's called a mutation, which is modifying something on the server. So, a query gets information, a mutation modifies that information. But if you look at a lot of the documentation online or if you look at other people's examples, most of the requests are using post requests. So, we are going to follow in that same convention and use a post request. And we are going to issue our request to GraphQL, that is our endpoint. And we saw that a few lessons ago whenever we made an actual query inside of the browser. So because we are issuing a post request, we need to send our query data with the request. And we do that kind of like what we would have done with a GET request. If you remember, we used a query, URL parameter, and then we specified the query that we wanted to execute. So we have that still, and for right now we are just going to use this simplified query. Eventually, we are going to go to the more long form because that gives us a lot more power. But in this case, we're just going to do something very simple. But we are going to include the description here, because we want to display the description. So let's go ahead and let's change this, so that we are going to display the project title, as well as the project description. But of course, none of that exists yet, because we haven't even done anything with the results of the query. So I'm getting ahead of myself. So let's go ahead and let's write the then handler, so that whenever we get data back from the server, well, then we could have a data property called projects, and we could set that equal to the response from the server. Now, if you'll remember whenever we did issue that request and we saw the JSON structure that came back. It was an object that has a property called data that itself had a property called projects. So here we're gonna have res.data because that is from axios. That's how we are accessing the data coming back. And then we have .data because that is the property on the JSON structure that came back. And then finally, projects. And so, of course, we need to go ahead and define that data property. So let's do that, and then we will be able to iterate over our projects and display their information. Of course, projects is going to be an array because that is what is coming back from the API. Okay, so for our card, all we are going to do is use a v4 foreach project in projects. Then we are going to display the project title and the description in each of the cards. Sounds pretty simple enough, so let's go to the browser. Let's refresh the page and we will hopefully see our result, we do. We have our Project Manager or Project Manager Development that's the title of the project and then the description, write the project manager application. Now, I don't want to leave it like this. I mean, yes, this works and it's fine. However, instead I want to break out the individual projects into their own components. So inside of the Components folder, let's create a new file and we will call this ProjectCard.vue. And for the template, we will essentially take that HTML for the individual cards, and we will use that here. But of course, we need to lose the v4 here. So let's get rid of that and let's go back to our dashboard and use it here. So as far as this elements name is concerned, we'll just say ProjectCard and then we will have the v4 there. Visual Studio Code wants us to have the key as well, so let's go ahead and just say project.id is gonna be the key. And that will be okay, although we do need to pass the project to it. So we'll say that we'll have a prop called project. We'll pass project there and that will be it, at least for now, for our dashboard. So that the inside of our project card we will have a project prop. So let's go ahead and add that and we should still end up with a working dashboard. And there's not much to it, although something definitely did wrong. That's because it doesn't know where ProjectCard is. So let's import ProjectCard from and we need to go back one so that we can get to ProjectCard.vue and of course we do need to specify that we are using that component. So, there we go. Now that should work, let's refresh the page and there we have our project card. Well, it's great that our client can retrieve the projects from our API and display them in the dashboard. But now we need to take it a step further and display an individual project by itself. And we will get started with that in the next lesson.


