
 Lessons: 21Length: 2.6 hours
- Overview
- Transcript
2.2 The Staging Area and Status Command
Unlike many other source control management systems, Git has a special intermediate area called the staging area. In this lesson we'll see what this is all about, as well as look at the git status command, which we'll use frequently to assess the state of our repository.
1.Introduction
1.1Introduction02:59
1.2Installing and Configuring Git08:00
1.3Git Concepts05:40
2.Git Basics
2.1Initializing a Repository07:05
2.2The Staging Area and Status Command05:12
2.3Making Commits10:34
2.4Ignoring Files08:06
2.5Viewing the Log09:46
3.Branching and Tagging
3.1Creating Branches08:02
3.2Fetching and Pulling09:20
3.3Diffing Files05:13
3.4Merging Branches07:03
3.5Tags06:38
4.GitHub and Remotes
4.1Setting Up GitHub10:42
4.2Working With Remotes10:12
4.3Creating GitHub Pages11:57
4.4Contributing and Contributors06:43
5.Intermediate Usage
5.1Stashing Changes10:45
5.2Cleaning Up Merge Conflicts03:46
5.3Rebase07:33
6.Conclusion
6.1Conclusion01:16
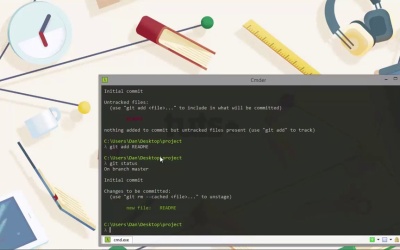
2.2 The Staging Area and Status Command
Hi, folks. In this lesson, we're gonna take a look at the staging area of Git, which is an intermediary area between untracked files and tracked files, which Git is monitoring for changes or between changes that have not been added and changes that have been added. We can also take a look at the status command, which we use often to look at the state of our repository. So first of all, lets add a new file to our project. We'll just use vim and if you remember this is included with the commander app. And we will just need to cd into our project folder and now lets create the read me file. So lets just add some basic content inside. [BLANK_AUDIO] Okay. Great. So let's save that and go back to the command line. So now we've added a new file, let's run the git status command now. So we get some output from this. We can see that we're on the master branch, which is the default brunch that git creates for us. We're at the initial commit, so that's the very first commit, which doesn't have any parent commits or anything like that. And as you can see, we have some untracked file and Git gives us a little hint there, that says that we should use git add and the file name to include what will be committed and the name of the file that's untracked is listed in red. At the very end, it says that there's nothing yet to commit, but the untracked files are present. And again, it tells us that we need to use git add in order to track these files. So let's run the git add command and see what happens. So we don't get any output now, but if we run the git status command again, we should see something a bit different this time. So we can still see that we're on the master branch, we're still at the initial commit, but now there are changes that will be committed. And it lists the README file in green as a new file. And again, it gives us a hint about what we might want to do. In this case, we can use get rm dash, dash cache and the name of the file is we want to unstage the file. We're not going to do that. So, at this point, our README file is staged or on the staging area or in the Index, as it's sometimes known. But basically, it's ready to be committed. So what exactly is this staging area or index? The staging area is an intermediary step that files or changes to files can be in where the changes aren't fully committed, the git is still tracking changes to them and aware of them. So let's update the README file once again. And this time, it's just add the date at the bottom of the file and we'll save and exit that once again. So now let's run git status once again. And we can see that the message once again is slightly different, so it gives us some of the same information as before. We're on the master branch, we're at the initial commit and there are changes to be committed. But there are also some changes that are not staged yet for commit and we need to add the file again. And that will update what will be committed or we could check out the branch once again to discard any changes in the working directory. Now most of these commands we haven't yet looked at, so we're just gonna ignore those. But the point is that, although git is aware of the README file and some of the changes from that file have been staged. Git is able to stage different parts of a file independently. So, if we were to run git commit now, the first part of the README would get committed and would become part of our repository and it would show up in the history for our, our project. But the last change that we just made, adding the date would not be committed. So before we can commit any changes to files tracked by Git or tell Git to start tracking changes in files, those changes must be staged. And this gives us really granular control over exactly what we commit. We haven't yet looked at actually making a commit yet. We'll come to that in the next lesson. But for now, just understand that the staging area is like a special pre-commit area. In this example, we specified exactly the file that we wanted to add, which is okay when we only have one or two files. But if we had lots of changes that we want to stage, it'll be a bit of a pain to list every single one of them. So, in this case, we can use the dot after the command and this just tells git to add everything that is changed in the working directory. So, in this lesson, we looked at the staging area in git and the status command. We saw that before we can commit changes to the content of files or tell Git to start tracking new files, we have to stage them first. This gives us a very fine degree of control over exactly what gets committed. We also looked at the git status command, which as we saw, tells use the state of our repository as in which files are untracked and which files are staged, ready to be committed. Thanks for watching


