
 Lessons: 21Length: 2.6 hours
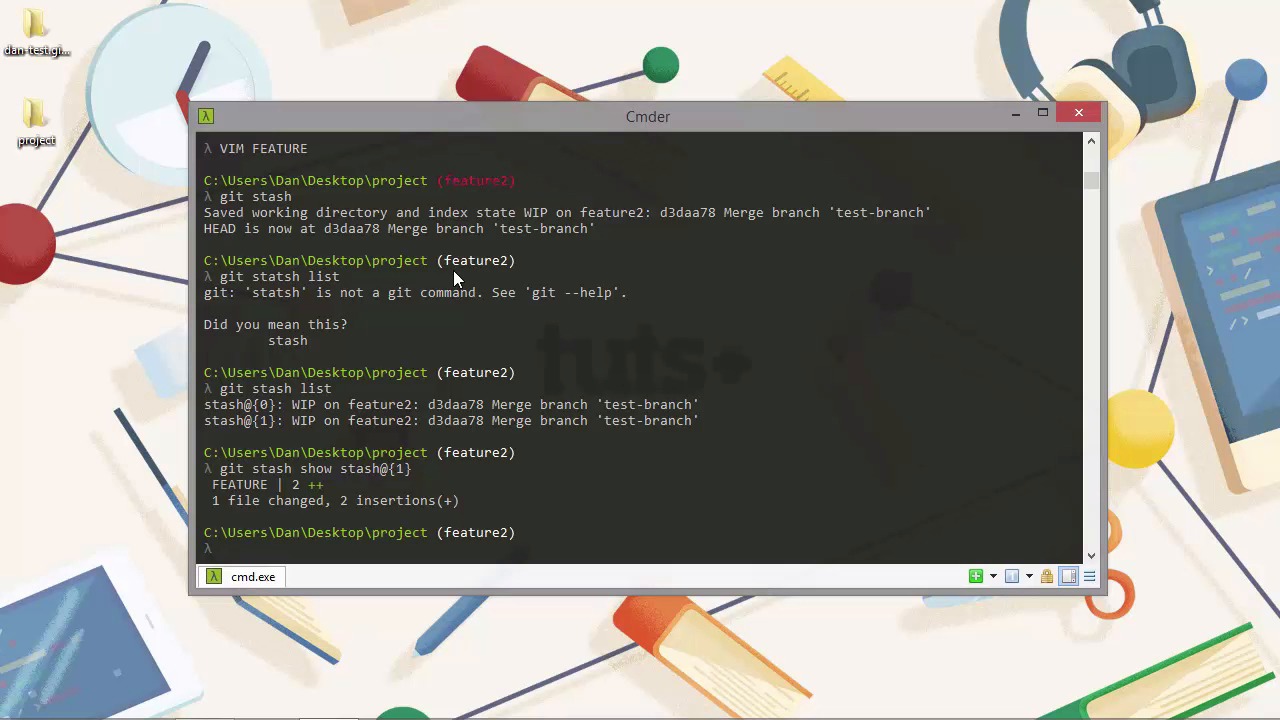
- Overview
- Transcript
5.1 Stashing Changes
Another feature of Git, which can be useful when we're working on larger projects, is the stash feature. Let's see how it can be used and when it's useful.
1.Introduction
1.1Introduction02:59
1.2Installing and Configuring Git08:00
1.3Git Concepts05:40
2.Git Basics
2.1Initializing a Repository07:05
2.2The Staging Area and Status Command05:12
2.3Making Commits10:34
2.4Ignoring Files08:06
2.5Viewing the Log09:46
3.Branching and Tagging
3.1Creating Branches08:02
3.2Fetching and Pulling09:20
3.3Diffing Files05:13
3.4Merging Branches07:03
3.5Tags06:38
4.GitHub and Remotes
4.1Setting Up GitHub10:42
4.2Working With Remotes10:12
4.3Creating GitHub Pages11:57
4.4Contributing and Contributors06:43
5.Intermediate Usage
5.1Stashing Changes10:45
5.2Cleaning Up Merge Conflicts03:46
5.3Rebase07:33
6.Conclusion
6.1Conclusion01:16
5.1 Stashing Changes
Hi folks. Today we're gonna see how we can stash changes. Stashing is a way to take any changes that have not been committed yet and put them somewhere safe. Maybe we're halfway through adding a feature and a bug comes up. But when we try to switch branches, Git tells us that we can't change branches without losing some work, which can happen if we have a modified file in two different branches. But maybe we're not ready to actually commit those changes yet. So we're in a bit of a difficult situation. We can't change branches because we've got uncommitted files but we don't want to commit yet. So let's see what we can do in this situation. So first of all, let's just switch back to our master branch. [BLANK_AUDIO] And because we're tracking an upstream branch now, we have a message at the bottom to say that our branch is up-to-date with the remote branch on the origin. So one of the files we have in our master branch is called feature. Let's say that we want to continue developing this feature now. [BLANK_AUDIO] And it looks like that because I didn't add those deleted files properly in an earlier lesson. Those files are showing as being deleted in this branch. And as you can see the branch has got untracked changes in it that's why it says master in red. So I don't actually wanna delete any of those files. So let's just run git status and see what it says. And it says that all these files have been deleted. What I wanna do now is unstage these. And what we're gonna have to do is just check out everything again and now we're back to having a clean working directory. So let's say we want to continue developing the feature that it is in the file called feature and let's create a new branch to do this. We'll just call it feature two. [BLANK_AUDIO] And let's start work on our new feature. [BLANK_AUDIO] And let's just close them now. [BLANK_AUDIO] Our working directory is no longer clean. You can see that because the text shown above the cursor is in red. But now a new bug report comes in. We're not ready to commit the feature yet. We haven't finished working on it and as I said, a commit should be a nice atomic thing which contains just one thing but just the whole of one thing. It shouldn't be half a thing. But if we don't do something with these changes when we switch back to the master branch Git will see these changes. And they could get committed with the fakes and it could all get a bit messy. So lets add our current unadded and uncommitted changes to a stash. All we need to do is use the stash command and we get some output there. It says that the working directory has been saved. And the index state has been saved as a work in progress on the feature two branch and it gives us the shortened version of the hash and the commit message for the last commit. And it now says that our head is now at this other previous commit. So basically it's as if we did what i did at the start of the lesson and that was just undid any changes. So we haven't actually undone those changes. The changes that we've added to our feature file are still accessible as you'll see later on but our, our working directory and index have been rolled back to a clean state. So the stash in Git is a stack where the most recent stash is at the top of the stack and all the stashes are given a numerical index indicating their position on the stack. If we run the stash command with the list argument it will show us what we have stashed. In this case you can see that we've just got one stash, and it's a work in progress on feature two branch. And it just shows us the commit information from the most recent commit. So if we add another change and stash it, then we'll end up with two stashes. The newest stash being index zero, and the original stash going to index one. So let's say you put up the file in vim again. And you can see that it's back to it's original state. And let's run the Get stash command again. And now let's view our list of stashes. I need to spell it correctly. So now we see that we have two stashes. They both have the same name because they were both quite similar. Nothing was added, nothing was committed so it uses the previous commit message each time. So we can take a look at each stash individually if we want using the show argument and the name of the stash that we want to view. [BLANK_AUDIO] So we get a little report saying which file was changed and whether the file had insertions or deletions and remember this is the first stash that we made not the second one. The stash with the lowest index is the most recent stash. So it still doesn't show us what the actual changes were however, we can see these by adding the -p flag which shows us the actual changes. [BLANK_AUDIO] And now we can see a diff which shows us what those changes were. And this time we viewed the most recent stash and that was just where we added the text update which you can see in the diff at the bottom. So what if we want to compare two stashes? Can we do that? Yes, we can. And we use the get differ to do that. [BLANK_AUDIO] And you can see the diff for what was added in each version of the stash. If we want to a specific stash and we know what index it's at, we can use the drop argument and supply the index that we want to drop. [BLANK_AUDIO] So it tells us that it dropped the stash and it gives us the hash. So now lets list the r stashes again. [BLANK_AUDIO] And you can see that we have only one now. If we want to remove all stashes, we can use the clear argument instead. Now let's list our stashes again. And now we have none. So we should now be back to having no stashes at all. Instead of relying on the index and then diffing or viewing the changes in each stash, we can add a message when we create the stash. Let's just see what happens when we run git status, have we got any changes to add. Our working directory is clean so let's just open up the file again so that we can make another stash. [BLANK_AUDIO] It looks like I've opened up the wrong file. [BLANK_AUDIO] It's actually the feature file that we want to update. [BLANK_AUDIO] Here's our feature file. [BLANK_AUDIO] And now let's save a stash and give it a description. [BLANK_AUDIO] So this time we use the save argument and we passed the message that we'd like associated with the stash after that argument. We're just going to call this one feature changes. And it gives a similar output to before so let's just list our stashes now. And now we can see that it shows us the message and it shows us the branch so stash at zero position, our only stash, was made on the branch feature two. And it had the message feature changes. So when we want to reapply a stash, we have a couple of different options. If we use the pop argument git will reapply the most recent stash. And remove it from the stack so it will no longer be stashed. Or we can use the apply argument. In this case we can specify which stash we want to apply using the numerical index and the stash is not removed from the stack. So let's just open up the feature file once again. So we see that it's back to the original content. Let's quit out of them without making any changes [SOUND]. So now let's apply our stash. We've only got one stash so we don't need to specify which one. If we just specify the apply arguments then Git will just automatically use the most recent one. So now we can see that our working directory has changes and that the file that's been modified is called feature. And also because I accidentally created a file called update. Vim has created one for us. I'm just gonna remove that file. And now let's just run Git status once again. So we can see that the feature file has been modified. So what Git's done is it's taken the update that was stashed and has reapplied that to our file and now it sees that as a change, that needs to be added. So let's just reset our working directory very quickly. [BLANK_AUDIO] I was just wrong on so many levels. And now let's open up the feature file. We can see that it's back to how it was originally. Let's quick out of vim again. And let's just view our stashes. So we can see we still have our feature change stash. So now let's use the pop command instead of apply. Pop, remember, just takes the most recent stash and applies it and it removes it from our list of stashes. So we can see the feature file has been updated once again and let's just look at our list of stashes. And we can see that we have no stashes now. So in this lesson we learned all about stashing our changes. We saw that the stash is a stack which can take any number of stashes and that they are stored in reverse chronological order. We saw that we can see all of our stashes with the list arguments and that we can diff or see the changes in a stash. Using the diff command. We also saw that we can remove some stashes or all stashes and that we can reapply the stashes in different ways using either the pop or apply arguments. Thanks for watching.


