
 Lessons: 21Length: 2.6 hours
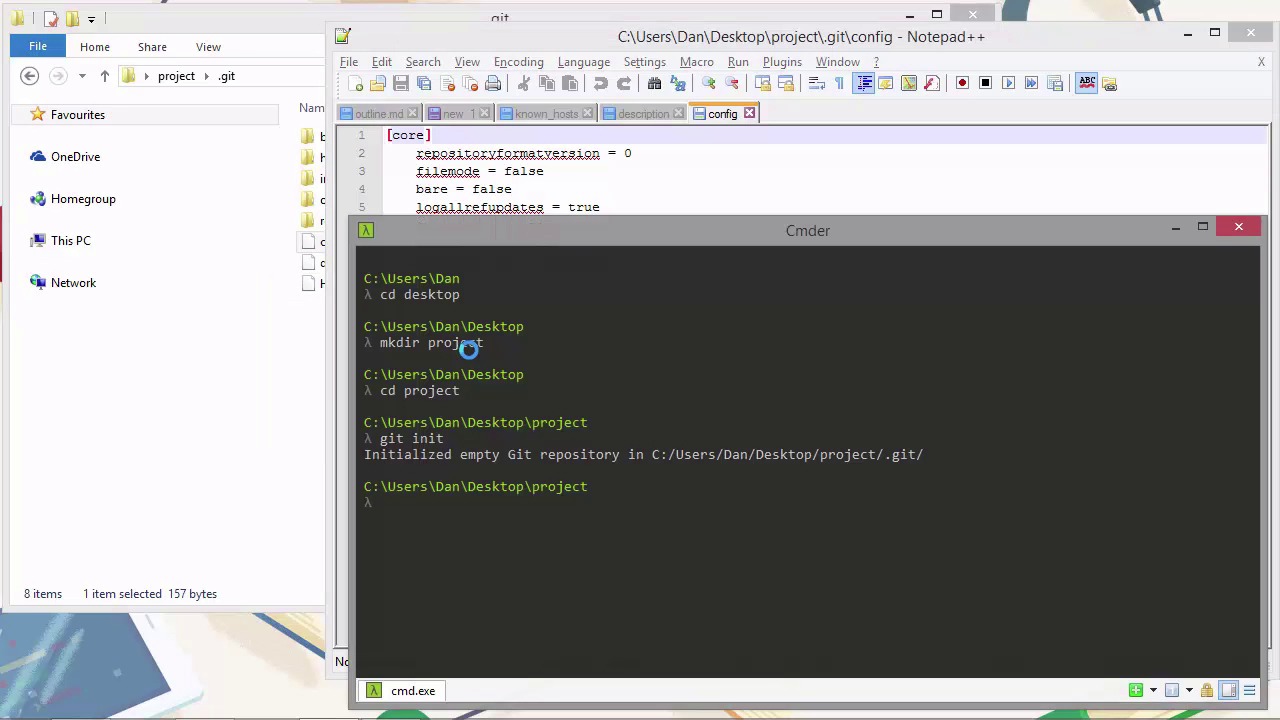
- Overview
- Transcript
2.1 Initializing a Repository
One of the first things we'll want to do with Git is create a repository for a project that we want to work on. In this lesson we'll see how to complete this fundamental task, as well as learning a little about what a repository actually is.
1.Introduction
1.1Introduction02:59
1.2Installing and Configuring Git08:00
1.3Git Concepts05:40
2.Git Basics
2.1Initializing a Repository07:05
2.2The Staging Area and Status Command05:12
2.3Making Commits10:34
2.4Ignoring Files08:06
2.5Viewing the Log09:46
3.Branching and Tagging
3.1Creating Branches08:02
3.2Fetching and Pulling09:20
3.3Diffing Files05:13
3.4Merging Branches07:03
3.5Tags06:38
4.GitHub and Remotes
4.1Setting Up GitHub10:42
4.2Working With Remotes10:12
4.3Creating GitHub Pages11:57
4.4Contributing and Contributors06:43
5.Intermediate Usage
5.1Stashing Changes10:45
5.2Cleaning Up Merge Conflicts03:46
5.3Rebase07:33
6.Conclusion
6.1Conclusion01:16
2.1 Initializing a Repository
Hi folks, in this lesson we're going to set up our first repository. As we saw in the Git Concepts lesson, a repository is a container for a project. Before we can start track the changes in our files, we need to set up a repository. So let's do that now. So we can open up Commander, or whatever terminal is available on the platform that you're using. And cd into wherever we want our repository to be. I'm just gonna put mine on my desktop here. [BLANK_AUDIO] And let's just create a new directory, which we can just call project. So now a new directory should appear on the desktop here. Let's just open this up in a window. So I'm just gonna put that there, and bring this down here a bit. And now let's cd into the directory that we just created. So to initialize an empty repository, we use the git init command. And we should see a message that says initialized empty git repository and it tells us the path to the .git folder. And in the Explorer window behind the console here, you should be able to see that there is a hidden .git folder. So I've got my Explorer set up to show hidden files. You might need to do something similar before you can see the git folder there. So this is our repository. And if we open this up, we should find that there are various subdirectories. Let's just have a quick look. So we have subdirectories for branches, hooks, info, objects, and refs. And we have a couple of files, there's a config file there, there's a description file, and there's a file called HEAD. So let's just open one of these files up and take a look. We could use a text editor or VIM from the console. I'm just gonna use a text editor. [BLANK_AUDIO] And in the description file, we can see that it's an unnamed repository and that we can edit this file to name the repository. Great, so let's do that. So we'll just call the repository project, and we can save the file and close it now. We don't have to worry about that file anymore. We won't actually need to use this, but the file can be used by scripts or GUIs to get the name of the repository. So what I wanted to show you though is that the file can be edited in a simple text editor. It's just a text file, and most of the files Git uses can be opened up in a text editor. But the object such as blobs and trees, we can open them up in a text editor but they won't make much sense because of the format that Git saves them in. But that's fine. So, another interesting file in here is the config file. As you can probably guess, this is the local configuration, just for this repository. So, let's open this up, next. And it looks quite similar to the file that we looked at in Vim, earlier in the course. There is a core section, and it just has some default settings. So the way the configuration in Git works is that global options override system options and local options override global options. So if we wanted to set a different username and email just for this repository we could run something like this. [BLANK_AUDIO] And if we come back to the config file now, then we can see that there's a new section called user and that the name has been set to Fred. So, I'm gonna take that away now because I'm not called Fred, I'm called Dan and I already have my name set. Because this config file is just a simple text file at hearts, we can just edit this in the text editor here, if we wish. And I'm just gonna delete that section and save the file. So the git init command can take a number of different options. For example, if we cd the backup to the desktop briefly. [BLANK_AUDIO] Then we can pass a string to the init command and git will use that string as the folder that contains our repository. [BLANK_AUDIO] And now if I look on the desktop we can see that we now have project2 folder and git created that for us. So each time we initialize a repository we get this message to say that the empty git repository has been initialized and it tells us the path. If we want to suppress this output, then we can pass the -q flag and q is just short for quiet. And we can use that flag with many other commands to suppress output and various other commands that we might run in the future. So, let's just see that one in action. And it looks like I've passed the flag before the command, which is the wrong thing to do, let me just run that again. And this time, as you can see on the desktop in the background there, we now have a project 3 folder. But we didn't get the message to say that the repository has been initialized. So, once we've added files or changes in files to the staging area, the git directory will also contain a file called index. This is the staging area that we talked about in the git concepts lesson. And this contains all of the changes that we have marked as ready to be committed. A slightly more advanced way to initialize a repository is with the bare option which initializes a bare repository. The repositories that we've created so far all contain working directories. So, we can add files, forget to track, we can edit them and make comments there. A bare repository is intended not to be a working directory. But rather a copy of the repository that multiple developers working on the same code can all push to or pull from. When we create a repository Apple GitHub it's a bare directory that we will push to and which other people can pull from. But we won't ever actually cd into GitHub and edit files manually in the working directory. Because there is no working directory. That's not how GitHub is designed to be used. I just want to mention also that we don't have to start out with an empty directory when we initialize a repository. We can cd into a folder that already contains files and folders and initialize a repository in exactly the same way. The command doesn't empty the folder or override and existing files, or anything like that. So we can go ahead and remove all of the new directories now except for the initial project one. In the lesson we looked at some of the different ways that we can initialize a repository. And saw a couple of the different options we can use with the get init command. Thanks for watching.


