
 Lessons: 21Length: 2.6 hours
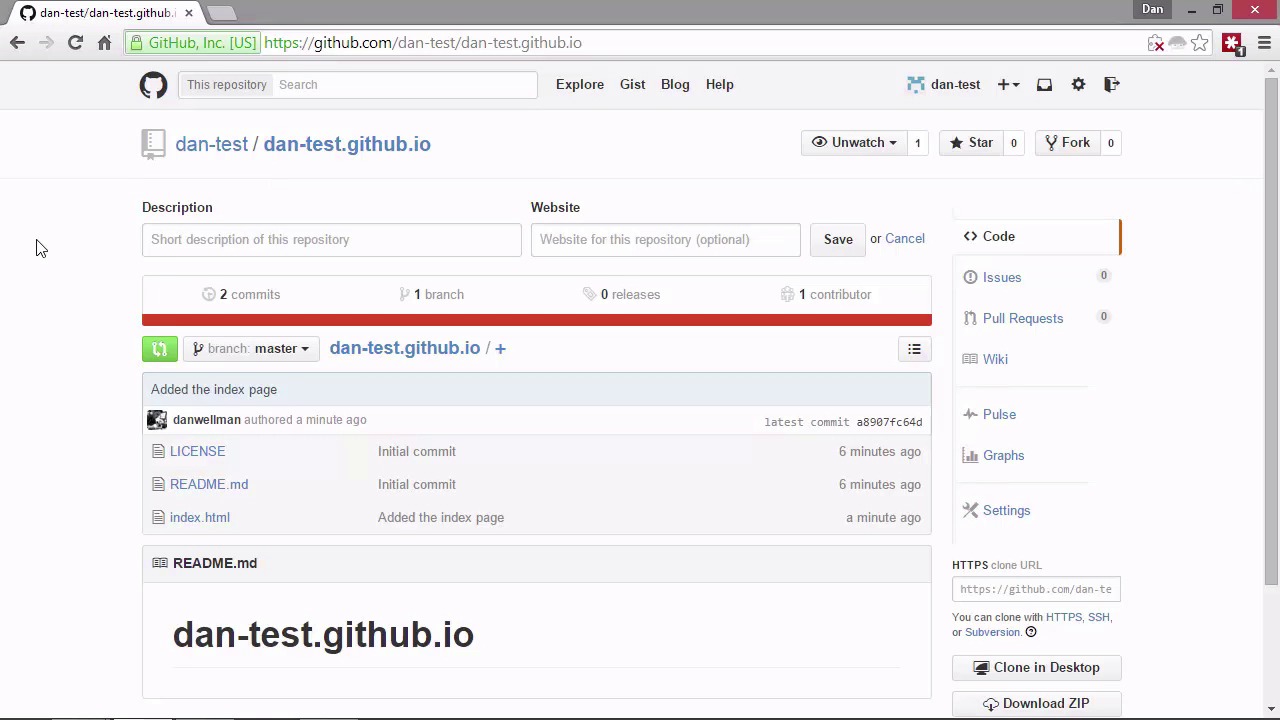
- Overview
- Transcript
4.3 Creating GitHub Pages
GitHub allows us to create a static website for ourselves, as well as individual websites for all of our repositories. Let’s find out how we can do that in this lesson.
Related Links
1.Introduction
1.1Introduction02:59
1.2Installing and Configuring Git08:00
1.3Git Concepts05:40
2.Git Basics
2.1Initializing a Repository07:05
2.2The Staging Area and Status Command05:12
2.3Making Commits10:34
2.4Ignoring Files08:06
2.5Viewing the Log09:46
3.Branching and Tagging
3.1Creating Branches08:02
3.2Fetching and Pulling09:20
3.3Diffing Files05:13
3.4Merging Branches07:03
3.5Tags06:38
4.GitHub and Remotes
4.1Setting Up GitHub10:42
4.2Working With Remotes10:12
4.3Creating GitHub Pages11:57
4.4Contributing and Contributors06:43
5.Intermediate Usage
5.1Stashing Changes10:45
5.2Cleaning Up Merge Conflicts03:46
5.3Rebase07:33
6.Conclusion
6.1Conclusion01:16
4.3 Creating GitHub Pages
Hi folks. In this lesson, we're gonna look at how we can create Github pages. There are two types of Github pages. We can have a page for ourselves, like if we're a company, producing open source software. We can have a static site that talks about our products and the company etc. And we can also create a static site for our repositories. If the repository is a library or framework, this could be for the documentation, the contributors, and that kinda thing. So let's see how we can create these different types of pages, starting with the user or organization page. All we need to do is set up a new repository which has a specific name and the name should a username followed by .github.io. So let's go back to GitHub and do this now, we'll do it through the GitHub website. [BLANK_AUDIO] So remember the repository has to have a very specific name and that is our username followed by .github.io and we can leave a description if we want. And this time we will initialize the repository with a readme and we can also add a license, let's just. Let's just go with. [BLANK_AUDIO] Let's just go with MIT. So we'll create the repository now and what we need to do now is just clone this repository to our computer using the clone command. So this si the equivalent of using git init in that we end up with a copy of the repository and a working directory on our local machine. We're just not initializing it ourselves directly because Github has already done that. So we want to cd up out of our main project repository to do this and now let's run the clone command. [BLANK_AUDIO] So we should get some feedback to say that it is cloning into a repository and it tells us how many objects there are in the remote. And it brings the files down for us it compresses them. And it unpacks them and it should complete successfully and as you can see in this case it has done. So if I go to my desktop now, I find that I've got a new repository there and there should be a copy of the repository that is up on gethub. So let's go into the folder now and we can see that it has the license that we added. It has the heading.git folder and it also has the readme markdown file that GitHub added for us. Great, so now we can just add an index.html file here. Just go back to the command line and do that in VIM. [BLANK_AUDIO] Okay, so let's just save and close VIM now. So I just want to point out that if we add an HTML file that has unclosed tags in it or tags that don't match or there's some kind of other syntax error. Or formatting error then Git won't create this static website for us. It has to be valid HTML and it doesn't have to just be an index page we could add an entire static site if we wanted to. In this case, I'm just adding a simple index.html page and there's one other point to note as well. And that is that your email, your email address must have been verified. So when we create our account and add the email address, GitHub will automatically send a verification email. So I've just gone into my email account now and clicked on the link and verification email and just verified my email address. So you'll need to make sure that you've done the same thing before trying to do the example in this lesson. But once that's done we can create the static site very easily. So we've created the index page now, so let's just add and commit this. [BLANK_AUDIO] And now we can push that back up to GitHub. [BLANK_AUDIO] So just to remind you, when we use the push command we can add the -u flag to tell Git that we want to track this remote branch. And then we specify the name of the remote which in this case is origin and the name of the remote branch which in this case is master. And because I didn't set up my SSH stuff properly because I've already got some SSH stuff set up for a different account. It's gonna now ask me for my username and password and I am gonna have to do this every time I want to push code to this repository which gets very annoying very quickly. So you shouldn't have to do this step because you should have already verified the authenticity of your computer using your SSH keys which we did in the last lesson. But for me I just need to enter my username and the password. [BLANK_AUDIO] Okay, so once the push has happened we can go back to GitHub now and just verify that and let's just refresh the page. And we can see that's an index.html file was added one minute ago. So it takes a little while for GitHub to build our site as this is just a single HTML file, it should build pretty quickly but we'll need to give it a few minutes. When we want to visit our static website, so this is our user site, remember or it could be an organization site. But in this case I'm just a regular user I'm not an organization. And so the site that I've created is a user site as opposed to an organization site. But when we want to actually visit that site the URL that we want to go to is the same as the URL for the repository. So let's just take a look and see if git has built that yet. [BLANK_AUDIO] As you can see, it has. It only takes a minute or so and we can see the heading that I added, Dan's test and this a brilliant way that we can host a simple static website. We don't have to set up any hosting, we don't have to have a hosting provider. We don't need to do any tricky FTP stuff, we can do it all through Git and GitHub and that's a brilliant thing. So creating a project site is just as easy. So this time we need to create a new branch in the repository that the repository site is for. So let's just go back to our main page and let's now get back into our project repository. And we want to create a new branch, so we can do that with this branch button just above the list of files here. And we're gonna create a new branch and this branch must have a very specific name again. So very much like the repository that we created for our static site had to have our username flow by .github.io. When we create this branch for our project site we need to use a specific branch name and that name is gh hyphen pages. [BLANK_AUDIO] So now we have the gh-pages branch and what we need to do now is pull this branch from the remains. So now let's cd back into our project repository and now we need to pull our new branch. So we specify the name of the origin after the pool command and the name of the branch which in this case is gh hyphen pages. So it's port the branch now, we're still in our master branch so let's check out our new branch. And now we can just add a simple HTML file here as well. And rather than doing that through VIM, I'm just going to copy and paste the file that we just created earlier. [BLANK_AUDIO] And I'm just gonna open that up and just make a minor change. [BLANK_AUDIO] So we've made a couple of changes there, I'll save that file. Let's just close all these windows down. So back in the command line let's just run get status. So it tells us that there's an untracked file, actually let's just reopen the folder again. So we're in a different branch now, we don't need any of these other files so I'm just gonna delete all of these. So don't forget we're in a different branch now, so those files haven't really been deleted forever from our repository. As soon as we switch branches again we should get those back and I'll just run Git status again. And this time it tells us there's some files that have been deleted and a new file that's been added. So let's just git add everything and let's commit that as well. [BLANK_AUDIO] And now let's just push that back to the remote. [BLANK_AUDIO] So we get a message that, that just tells us about some upcoming changes in the next version of Git that we will probably want to get used to. I'm not going to worry about those for now but as you can see again, it's asking for my username. Let's just put this in again, this is starting to get laborious now. And it wants the password again, I'm just going to add that. So don't forget that should be much easier for you because you shouldn't have to do any of that username and password stuff. And I just want to check the log because it looks like nothing was added. Okay, it's looking good. [BLANK_AUDIO] So we've done the push now. Let's just go back to GitHub and just make sure that our new file is in the gh pages branch. [BLANK_AUDIO] So it looks like it hasn't pushed the removal of the old files. I think that's probably going to be fine that shouldn't affect things. So we'll give it a couple minutes again and this time we need to visit a different URL in order to see this static site. So lets get that ready. So this time we want to go to HTTP, so project sites are always in the HTTP version they're never HTTPS. [BLANK_AUDIO] So we do our username followed by .gethub.io but then we specify the name of the repository as well. And as you can see, in the time that it's taken for me to type that URL it's already built my very simple index page. And the heading this time is Dan's project repository. And that was just as quick and easy as creating the user site was as well. So in this lesson, we saw how to build two different types of static website that GitHub will host for us. So that we can describe ourselves or our company, or our documentation for our project. As we saw, the process is really quick and easy and although we did everything manually today GitHub does have generators that can build these pages for us. And apply cool themes to save us on a bunch of styling and design work. So let's just take a look at these quickly before we wrap up for today. To get to these generators, we just need to go to pages.github.com. [BLANK_AUDIO] And there's lots of information about the different types of pages that we can create. So I'd recommend that you have a good look through this in your own time. Thanks for watching.


