
 Lessons: 21Length: 2.6 hours
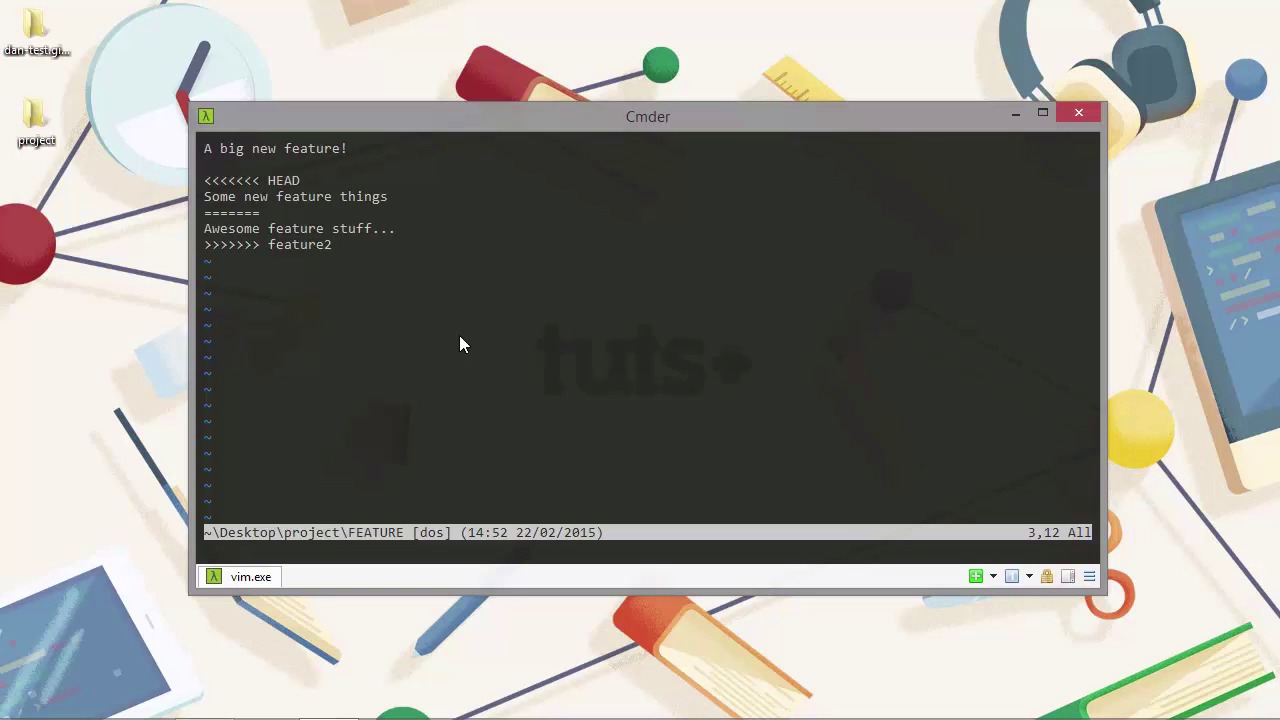
- Overview
- Transcript
5.2 Cleaning Up Merge Conflicts
Quite often we'll have a situation where changes have been made to the same files on more than one branch. When we try to merge the branches together, we'll get a conflict. In this lesson we'll see how to recover from this common scenario.
1.Introduction
1.1Introduction02:59
1.2Installing and Configuring Git08:00
1.3Git Concepts05:40
2.Git Basics
2.1Initializing a Repository07:05
2.2The Staging Area and Status Command05:12
2.3Making Commits10:34
2.4Ignoring Files08:06
2.5Viewing the Log09:46
3.Branching and Tagging
3.1Creating Branches08:02
3.2Fetching and Pulling09:20
3.3Diffing Files05:13
3.4Merging Branches07:03
3.5Tags06:38
4.GitHub and Remotes
4.1Setting Up GitHub10:42
4.2Working With Remotes10:12
4.3Creating GitHub Pages11:57
4.4Contributing and Contributors06:43
5.Intermediate Usage
5.1Stashing Changes10:45
5.2Cleaning Up Merge Conflicts03:46
5.3Rebase07:33
6.Conclusion
6.1Conclusion01:16
5.2 Cleaning Up Merge Conflicts
Hi folks. In this lesson we're gonna see how we can clean up merge conflicts. Merge conflicts are caused when we have changes to the same file in multiple branches and when we try to merge these branches, Git doesn't know which content we want to keep. So in the last lesson we made a change to the feature file in a branch called Feature 2. Let's just make sure this change is committed. [BLANK_AUDIO] And now let's switch back to the master branch. So now let's update the exact same file but give it some different content. [BLANK_AUDIO] And let's just add and commit that. [BLANK_AUDIO] Great. So now that we've got committed changes in both of our branches let's just try to merge them back together and see what happens. So it tried to also merge the feature but it says there was a conflict, and it tells us which file was conflicted, and it says that the automatic merge failed. And we need to fix the conflicts and then commit the result. Great. So where are these conflicts? Well, let's open a feature file in Vim and take a look. Wow. So we've got some new things in here. We've got a bunch of left-angle brackets and head at the top, and then a line of content, followed by a separator in the form of a bunch of equal signs. Followed by another line of content which is followed by a bunch of right angle brackets and the name feature2. So Git has added these special characters for us. The left angle bracket means this branch and the branch name. It doesn't say master, it says HEAD, which if you remember points to the last commit. Then we have the content that we added in this branch. The right angle brackets down below mean the content from the other branch. And as we know this branch is called feature2. So what we have to do now is remove everything that we don't want to keep and then commit the file again. So let's keep the stuff that we added in the master branch which is what our head is pointing to. [BLANK_AUDIO] And let's just save and quit then. So now we have some changes again. We need to commit and add those. [BLANK_AUDIO] And we should now be done. So what we have to do is remove everything we don't want to keep and then commit the file again. So now let's run Git log. And we can see that we've got a couple of different commit messages here. It keeps both the commits from before the conflict but then the most recent commit is the, is after the conflict where we fixed the file and we kept the content that we wanted to keep. if we did pick the wrong content, then because we have both of the previous commits, we can easily get back to either piece of content and we can take that instead. Although we did everything manually in this lesson, there are actually GUI based merge tools that we can use to show us the changes in maybe a nicer way and we can click on the lines that we want to keep without having to edit files manually. So there's one called winmerge on Windows and the Tortoise client has a merge resolution tool built in as well. And we can even configure git so that it uses one of these tools automatically whenever we get a merge conflict. So in this lesson we saw how to resolve the fairly common scenario of a merge conflict which happens when the same file is updated in multiple branches. And don't forget this situation can arise from the pulling changes from an upstream branch as well. Thanks for watching.


