
 Lessons: 21Length: 2.6 hours
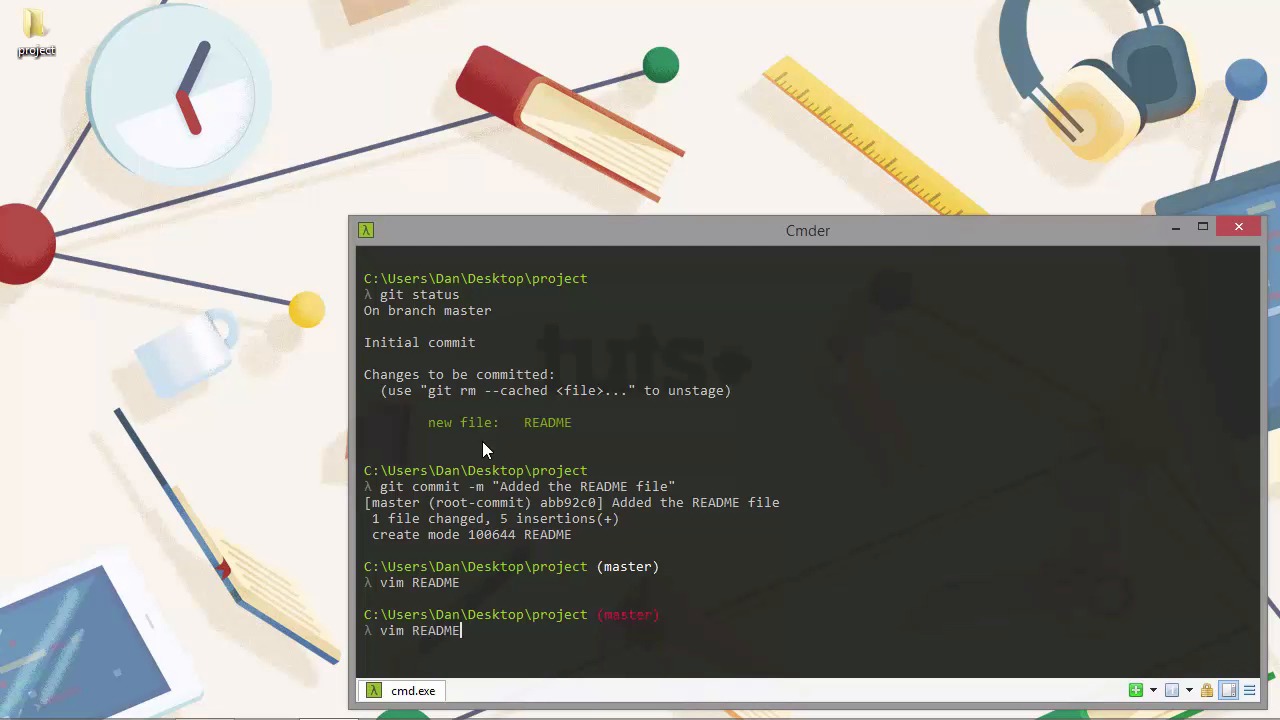
- Overview
- Transcript
2.3 Making Commits
Another fundamental aspect of Git is making commits. When changes in files are committed, those changes are stored permanently in our repository, so git commit is a command that we'll be using very often. Let's see what it entails.
1.Introduction
1.1Introduction02:59
1.2Installing and Configuring Git08:00
1.3Git Concepts05:40
2.Git Basics
2.1Initializing a Repository07:05
2.2The Staging Area and Status Command05:12
2.3Making Commits10:34
2.4Ignoring Files08:06
2.5Viewing the Log09:46
3.Branching and Tagging
3.1Creating Branches08:02
3.2Fetching and Pulling09:20
3.3Diffing Files05:13
3.4Merging Branches07:03
3.5Tags06:38
4.GitHub and Remotes
4.1Setting Up GitHub10:42
4.2Working With Remotes10:12
4.3Creating GitHub Pages11:57
4.4Contributing and Contributors06:43
5.Intermediate Usage
5.1Stashing Changes10:45
5.2Cleaning Up Merge Conflicts03:46
5.3Rebase07:33
6.Conclusion
6.1Conclusion01:16
2.3 Making Commits
Hi folks. In this lesson, we're gonna see how we can actually commit changes to the repository so that those changes are made permanent. The command is the Git commit command, and unlike the few basic commands that we've looked at so far, this command must be used with at least some options. There are quite a number of different flags and options that we can set against this command, but only one is really required. So let's take a look. In the last lesson, we added a file to the staging area, or the index, as it's also known. Now that the index has been updated, we can commit everything that has been staged. All we need to do is give the command a message to use for the commit. So let's just open up Cmdr, and we can take a look. Let's just run the git status command to remind ourselves what we're about to commit. We can see that there is a new file called README. Great. So now let's run the commit command. We need to use the -m flag. And that is to give a message that Git will associate with this commit. So let's just add a basic message to say what the commit contains. [BLANK_AUDIO] And if we press Enter now, then we can see that we do get some output from that. It tells us that we are on the master branch and it was the root-commit. And we see the short version of the hash there. And we see our commit message, Added the README file. We can see that there was one file changed and that file had five insertions. And we can see that Git used create mode, and it gives us the number 100644, and then the file name, README. So we don't need to worry too much about what this code 100644 means. But just in case you're curious, that is the code for a file that is non-executable, so just a regular file like a text file. And that's exactly what the README file is. And as you can see, the command prompt has changed slightly now. Now that we've made a commit, we can see that the name of the branch that we're on is shown in brackets after the path that the console is currently running in. So this is a really handy feature of Cmdr. And it's part of Cmdr's Git integration. There are more integration features as well, but this is one that we see everyday. And it's just a really quick visual reminder of which branch we're on. And even this changes as well, as you'll see shortly. So, when we ran the commit command, we used the -m flag, and that stands for message. And that allows us to add a message that Git will associate with the commit. And that is a mandatory requirement. We have to supply a message if we want to do a commit. So things like the date and our name and email address are also associated with each commit. And Git will generate a unique hash for the commit that can be used to identify this exact commit. So we can see part of this hash in the first line of the output that we got after running this command. The abb92c0, that's the first seven letters of the SHA-1 hash for this commit. So let's just come back to these insertions. What are those insertions? When Git sees a change in a file, it doesn't see a character by character change. It sees a line-by-line change. And we added a title, which was Project. Actually, let's just open this file again in Vim. And if we just remember that there are five insertions, when we open Vim, we can see exactly what those insertions are. So it looks like we've only added three lines, but if you count the two empty lines, then that brings the total up to five. So five lines have been added, and that's how Git tracks those changes. Let's just come back out of Vim. So now the Git integration feature where it shows the branch in brackets, I said there was slightly more to that feature than we first saw. As you can see, now that we've opened the README file, it has changed some of the metadata. And now Git thinks that the file itself has changed, and so it's showing the name of the branch in red. And that just means there are changes, and those changes are yet to be added or committed. So every time we have a non-clean working directory, Cmdr will show the name of the branch in red. And again, it's just a really useful feature that we'll come to kind of rely on when we use Git on a day-to-day basis. Another flag that we can use with the commit command is the add flag, which we can use to add or change or deleted files to the staging area automatically before we make the commit. So this is useful if we just want to commit everything, and it means we can combine the add and commit into a single step. So if we try to add the change generated when we opened and closed the README file, Git won't actually add it because the content of the file itself hasn't actually changed. So let's just go back into the README file again and just make an actual change. And all I'm gonna do is add a full stop after the date here. So now let's run the add and commit in a single step command. So again, this is really, really useful, and we'll probably use this very, very often. If we're working in a different branch and all of the files that we're changing are all related to the same thing, then we can just add and commit everything at once. [BLANK_AUDIO] So this time, we used both the a and m flags, and we combined them with a single dash. And again, we need to specify a message to be used with this commit, and we're just gonna say that we updated the README. And then we get some output again. We can see the branch that we're on, the short hash for this commit, and the commit message. And we can see that one file was changed and it had one insertion and one deletion. So let's just cover what this means. We didn't actually delete anything, so what's going on? Well, remember how I said that Git sees changes on a line-by-line basis. When we change a line that already exists, what Git will do is completely delete that line, and then it will re-add the line with the changes in. So from Git's point of view, one line was deleted and one line was added. From our point of view, we just edited a single line. Another useful thing that we can do is amend previous commits. So let's say that we've already committed, just like we have, actually, and we realize that we forgot something. So let's say we should have added a full stop after the, the middle line of content in the file as well. Whoops. So let's just reopen the file once again. [BLANK_AUDIO] And let's add that missing dot after the middle line of content there. [BLANK_AUDIO] So we have changes again. Actually, we don't want to make a new commit just for this change. It's a bit pointless. It's awful really. We, we should have remembered to add that full stop when we added the previous full stop. And we don't want to make our Git history really messy and have lots of commit messages like whoops, added a full stop, oh dear, added another full stop, and that kind of thing. It just makes the history look untidy. So that's fine. That's no problem. Let's just amend our previous commit so that it includes this change also. [BLANK_AUDIO] So we use the a flag once again to say that we want to make an addition as part of this commit. And then we use the --amend flag. And what that's done now is open up Vim for us. And it's shown us the message that we added for the previous commits, the commit that we are actually amending. And it gives us the opportunity to update or change that commit message if we want to. Now, I'm not gonna actually do that. I'm just gonna quit straight out of Vim, and so Git will use this message for this commit. And now let's run another really useful command. That's the log command, and that will actually show us a list of all of our commits. So this shows us that we've made two commits in this project. We added the README first of all, and then we updated the README. Now we know that we've actually made three commits. But because we use the Git amend command, Git has condensed the previous two commits down into one. So now, in our history, we just have two commits. And as you can see, when we run the log command, we get a bit more information. We can see the full 40-character SHA-1 hash, and we can see the name of the person that made the commit. In this case, it was me, Dan. And we can see the date that the commit was added, and also the message that was used with that commit. So don't worry too much about the log. We'll cover this in much more detail later in the course. And now, if we run git status again, we can see that we're on the master branch and that there is nothing to commit, which means our working directory is clean. So, one very important point to note is that a single commit should represent a single change to the project. Commits should be atomic. This might be the fix for a single bug, or it may be the smallest working component in a new feature. But it shouldn't be a bunch of different, unrelated things. For the history of the project to be useful, it should represent a series of ordered changes, where any single change can be identified. So, our commit messages should always be something like fixed bug x, or refactored auth module, but never things like fixed some stuff, or fixed a bunch of things and added some new features and also fixed some bugs and moved some file system stuff around a bit. So in this lesson, we made our first couple of commits and saw the command and the flags that we need to set with this command. We saw that we have to supply a message with the -m flag unless we're amending a previous commit, in which case we can use the --amend flag. And we can choose what message we'd like this combined commit to have. There are many other flags that we can use with the commit command, but in your normal day-to-day usage of Git, this is probably what you would use most of all. Thanks for watching.


