
 Lessons: 21Length: 2.6 hours
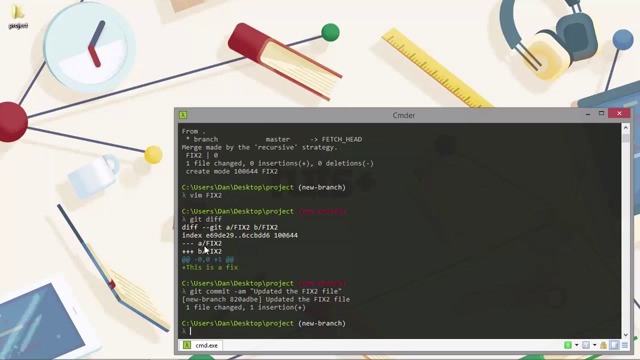

- Overview
- Transcript
3.3 Diffing Files
Once we start to use branches, we'll often want to see what the changes are between files in different branches. In this lesson we'll see how to use the git diff utility for this purpose.
1.Introduction
1.1Introduction02:59
1.2Installing and Configuring Git08:00
1.3Git Concepts05:40
2.Git Basics
2.1Initializing a Repository07:05
2.2The Staging Area and Status Command05:12
2.3Making Commits10:34
2.4Ignoring Files08:06
2.5Viewing the Log09:46
3.Branching and Tagging
3.1Creating Branches08:02
3.2Fetching and Pulling09:20
3.3Diffing Files05:13
3.4Merging Branches07:03
3.5Tags06:38
4.GitHub and Remotes
4.1Setting Up GitHub10:42
4.2Working With Remotes10:12
4.3Creating GitHub Pages11:57
4.4Contributing and Contributors06:43
5.Intermediate Usage
5.1Stashing Changes10:45
5.2Cleaning Up Merge Conflicts03:46
5.3Rebase07:33
6.Conclusion
6.1Conclusion01:16
3.3 Diffing Files
Hi, folks. In this lesson, we're gonna learn about Diffing Files we get. You may already be familiar with the term diffing, especially if you've used other source control management tools in the past. But for those of you that haven't come across the term before, it means to compare files and view the changes between them. There are stand alone tools not involved with source control that can be used to see the differences between files and we can even configure Git to use a third party tool if we prefer, but we wont be doing that today. So lets see what Git can do with its default differ. So, if you remember near the end of the last lesson, we did a fetch and ended up with a FETCH_HEAD file in our repository. And as I mentioned, we can use this file to see what the changes we fetched actually are. Let's do that now. We can just tell the diff utility to look at the FETCH_HEAD file. [BLANK_AUDIO] So we do get some output here. We can see that we have a new file in one branch compared to what was fetched, which is the feature that we added in this branch. And below this, we can see that in this branch, we have a deleted file that the other branch has and that's the FIX2 file. It's not that interesting, because the files themselves have no content and Git is interested in content not files. Okay. Well, let's actually merge the changes from FETCH_HEAD into our branch. We could use the merge command, but we haven't covered merging yet and I don't want to subtract anything from that lesson. So let's just do a pull, which as we know will merge the changes in automatically. Great. So now we have the FIX2 file in both branches. Let's just edit the file in both places and then we'll really get to see the interesting output that diff can offer. So let's open up with vim and add some text in it. [BLANK_AUDIO] And now let's run the git diff again. But first of all, let's not specify any flags or other arguments at all. So this diff is for the changes to the FIX2 file in this branch only when comparing revisions of the same file in the same branch. And we can see that align of text has been added and that's the text shown in green with the plus sign. Technically, we're diffing the head with the working directory. Okay. So that's pretty useful. Let's add the change and commit it to the repository [BLANK_AUDIO] So now can we diff this file across branches? Yes, we can and we do it like this. [BLANK_AUDIO] All we need to do is specify the names of the branches that we want to compare, so we can see that the text from the file in the new-branch is seen as an addition. Whereas, if we were to switch to the master branch and run the same command again, then it would show us that that line of text is a deletion, because the line of text isn't in the file that's in the master branch. And as you can see, when we ran the git diff command above, we specified master first and then new-branch. We could reverse those if we wanted and it would show us slightly different outputs. And like you just mentioned, that, that shows that the line of text has been removed. Because in the master branch, that line of text doesn't exist. So, as well as separating the two branches to compare with a space, that's the same as using two dots and we can also use three dots between the branch names if we want. [BLANK_AUDIO] And in this case, we don't see what has been removed from the other branch, only what has been added to the master branch. So, as well as diffing files, which if you remember, git stores as blobs and branches, we can also diff trees or even entire commits or anything else that has a hash associated with it. Diff is powerful. It has a lot of different flags and options that can be done with it. Let's just take a look at a few of these before we wrap up for today. So maybe instead of seeing all the changes in the files when diffing these branches, we just want to see the names of the files that've changed. We can do these with the dash dash name hyphen only flag. [BLANK_AUDIO] And this time, it just tells us the name of the files that are different. The dash dash stat flag is similar, but it gives us a little bit more information. [BLANK_AUDIO] And this time, it gives us a little report of actually what has changed in those files. And at the end, it gives us a summary, which says that two files have changed and that there was one insertion. So this is very similar output to when we used the stat flag with the log command. So, in this lesson, we took a look at Git's built-in differ, which we can access using the diff command. We saw that we can compare changes between files in the same branch or changes between branches. And also, learned that we can pretty much diff anything that has a hash. Thanks for watching.


