
 Lessons: 21Length: 2.6 hours
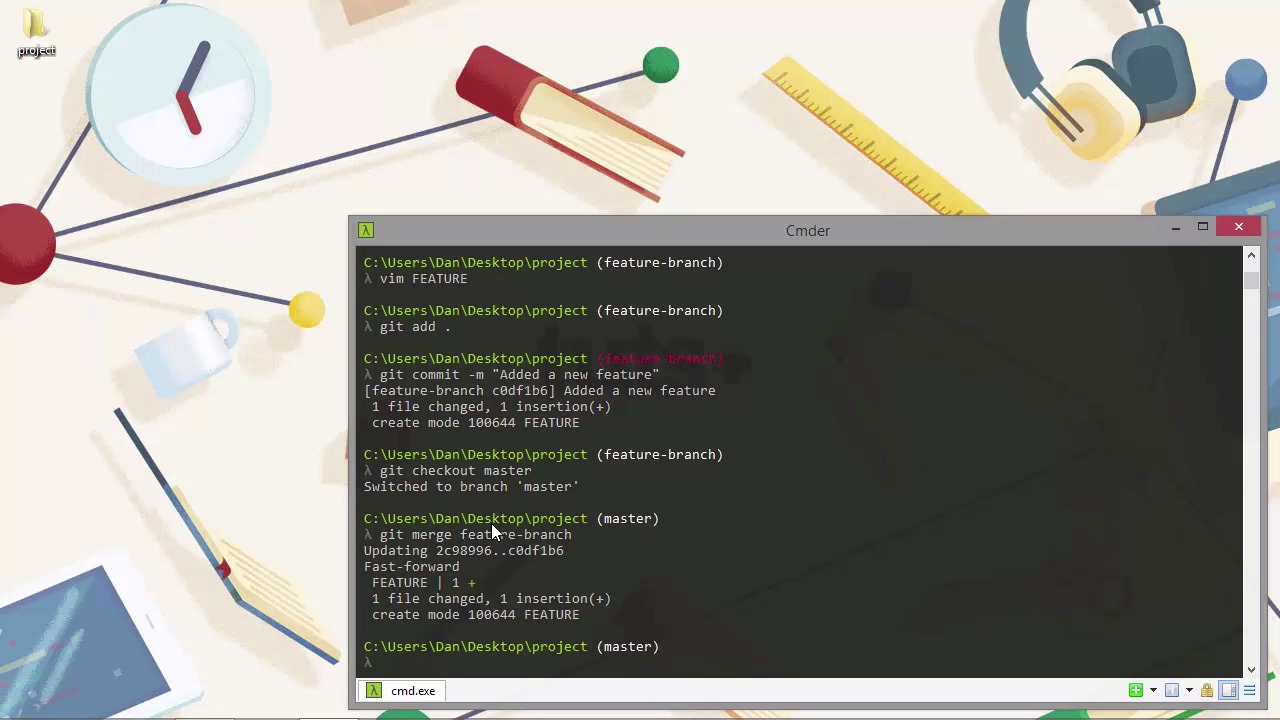
- Overview
- Transcript
3.4 Merging Branches
After we've developed a feature or fixed a bug in the branch we're working on, we'll want to merge the code in the branch back into the master branch, and probably delete the working branch afterwards. In this lesson we see how to do this with the git merge command.
1.Introduction
1.1Introduction02:59
1.2Installing and Configuring Git08:00
1.3Git Concepts05:40
2.Git Basics
2.1Initializing a Repository07:05
2.2The Staging Area and Status Command05:12
2.3Making Commits10:34
2.4Ignoring Files08:06
2.5Viewing the Log09:46
3.Branching and Tagging
3.1Creating Branches08:02
3.2Fetching and Pulling09:20
3.3Diffing Files05:13
3.4Merging Branches07:03
3.5Tags06:38
4.GitHub and Remotes
4.1Setting Up GitHub10:42
4.2Working With Remotes10:12
4.3Creating GitHub Pages11:57
4.4Contributing and Contributors06:43
5.Intermediate Usage
5.1Stashing Changes10:45
5.2Cleaning Up Merge Conflicts03:46
5.3Rebase07:33
6.Conclusion
6.1Conclusion01:16
3.4 Merging Branches
Hi folks. In this lesson, we're gonna finally focus on merging. We had a bit of a preview of merging when we looked at the pull command earlier in the course. But let's dive a bit deeper this time, and look at merging by itself. As you can probably guess, merging means to take some content from one branch and merge that changed content into a different branch. At the moment, we have two branches, our master branch and the new branch. In order to show the diff command in the last lesson, we changed the same file in different ways in each branch. If we try to merge these branches now, we'll get a merge conflict, because Git won't know which version of the file, or which version of the contents of this file we actually want to keep. I don't wanna get into this right now. We'll be looking at resolving merge conflicts later in the course. So let's just delete the new branch and create a different branch that we can then merge back into master. [BLANK_AUDIO] Okay, so I used the lowercase d flag which as we learned earlier in the course means delete. And I wanted to use that so that you could see what happens when you try to delete a branch that you're currently on. And in this case, it's gives us an error message to say that we can't delete the branch that we're currently on. So, that's fine. So, let's check out the master branch now. And let's try running that command again. And we still get an error message. And the reason why we get an error message is because the other branch contains changes that are not fully merged. So, again, I wanted to trigger that message on paraphrase so that you could see what happens in this situation. And as usual, Git gives us a little bit of a tip as to what we might wanna do. And, in this case, we want to use the uppercase d to force delete the new branch. So let's do that. And this time, the branch was deleted and we see what's the short version of the hash it had was. Okay, great. So let's add a new branch and we can add a new file with some content in it there. [BLANK_AUDIO] Great, so once again, we have a new branch with some content in it and a commit. So the feature is complete, it's ready to be merged back into master to become part of the stable branch. So, we'll need to switch back to the master branch first of all. And now we can merge the changes from the feature-branch into the master branch, and we do that using the merge command. [BLANK_AUDIO] So what we do is specify the name of the branch that we want to merge into the current branch. When we merge, we're always merging into whichever branch we're currently on. So we don't need to tell Git which branch we're on. Git knows this already, we just need to supply the name of the branch that we want to merge into our current branch. So we should see some output in the console here, and we can see that one file with one new line of content was added. And there's also a line in the output that says fast-forward. What does this mean? All this means, that the, because the branch being merged is directly upstream of the current branch, Git only needs to update the head to point to this new commit. When we say that it changes upstream, we just mean that it contains all of the changes from the current branch, plus whatever new changes are in the new commits. And it doesn't have to be just one commit upstream. It could be ten commits that were made in a new branch. But because no commits have been made in the branch that we're merging into, Git can just update its head pointer to point towards the commit that contains the new content. The important thing is that the master branch now contains the new feature. And if we run the git log command with the dash, dash graph flag, the history should look completely linear. [BLANK_AUDIO] And as you can see, it does. So now we can safely remove the feature-branch [BLANK_AUDIO] And this time, Git doesn't give us any errors about the branch not being merged because we have merged it. So a fast-forward merge is the simplest type of merge, but if we have new commits in both of the branches we're merging, a more complex merge may be required. Let's take a quick look. So let's create another new branch and we can just call this one test-branch and we'll just add a file with some content in it and get that added and committed. [BLANK_AUDIO] And now let's switch back to our master branch and add a new commit there as well. [BLANK_AUDIO] Great. So now we have new commits in both of our branches, the branches have diverged, and now neither branch is directly upstream from the other. Can we still merge? You bet we can. And for us, it's easy. It's Git that has to work a little bit harder. So let's run the merge command once again. The output is similar. But this time, Git reports that the merge was made using the recursive strategy. What this means is that Git had to go back through the project's history until it found the commit that was the common ancestor of both of the new commits and do the merge from there instead. It couldn't just update the pointer. If we run git log dash, dash one line now, we can see that it shows the two commits from both of the branches. So we have our test content and we have another bug fix. And then above that, we have another merge commit, which Git has added automatically. Like most Git commands, there are a lot of different flags that we can use to control exactly how the merge should happen. Whether a commit should be carried out if necessary, whether or not to fast-forward even if it's possible to do a fast-forward, and different options for the output afterwards, and much, much more. But generally, these additional flags are for much more advanced scenarios. And we can usually get by with the simple version of the command that we've been running today. So in this lesson, we took a look at basic merging with the merge command. We learned that a merge is a way to converge two branches that have diverged. And that it doesn't matter if one branch contains commits or both branches contain commits. We saw that we only need to specify the branch that we want to merge in, and that the current branch is always the branch that receives the merge updates. We'll be coming back to merging later in the course when we cover conflicts and rebasing to look at some slightly more advanced scenarios. Thanks for watching.


