
 Lessons: 21Length: 2.6 hours
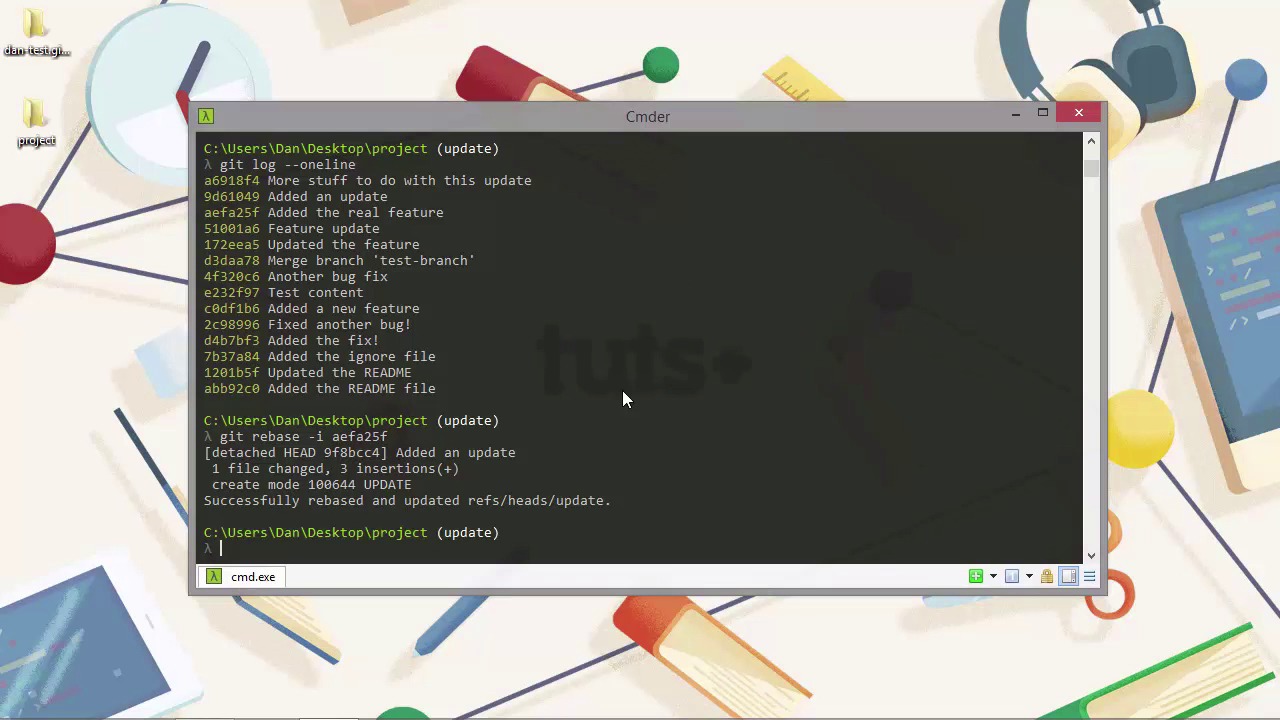
- Overview
- Transcript
5.3 Rebase
Rebase is a powerful command that lets us literally rewrite history, at least as far as our repository is concerned. Let's see some of the basic uses of the git rebase command before we wrap up the course.
1.Introduction
1.1Introduction02:59
1.2Installing and Configuring Git08:00
1.3Git Concepts05:40
2.Git Basics
2.1Initializing a Repository07:05
2.2The Staging Area and Status Command05:12
2.3Making Commits10:34
2.4Ignoring Files08:06
2.5Viewing the Log09:46
3.Branching and Tagging
3.1Creating Branches08:02
3.2Fetching and Pulling09:20
3.3Diffing Files05:13
3.4Merging Branches07:03
3.5Tags06:38
4.GitHub and Remotes
4.1Setting Up GitHub10:42
4.2Working With Remotes10:12
4.3Creating GitHub Pages11:57
4.4Contributing and Contributors06:43
5.Intermediate Usage
5.1Stashing Changes10:45
5.2Cleaning Up Merge Conflicts03:46
5.3Rebase07:33
6.Conclusion
6.1Conclusion01:16
5.3 Rebase
Hi folks. In this lesson, which is the last practical lesson of the course, we're going to take a look at the rebase command. Rebase has a bit of a reputation as being hard to understand or difficult to use, but actually it is neither of those things. However it is a very powerful command. And it's possible to really screw things up if you use it incorrectly. So it's important to understand how to use it before you try to use it. But it's really not that hard. Let's take a look. We'll look at a couple of common uses for Rebase. Starting with the squash command. Let's say we're working in some branch and we've made a bunch of different commits. And we're about to merge back into the master branch as a complete feature. In order to keep the history in the master branch clean and concise. We can squash all of our commits down into a single commit before we merge back in. So let's create a new branch and add some new commits in it. [BLANK_AUDIO] Great. So we've added a new file and we've updated it a couple of times. We've made a couple of different commits. Let's just do a git log now. [BLANK_AUDIO] And we can see that we added an update and then we did some more stuff to do with this update. So we can merge this back in, but from the master branch's point of view it's just a single update. So it doesn't need to know about how many commits actually made up the update. Let's squash the two commits into one before we merge it back in. We do that, remember, using the rebase command. [BLANK_AUDIO] So before I run that command, let's just take a look at it. So the command itself is called rebase. Now we use the -i flag to make the rebase interactive. And in this case, when we're squashing commits down, we do want to do that because we're gonna need to check which commits get squashed and we want the chance to update the commit message maybe. And then we need to specify which commits we'd like to start squashing after. So in this case, we specify. Aefa25f. Which is the third line down in our log. We don't actually want things squashed into that, but we want to start squashing after that commit. So that's the commit hash that we use. So now I'm gonna run that. So first of all, it takes us into vim and it shows us the commits that we've got to pick from here. So we can use pick and if we look at the commands instructions below, it says that pick means use the commits. And we've got a couple different options as well. So we're gonna take the first commit which was where we added an update, but then the second commit we're gonna squash that down into the first one. So we need to navigate down to the second line and then we just need to change the word pick to use s. Which is short for squash. And then we can quit out of vim. So it does some more stuff, and it takes us back into vim. And the reason it's taking us back into vim is because we might want to choose which commit message actually gets used when we squash these commits down into one. So we've got two commit messages. Which one are we gonna use? Let's use the first one. So we need to go right down to the bottom one and just comment that out. So we can do that by adding a hash to the start of the line. And we'll go with the message, added an update. That's what we've done. So let's quit out vim again. And it does some more stuff. And we just wait for that to finish. And it says that it successfully rebased and updated the rest. Great. So now let's go back to our master branch. [BLANK_AUDIO] And it says that it's ahead of the master by three commits. We've only done two commits but now that we've got this rebased squashed commit as well. So Git knows that that's actually a third commit, but watch what happens when we bring that into master. [BLANK_AUDIO] So it's been able to fast forward which is fine. And now let's just run Git log and take a look at the log. So from the master branch's point of view, there was only one commit made. And that was where we chose the message, added and update. So all of the other commits that were made in that branch our master branch doesn't know or care about. And it doesn't need to know. And this is a very useful way of keeping the history for our master branch in a nice clean way. So it's, it's not littered with things like, added the first part of the update, added the second part of the update. It just has the update and it sees that as one whole thing. So another common use for rebase is to bring new changes from another branch into the branch we're working on, but slipping them in underneath our changes as if we'd branched off later than we actually had. So this helps us to avoid pointless merge commits in the branch we're working on which again, can just help keep things cleaner when we want to merge back into master later on. So we're back in the master branch now and let's just make another commit. And I'm just gonna maybe add some copyright information now to this file. [BLANK_AUDIO] Okay and let's save and exit vim now. So we have changes in our master let's just commit and add those. [BLANK_AUDIO] And now let's just switch back to the update branch. [BLANK_AUDIO] So let's just say that we have some more update stuff to do. So let's open up our update file once again. And now we need to add and commit this change as well. [BLANK_AUDIO] But now we want to bring the changes from the master but we're not quite ready to merge back in yet. So even though we've done an add and a commit, we want to bring in the latest commit from master, but we want it to look like that commit came in before we'd made any of our changes in the update branch. So we can do that using rebase as well. So let's rebase the changes from master underneath our current changes. [BLANK_AUDIO] So we see some messages in the output there it says the first is rewinding the head to replay the work on top of it and then once that's been done it can then add our latest commit which was more feature work. So rebase has the power to rewrite the history for our project. We shouldn't ever use rebase if we've pushed our changes to a remote repository that other people are using. But before we push, it can be really, really useful to just make our history nice and neat and linear and clean. There are many, many other ways to use rebase. Some of these are very complex, but the ones that we've looked at today are probably the most common and the most straightforward way to use rebase. As you can see, there's nothing to be afraid of. So in this lesson we took a look at the rebase command and saw that we can use it to tidy up the commit history in a branch by squashing sever commits down into one. And we saw that we can use it to bring new changes into our branch. But change the history so that it looks like these other changes happened before our own. Thanks for watching.


