
 Lessons: 21Length: 2.6 hours
- Overview
- Transcript
3.2 Fetching and Pulling
If changes occur in one branch while we're working in a different branch, we'll probably want to include those changes in our current branch to ensure that we're developing against the latest code. In this lesson we see how to do that with the git fetch and git pull commands.
1.Introduction
1.1Introduction02:59
1.2Installing and Configuring Git08:00
1.3Git Concepts05:40
2.Git Basics
2.1Initializing a Repository07:05
2.2The Staging Area and Status Command05:12
2.3Making Commits10:34
2.4Ignoring Files08:06
2.5Viewing the Log09:46
3.Branching and Tagging
3.1Creating Branches08:02
3.2Fetching and Pulling09:20
3.3Diffing Files05:13
3.4Merging Branches07:03
3.5Tags06:38
4.GitHub and Remotes
4.1Setting Up GitHub10:42
4.2Working With Remotes10:12
4.3Creating GitHub Pages11:57
4.4Contributing and Contributors06:43
5.Intermediate Usage
5.1Stashing Changes10:45
5.2Cleaning Up Merge Conflicts03:46
5.3Rebase07:33
6.Conclusion
6.1Conclusion01:16
3.2 Fetching and Pulling
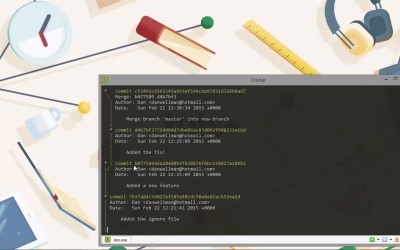
Hi folks. In this lesson, we're gonna see how we can get changes from one branch into another branch, or certainly one of the ways, because there a number of different ways that we can do it. So, in the last lesson, we created a new branch and we added a new feature in and committed that to the branch. But let's say a bug comes in and we need to switch back to the master branch to fix it, because that's the production branch. In the real world, we'd probably create a hotfix branch to fix the bug in rather than working directly on master, but let's just keep things simple and fix the bug in the master branch. So we need to switch back to the master branch and we can just create a fix file and then commit it. [BLANK_AUDIO] Great. If only all bug fixes were that simple. Okay. So, the only problem now is that the master branch is further on by one commit than it was when we made the new branch in order to add the new feature. The new branch is also ahead of the master. But now the master is also a commit ahead of the branch. If we take a look at the Git log while we're on the master branch, we should see that the latest commit is the fix commit. And we'll keep that on one line just to keep it simple. So we can see that's, we added the fix that's the latest commit. But now let's switch back to the new branch. [BLANK_AUDIO] And let's just run the git log once again. And we can see that the latest commit, this time, has added a new feature. We can't see a fix. Fortunately, Git makes it very easy for us to pull the changes from the master branch into a current branch, the new branch. One way that we can do it, which suits our situation here, is to use the git pull command. [BLANK_AUDIO] And we can see that we get some output there, so the commit that we ran was git pull.master. So pull is the name of the command. We want to pull some changes. The dot just means that we're pulling those changes from our local repository. Later on in the course, when we add a remote repository, if we wanted to pull from the remote repository, we would have to supply the name that we associated with the remote repository instead of the dot. And then lastly, we just, tell Git the name of the branch that the changes that we want to pull are in. In this case, they're on the master branch. And the output says that from our local repository, we pulled from the master branch, and what get actually did under the scenes was fetch underscore head. And we can see that the merge was made by the recursive strategy. We'll talk about that later on, and we can see that we pulled in a file called fix. But that file had zero insertions or deletions. And what Git has actually done is create this new file for us in our new branch and we can see from the 10644 code, that it's a non-executable, regular file. So don't worry too much about what a merge is, we'll cover this in another lesson very soon. The main thing is that our branch now contains the latest commit from the master branch. So, I'm just gonna clear the screen quickly and then let's run the git log command once again. And now we can see that we have the commit that says added the fix and that comes after the commit that we made in the last lesson to add the new feature on this branch. But also we have this, this merge commit as well. And it just says merge branch master into new branch. So like I said, we'll look at merging in much more detail soon. But for now, just understand that when we pull by default, the new changes we pull in emerge automatically, and they could given this standard merge commit message. So remember earlier in the course when we looked at the git log command in detail, we saw that we can create a graph of the log, but at that point our repository didn't contain enough things to make the graph interesting. Well now we have two branches. Both of which have commits, and one of which has a merge. So the graph should start to look a little more interesting. Let's run the log command, and use the dash, dash graph-flag, and just take a look at what it looks like. [BLANK_AUDIO] So let's just take a moment to understand exactly what's happening here and what these different lines represent. So the main line that goes all the way up the left hand, that represents the branch that we're currently on. So prior to this where the line is shown in green, we had just one branch and we can see that there was a commit, which we made in the master branch, that was the only branch at the time when we made that and that was the ignore file. And then after this, but before the next commit, then things start to branch off and we can see that after that point for, for a short while we had two branches. So we've got two lines, one of those is shown in red and one of those is shown in green. And we can see that just after we branched off, we made a commit on the current branch. So, remember that's the new branch. And then after that the line is red, but then after we branched off in the other branch, the one that's shown in green, we can see that there's another commit there. That was when we switched back to the master branch and added the fix. And then the latest commit message, the merge commit, that happens after these two lines converge once again. So once we're used to looking at graphs and we're used to the information it represents, it's very easy to see that our development went into two parallel branches. And then they came back and converged into one again. So even in this super simple situation, the graph can tell us interesting things about our repository. Once we're working with numerous branches and commits, and perhaps commits from remote repositories, the graph can provide a very quick way to absorb a lot of information about the commits that have happened. It's a bit weird at first, but the more you get used to reading the graph, the easier it becomes to make sense of it. Pretty soon you won't even have to think, you'll just look at and say, I know exactly what that means. Another command which is very similar to pull is fetch. Let's just take a quick look at this before we wrap up for today. So we'll need to make another change in the master branch so that we can fetch it. Let's just clear the screen. I'll need to just hit Enter a few times and just let the rest of the graph display. And now let's switch back to master. And let's just say that, oh dear, another bug has been found, so let's fix that quickly. [BLANK_AUDIO] And we can then check out our new branch [BLANK_AUDIO] I'm just gonna clear the screen again. So we're back on our new branch. There's another change in master. So instead of pulling that change, let's fetch the change instead. We can do that using the fetch command. So the, the structure of the command is very similar to when we used the pull command earlier. We supply the dot, say that the change that we want to fetch is in our local repository, and then we supply the name of the branch, which in this case again is master. And as a short summary there, this says we pulled from local. And it basically shows us the same thing. It did a fetch underscore head for the master branch. But now let's run the git log command. And we can see that this time, we don't have a new merge commit because the change that we fetched hasn't been automatically merged. And there's something else as well that we didn't cover a moment ago, and that's what this FETCH_HEAD thing at the end actually is. So this is a file that Git creates, and this file represents what was actually fetched. And if we open up Explorer and look in our .git folder, we can see that it has this FETCH_HEAD file there, and let's just open that up. What we can see in our text editor, that it shows a commit hash, it shows the full hash and that this was the latest commit in the master branch of the doch which is our local repository. So we can use this file to see what the changes we fetched actually are. And we're gonna do this in the next lesson. I just wanna reiterate that fetch is like a pull that doesn't actually make any of the changes in the current branch, it just gets those changes ready. And that we can do various things to see what those changes are, and we can then add them and merge them in ourselves manually if we want. So, there are many options that we can use with both fetch and pull in order to change the behavior of these commands. But generally, we won't need to do that except in more advanced situations. Also, we're only working with local branches at the moment. But fetch and pull are equally useful, if not more so, when we're working with remote repositories and remote branches. So in this lesson, we learned about how we can take changes from one branch and bring them into another branch. We saw that while git fetch doesn't actually change the state of the branch we're in, the git pull command does result in a merge commit by default. And interestingly, when we've run the pull command, Git will actually run the fetch command internally to get the changes before it does this merge. Thanks for watching.


