
 Lessons: 34Length: 3.4 hours
- Overview
- Transcript
3.1 Getting MongoDB Up and Running
It’s great to have our app up and running, but so far we’re missing a crucial piece of the puzzle. What is our back-end app going to talk to? A database, right? Well, where is that? In this lesson, you’ll get MongoDB up and running and ready to start receiving connections from your app.
Related Links
1.Introduction
1.1Introduction01:02
1.2Prerequisites06:19
2.Getting Started
2.1Creating the App Structure11:46
2.2Creating the Server-Side Entry Point10:14
2.3Starting the Angular and Express Apps08:48
3.Setting Up the Mongo Database
3.1Getting MongoDB Up and Running06:08
3.2Connecting to MongoDB06:47
3.3Creating the Database Schema07:49
3.4Creating a Simple Data Access Layer07:09
4.Creating an API With Express
4.1Handling Requests in Express09:57
4.2Taking Advantage of the Express Router05:52
4.3Adding the `GET` Handler to the API05:34
4.4Adding the `POST` Handler to the API03:18
4.5Adding the `PUT` Handler to the API02:17
4.6Adding the `DELETE` Handler to the API02:18
5.Building the Front-End Angular App
5.1Creating the Front-End Models06:57
5.2Creating an Angular Service07:31
5.3Making HTTP Requests From the Service08:33
5.4Setting Up the User Interface09:05
5.5Creating All the Components05:28
5.6Adding Routing to the App08:18
6.Creating the App Components
6.1Adding the View Lawn Markup05:55
6.2Adding the View Lawn Code06:51
6.3Adding the Add Lawn Markup04:34
6.4Adding the Add Lawn Code07:41
6.5Adding the Edit Lawn Markup03:06
6.6Adding the Edit Lawn Code04:11
6.7Adding the View Application Markup02:54
6.8Adding the View Application Code07:46
6.9Adding the Add Application Markup02:16
6.10Adding the Add Application Code04:49
6.11Adding the Edit Application Markup04:20
6.12Adding the Edit Application Code05:39
7.Conclusion
7.1Conclusion03:18
3.1 Getting MongoDB Up and Running
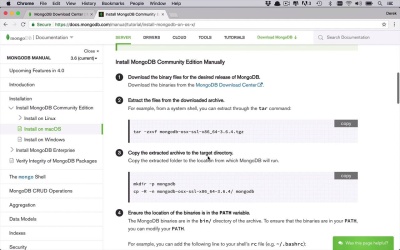
The next part of the application that we're gonna want to start to tackle is the database. Now you could go from a couple different directions, you could start from the Front-End and start working on your Angular components and services. And then get down into the Express layer where you're building out your APIs, and then get down to the database. But I feel like when you're building a application from scratch, it oftentimes is beneficial, at least in my mind, to start from the ground up. From the backend and move forward because at least if you start doing that you can start to see things happening right away. A lot a times when you start from the Front-End and start to move towards the Back-End, you run into the issue where you can start to kind of stub out components and see what the UI is gonna look like. But you can't get all the way from the Front-End to the Back-End. So what I'm gonna do is I'm gonna show you a little bit about Mongo and how to get it up and running. And what it looks like so that we can start to build on top of that layer, and start to build our application that way. So at this point I think it's gonna be beneficial for me to talk to you a little bit about Mongo. So I did point you to this website earlier to get things downloaded and installed. And I'm gonna show you some of the documentation that's gonna help you get started. So once you download it, you have probably clicked this link up here, and it's gonna take you into the download center. Now, you can pretty much pick between Community Server, you can, I suppose, get Enterprise Server if you would like. A Community Server should be fine for what you're trying to do for this particular course anyway. So all you gonna do is you're gonna pick your platform, in my case it's OSX. And I'm gonna download whichever version, and it's also going to show you how you can install it using a Package Manager named Homebrew, which is actually pretty easy to do as well. So you can follow those instructions if you would like to actually do the installation that way. So once you have downloaded it and gone through the installation process, you need to get it up and running. But interestingly enough like some other packages or software products, you can't just get it up and running out of the box. There is a little bit of work you have to do, very minimal, but there is some there. So in order to learn more about how to do this, you can come up to DOCS link at the top hand corner of the website. And it's gonna open up a new tab, and you can take a look at a lot of the documentation in here. But what I typically like to do, or at least point people to, is getting started, and there's a lot of information down here. It gives you an introduction and how to do a lot of things, but what's interesting is it tells you a lot about Mongo, and using the shell and all this kind of stuff and some commands that you can use. But it doesn't tell you how the installation works until you come down to the third section down here. So if you go to Installation, it's gonna show you how to install it. Now, it's gonna show all the different supported platforms, and how to do the actual installation. So you can pick which version you have over here, so if you selected that Community Edition, you can select that link, and then also pick which platform you're using, so in my case I'm using MacOS. So down here it's gonna give you more additional information, it's gonna tell you how to get it. How to unzip it, how to put it into a folder, put it into a path if necessary, which is probably not a bad idea. How to use Homebrew, so you can actually show you how to use Homebrew to install MongoDB. Which I would actually recommend cuz it's quite simple, if it's available to you. And then actually running it, so before you can actually run Mongo you have to create a data directory. And you can create a data directory anywhere that you want, but depending on where you create it, when every time you attempt to run Mongo, you might actually have to run an additional command or specify an additional parameter. So by default it wants to use a directory called /data/db at the root of your operating system. So that could mean in the root of Mac OS X, or maybe on the root of the C drive if you're in Windows, things like that. So by default, you're gonna want to go ahead and create that, so that's gonna be a necessary step that you have to do. Now, if you do that and follow along with that step, all you have to do is specify mongod, in this case for Mac OS X, to actually start run, and it's gonna find that directory because that's what it's assuming you're going to be using. Now, if you do choose to specify a different path to where the data directory could be, like I said, you could create it anywhere you want, but if you do do that, then you're gonna have to specify this dbpath when you start up Mongo. So like I said, if you start up mongod with no parameters after it, with no arguments, it's going to look for that /data/db directory and use that. And if not, if you use something else, you're gonna have to be very explicit about where it is. And then it's gonna go through a bunch of setup and things like that to actually get the service up and running. And then at the very end, if everything is successful, you should see a message like this, where it's waiting for connections listening on the default port. Once again, this is all configurable, but this is gonna be the default port of MongoDB 27017. So on my system I already have all of this up and running, or at least installed, so I'm gonna show you how this works. So I am just anywhere because I now have MongoDB in my path because I've already done that. So in this point, all I have to do is say mongod, and it's gonna go through it and it's gonna do some initialization. And, eventually, it's gonna get down to the very bottom, and it's gonna say, waiting for connections on port 2707. So it's got some other warnings in here about access control. I'm not too worried about that, cuz I'm just doing this locally for developmental purposes. And the other one is also kind of a similar issue because it's bound to localhost. Which can become an issue, if you are trying to do development on other systems, and you're making assumptions about where you're binding it to. So you can be explicit about binding it to a specific IP or things like that. But like I said, for this course I'm not too worried about that. I have MongoDB installed, I have it up and running, and now I'm gonna be able to use it in the following lessons when we start to build out our database structure.


