- Overview
- Transcript
5.1 Creating the Front-End Models
Now that we're moving into the front-end side of the app, we're going to need to have a way to communicate with the back-end. But in order to do that, the front-end app needs models for the date objects that will be exchanged. We have already created the models in the back-end for MongoDB, so now we're going create some matching models to use in Angular.
1.Introduction2 lessons, 07:21
1.1Introduction01:02
1.2Prerequisites06:19
2.Getting Started3 lessons, 30:48
2.1Creating the App Structure11:46
2.2Creating the Server-Side Entry Point10:14
2.3Starting the Angular and Express Apps08:48
3.Setting Up the Mongo Database4 lessons, 27:53
3.1Getting MongoDB Up and Running06:08
3.2Connecting to MongoDB06:47
3.3Creating the Database Schema07:49
3.4Creating a Simple Data Access Layer07:09
4.Creating an API With Express6 lessons, 29:16
4.1Handling Requests in Express09:57
4.2Taking Advantage of the Express Router05:52
4.3Adding the `GET` Handler to the API05:34
4.4Adding the `POST` Handler to the API03:18
4.5Adding the `PUT` Handler to the API02:17
4.6Adding the `DELETE` Handler to the API02:18
5.Building the Front-End Angular App6 lessons, 45:52
5.1Creating the Front-End Models06:57
5.2Creating an Angular Service07:31
5.3Making HTTP Requests From the Service08:33
5.4Setting Up the User Interface09:05
5.5Creating All the Components05:28
5.6Adding Routing to the App08:18
6.Creating the App Components12 lessons, 1:00:02
6.1Adding the View Lawn Markup05:55
6.2Adding the View Lawn Code06:51
6.3Adding the Add Lawn Markup04:34
6.4Adding the Add Lawn Code07:41
6.5Adding the Edit Lawn Markup03:06
6.6Adding the Edit Lawn Code04:11
6.7Adding the View Application Markup02:54
6.8Adding the View Application Code07:46
6.9Adding the Add Application Markup02:16
6.10Adding the Add Application Code04:49
6.11Adding the Edit Application Markup04:20
6.12Adding the Edit Application Code05:39
7.Conclusion1 lesson, 03:18
7.1Conclusion03:18
5.1 Creating the Front-End Models
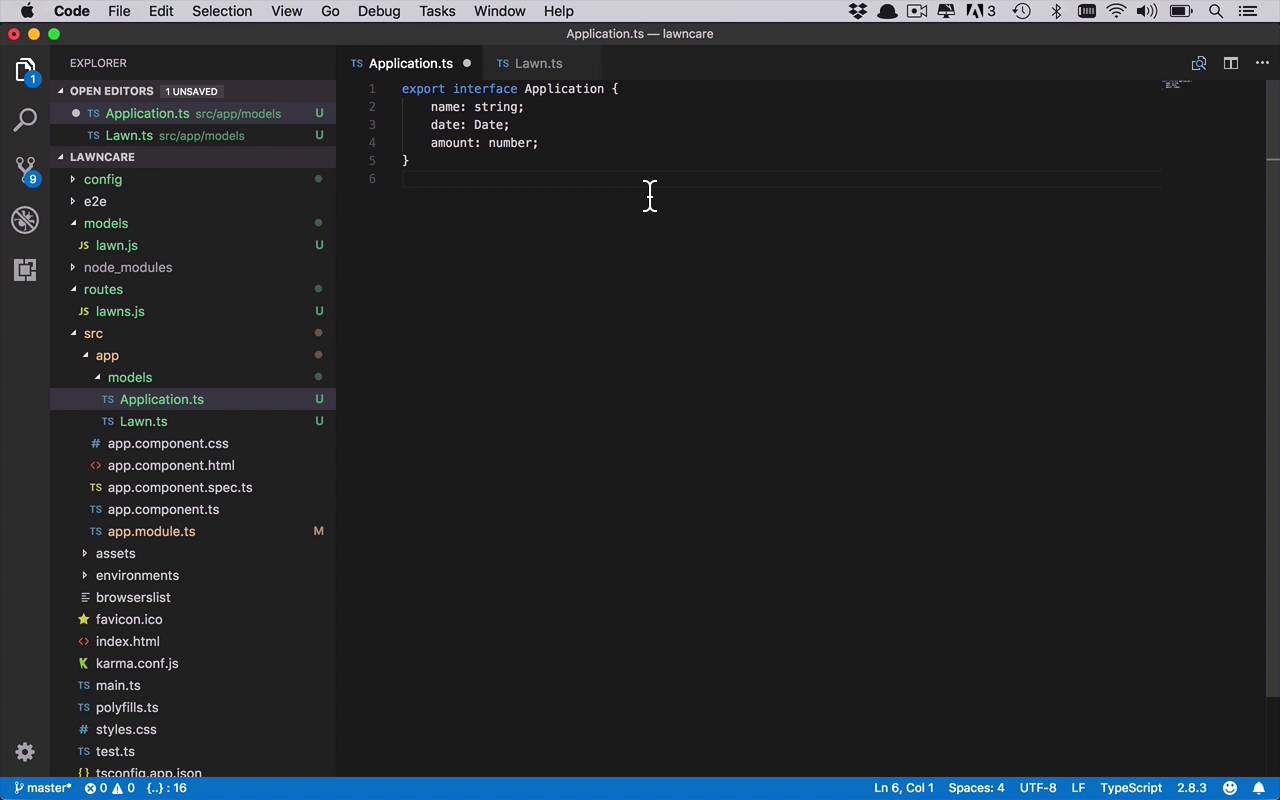
Now we're gonna be switching gears a little bit and moving to the front-end of our Angular application, the A part of your mean.io application. Now, at this point, you might be saying, okay, we can jump in and start creating the UI, and you could do that. But typically, when I'm creating an application like this, and I've done all this work from the back-end and moving up to the front-end. At this point, I've probably already created some models on the back-end to talk about whatever the domain of this application is. And we've already done that, we've created this concept of a lawn and of an application, and that is a living thing on the back-end. So the first thing that I like to do is I like to take that kind of concept and translate it into something that I can use on the front-end. Because that's where I'm gonna be needing to communicate with the back-end using a very similar object structure for a lawn, for an application. And I'm gonna need that model structure so that I can deal with it in my TypeScript within Angular, not only to just be able to represent that information, but I also wanna be able to use that in my service that I'm gonna use in Angular to communicate with the back-end. Now, I know that sounds like a lot, but it's actually quite simple. So let's go ahead and go through that process. So like I said, what I wanna do is I basically wanna mirror what it is these models look like on the back-end for lawn and for application, and mirror those things as models on the front-end. So how do we do that? Well, I'm gonna go into my source directory here, cuz remember, that's where our Angular app lives, and I'm gonna go into app. And so within here, I want to create a new folder, so I'm gonna create a new folder and I'm gonna call this models, quite similarly to how I did for the back-end. And then within here, I wanna create some TypeScript classes that are gonna be used to represent the same information for the lawn and for the application. So we will come in here, we're gonna create two files. The first new file is going to be Application.ts. Now, remember, we're gonna be using TypeScript on the front-end for our Angular application. So we have Application.ts, and then we're also gonna create another file here called Lawn.ts. So we're gonna be using application in Lawn. So let's go ahead and start with Application. So this is gonna be pretty straightforward, it's gonna be very similar to what we did for the back-end. We're gonna export interface and we're going to call this Application. And then within here, we need to give this a definition. So in this case, we are going to say that we want to have a name because we had a name before, and that's gonna be a string. And we are gonna have a date, and this is going to be of type date. And then we're also gonna have an amount, which is gonna be of type number. And we're gonna need to put a space on the end here. But now, remember, as I said before, when we're dealing with Mongoose and the MongoDB, when we're creating new instances of this application in the database, where I've the lawn in the database, it's going to, behind the scenes, create a unique identifier and assign it to that particular object. And so we wanna have that In place here for application as well as in lawn, even if it's not there yet. Which means we gonna have to create this and at least put it in there and make it so that it's optionally there. So we can use it if it's there, but if it's not there, we don't have to worry about it. So we're gonna put that in the top here. And remember, as I kinda mentioned before, in MongoDB, when it creates that ID, it's gonna be _id. So let's go ahead and mirror that same thing here. We'll say _id, and that's gonna be of type string because in MongoDB the unique identifiers, by default, are gonna be known as object IDs, which are actually GUIDs but they're just referred to as object IDs. So in this case, the closest representation we have for that on the TypeScript side in Angular is going to be a string. Now, remember, this is not always gonna be there because if I haven't saved this yet, it's not gonna be populated, so it's kind of like an optional. So i'm gonna do the same basic thing here by adding in a question mark to say it may or may not be populated. So that's just kind of another way to identify that. So let's go ahead and save this. So now we have our application class here ready to be used as a model. And now we wanna do something similar for lawn. So we'll go ahead and once again do another export statement. And we're gonna export interface, and this is gonna be Lawn. And we´re gonna do the same thing, we´re gonna have an ID for this, which may or may not be populated, which will be a string. Then we´re gonna have a title for this, which is once again going to be a string. We have our address, that´s gonna be a string, and then we also have a size, which is going to be a number. Now, we also are gonna have this concept of applications. And recall that the applications are actually going to be an array of application objects. So I can say application, and it's gonna be an array here, and I wanna bring that in. And so when you're using Visual Studio code, if you are referring to a type, in this case application, that Visual Studio code can find somewhere within structure of your application here. You can sometimes get away and use the command period shortcut if you are on a Mac, and you would able to see that what I wanna do is I want to import application from module application. And then it'll go ahead and bring in the appropriate reference at the top of the file. And the reason it's complaining here is because the TSLint wants to see single quotes, not double quotes. And then the very end here, this is complaining because it's saying there should be a new line at the end of the file. So the reason those things are showing up there is simply because when we created our application, it gave us this default tslint.jason which is showing the configuration of all the Linting rules that it's really taking advantage of and that it's enforcing on us. So you can once again go in here and you can kind of replace these or change them to be whatever you want so you either get those squigglies or you don't. It really doesn't bother me too much. I like to be consistent, so I usually just leave the defaults in there, unless there's really a reason for me not to. So now I have this Lawn.ts file and I also have this Application.ts file. So now, anywhere in my Angular application, I can be talking about a lawn and the applications that have been applied to the lawn so that I can use the same terminology on the front-end and as I was doing the back-end. So now that I have this, let's go ahead and start to take this to the next level and start to create the service that's gonna be using these lawns and applications to speak to the back-end in Express that we just finished completing.


