- Overview
- Transcript
5.6 Adding Routing to the App
Another important aspect of Angular apps is routing. We want all of the locations within our app to have a specific URL so that we can give our users the ability to deep-link into the app to go straight to the content they want. Let's add routing to our app now.
1.Introduction2 lessons, 07:21
1.1Introduction01:02
1.2Prerequisites06:19
2.Getting Started3 lessons, 30:48
2.1Creating the App Structure11:46
2.2Creating the Server-Side Entry Point10:14
2.3Starting the Angular and Express Apps08:48
3.Setting Up the Mongo Database4 lessons, 27:53
3.1Getting MongoDB Up and Running06:08
3.2Connecting to MongoDB06:47
3.3Creating the Database Schema07:49
3.4Creating a Simple Data Access Layer07:09
4.Creating an API With Express6 lessons, 29:16
4.1Handling Requests in Express09:57
4.2Taking Advantage of the Express Router05:52
4.3Adding the `GET` Handler to the API05:34
4.4Adding the `POST` Handler to the API03:18
4.5Adding the `PUT` Handler to the API02:17
4.6Adding the `DELETE` Handler to the API02:18
5.Building the Front-End Angular App6 lessons, 45:52
5.1Creating the Front-End Models06:57
5.2Creating an Angular Service07:31
5.3Making HTTP Requests From the Service08:33
5.4Setting Up the User Interface09:05
5.5Creating All the Components05:28
5.6Adding Routing to the App08:18
6.Creating the App Components12 lessons, 1:00:02
6.1Adding the View Lawn Markup05:55
6.2Adding the View Lawn Code06:51
6.3Adding the Add Lawn Markup04:34
6.4Adding the Add Lawn Code07:41
6.5Adding the Edit Lawn Markup03:06
6.6Adding the Edit Lawn Code04:11
6.7Adding the View Application Markup02:54
6.8Adding the View Application Code07:46
6.9Adding the Add Application Markup02:16
6.10Adding the Add Application Code04:49
6.11Adding the Edit Application Markup04:20
6.12Adding the Edit Application Code05:39
7.Conclusion1 lesson, 03:18
7.1Conclusion03:18
5.6 Adding Routing to the App
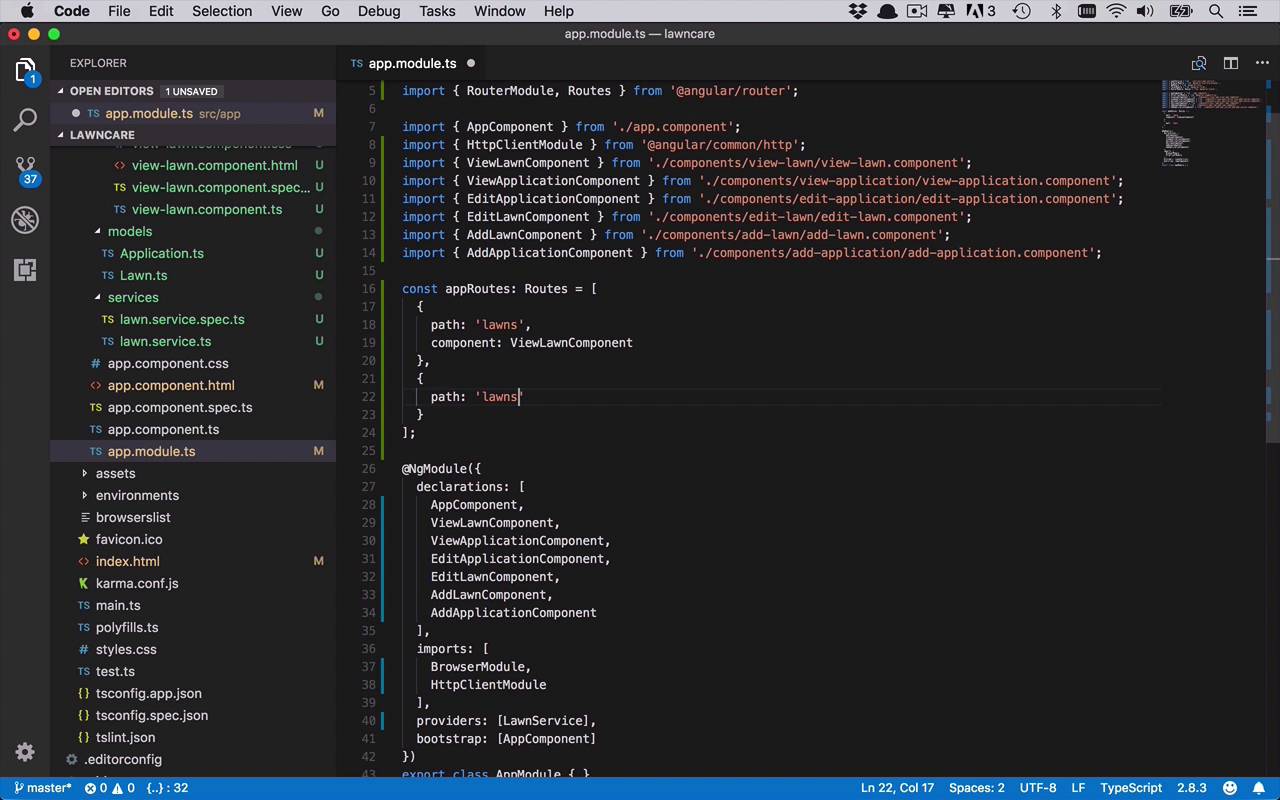
Before we get too deep into creating these components, I wanna introduced one other thing that's gonna become very necessary as we build out this application. And it's really important for you to understand at least the fundamentals the basics of this but when you're creating your Angular apps and that's gonna be routing. Now traditionally, when you started first using Angular or other frameworks similar to that you probably were creating single page applications where you typically were creating different views within a single page and you were just swapping them out, one for the other, maybe some animations or something like that. But a lot of times your URL never changed. And you would always be in that same URL just the content of your page would change. And this was good in the beginning, but then it became a little bit more complicated, because people were wanting to do deep linking. They wanted to be able to link to different parts of your application using a URL. But you weren't really able to do that, because the URL was always the same. So you would always have to navigate to the different view found within that single page application. So within Angular, we have a better way of handling that now, so we can have true deep linking and have different URL structures based on different parts of the application we wanna get to. It's actually quite simple and all we have to do is modify our app.module.ts just a little bit. So we're gonna bring in a couple things, and then we'll go ahead and add those into our imports. And then we'll kind of go from there. So the first thing that I wanna do is I wanna import three things in two different lines. So we're going to import first of all, the forms module. That's just a good thing to bring in anyway. That really doesn't have anything necessarily to do with routing. But when you start to do your components, you're gonna wanna introduce things like binding and two way binding that allows you to make updates to your UI based on inputs in other places or behind the scenes. If you update something in your code, you want it to show up on the UI. And vice versa, if you update it on the UI, you wanna see it in your backend code. And that's all really facilitated by the forms module. So you have to bring that in separately. And that's gonna be found in angular/forms, so we're gonna bring that in. And then we're also gonna bring in the pieces of the puzzle that we're gonna need for the routing. And there's two pieces, we need to bring in a router module. And we wanna bring in routes. Now they both come in from the same place. So we can say from @angular/router. So now we have these two things in here. And this is what's gonna really take the routes that we're gonna define within our application and really make them work. So how are we gonna make this happen? So we're gonna come down before we get into our actual module definition, and we wanna define the routes that are gonna be found within our application. And we're gonna have two main ones, and then we're gonna have kinda one other one that's gonna be kind of a catch-all. And you'll see how that's gonna work here in just a second. So let's create a constant called appRoutes and this is gonna be of type Routes. And we're gonna set this equal to an array of objects. And these objects are all gonna basically describe a route. So we're gonna define three of them. So we're gonna do open and close curly brackets, and the way that we do this is we define a couple of properties. We define a path, and this path is gonna be what does the URL structure look like. So in this case, if the URL structure looks like lawns on our front end hanging off of port 4200, then I want to use a specific component and associate and show that component at that point. And which one do we wanna show at this point? We wanna show our ViewLawnComponent. So if you navigate to port4200/lawns, I wanna see the lawns component, all right, so that seems fairly basic. What about the applications? So let's go ahead and handle that too. So if I go to a path, and what's that path gonna look like? Well, typically if I've clicked on a lawn, or I've navigated to an individual lawn, I wanna see the applications, and so we're gonna something like, lawns and have a slash, and once again, we're gonna have an id. And so we can use this kind of templating like we've seen before, where I can specify a variable. And in this case it's gonna be an id. So there's gonna be some value there. And then just like we've done before, we can create a component, or we can define a component to be used with that. In this case, it's gonna be the ViewApplicationComponent. So those seems fairly simplistic, but right now we're defining a lawns path and a lawns/id path. And those are only gonna live hanging off of port 4200, but what if the user navigates to just 4200 and not 4200/lawns? That becomes problematic, cuz we're not handling that. So what we can do then is kind of create a catch all. So we'll create a path here, once again. And this is gonna be the empty path. So if they just go to localhost 4200 instead of defining a component to handle that, we're actually gonna do a redirect to, and we can redirect to /lawns at that point. And then we're also going to define a path match of full, which means we wanna do a full match on that path so that we know it's the correct one that we're looking for. And then we can redirect to lawns, so now we've kind of created the routes that we wanna handle within in our application. And you can create as many of these as you want and link between them and redirect here and there and all sorts of things. But this is all we're gonna need for this particular application. So now we have that defined. Now we just have a couple other things that we want to be able to import, cuz remember, we import modules. So what we added into at the top. So we're gonna import the forms module that we brought in up above. And we kind of are going to import the router module, but not the same way we really have before. So we're gonna import the router module, but we're actually going to use a forRoot function here. And then in here, we can define what the actual routes are gonna be that we wanna use. And then we're going to use the app routes that we defined up above right here. So at least from a definition perspective and kind of bringing everything together, this should pretty much handle it. So if I were to save this, now I have to make one other change. So the code itself, app.model.ts understands that we're using routes, but the ui portion of our application really doesn't understand any of that yet. So we have to make one other minor change. So we're gonna come back over to app-component.html. And in order for routing to work within your application, you have to use a special HTML element that's defined down in the bowels of Angular in order for it truly to work. So we're gonna put that right here in our app-component since this is the main element, the main component that gets loaded up when we go into our application. So I'm simply going to add a little bit of markup here. I'm gonna add a div that's gonna be of type class container. And then within here I'm gonna add this special element and this special element is called router-outlet, open and close. So two parts to adding routing to your Angular application, you need to go into your app.module.ts, and you need to define the router module and the routes that you're gonna use for your application. And then you need to import them into your app.module. And then secondarily, you need to add in this router outlet element into your application somewhere. And this is where all the routing magic is going to be injected from Angular. So let's go ahead and save this. Now, if I head back to Google Chrome, you're gonna see now I'm sitting on /lawns, which is kind of something new, and that's because I added in that little bit of redirection. So if I try to go to 4200, it's actually gonna reload and redirect to lawns just like that. And if I try to add something on here, /5, it's gonna take me to the view-application works. So that's how we're going to necessitate the flipping back and forth between different views, namely the view lawns component and the view applications component using some basic routing in the URL bar right here.


