
 Lessons: 34Length: 3.4 hours
- Overview
- Transcript
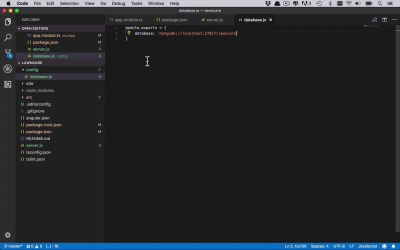
3.2 Connecting to MongoDB
Now that you have MongoDB installed, it's time to get our app connected to it. We're going to facilitate this connection using the Mongoose package that we installed via NPM. We'll also look at a common way to create configuration files in MEAN apps.
1.Introduction
1.1Introduction01:02
1.2Prerequisites06:19
2.Getting Started
2.1Creating the App Structure11:46
2.2Creating the Server-Side Entry Point10:14
2.3Starting the Angular and Express Apps08:48
3.Setting Up the Mongo Database
3.1Getting MongoDB Up and Running06:08
3.2Connecting to MongoDB06:47
3.3Creating the Database Schema07:49
3.4Creating a Simple Data Access Layer07:09
4.Creating an API With Express
4.1Handling Requests in Express09:57
4.2Taking Advantage of the Express Router05:52
4.3Adding the `GET` Handler to the API05:34
4.4Adding the `POST` Handler to the API03:18
4.5Adding the `PUT` Handler to the API02:17
4.6Adding the `DELETE` Handler to the API02:18
5.Building the Front-End Angular App
5.1Creating the Front-End Models06:57
5.2Creating an Angular Service07:31
5.3Making HTTP Requests From the Service08:33
5.4Setting Up the User Interface09:05
5.5Creating All the Components05:28
5.6Adding Routing to the App08:18
6.Creating the App Components
6.1Adding the View Lawn Markup05:55
6.2Adding the View Lawn Code06:51
6.3Adding the Add Lawn Markup04:34
6.4Adding the Add Lawn Code07:41
6.5Adding the Edit Lawn Markup03:06
6.6Adding the Edit Lawn Code04:11
6.7Adding the View Application Markup02:54
6.8Adding the View Application Code07:46
6.9Adding the Add Application Markup02:16
6.10Adding the Add Application Code04:49
6.11Adding the Edit Application Markup04:20
6.12Adding the Edit Application Code05:39
7.Conclusion
7.1Conclusion03:18
3.2 Connecting to MongoDB
Now that we're at a good point where we have our application running, so as you can see here I've recently run npm start. So I have ng serve running, and nodemon, so everything is being run and monitored live. And I also have MongoD up and running. So this is basically the state that we're gonna stay in now for the duration of this course. So we can start to build onto our application and then just have it continuously running and updating in the background. So now that we have MongoDB kind of up and running and ready to go, we can start to work on creating connections to it and then start to take advantage of that data store. So the first thing I would like to do in situations like this, where I have either a database or something that can require some level of configuration, I like to create a configuration file. Now there's a lot of different ways you can do this. I'll leave it up to you if you have other ideas or other ways that you like to do this, but this is typically the process that I like to follow. So I'm gonna create a new folder to give this some structure. I'm just gonna call this config, you can call it config or configuration or whatever you'd like to call it. And then within here, I am going to specify a file that is going to be relative or be very pointed to what it is I'm trying to configure. So in this case, I'm gonna call it database.js. So this is where I'm gonna contain my database configuration. And now all I wanna do at this point is I wanna export an object, basically, that's kinda flexible so I can add to it or remove from it if I want to. And then specify the connection string to the database that I wanna be able to use. So all I have to do is specify module.exports, and it's gonna export an object and this object is gonna have a property in it called database. And this is where the connection string to my Mongo database is going to live. Now, what does a connection string to a MongoDB database look like? Well, it's going to start off with mongodb:// and then you need to give it the location. And the location that we live at right now, at least that it's bound to, and you kind of saw this mentioned in the initialization output initially, was it's going to local host and remember our port is 27017. And at this point, you kinda have an option. So what you can do now is on the end of this, you can add into it a layer of, or a path, if you wanna consider that, to where you want this to live. So I can put a slash something here that can be more descriptive to where it is I am storing it. So I could create multiple collections, is basically what the terminology is within MongoDB, of where I wanna store this information. So in this case, I wanna be very specific and I want it to live at /lawncare. So I could also put another one in here at another URL called something else, xyz, for the xyz database. Do you see what I'm saying? So you can put different databases here so you can create multiple collections within those databases, and it's all gonna be broken up by this connection string, by this URL. So this is going to be the configuration of where I can pull my connection string for my database. So I'm gonna go ahead and save that. And now from this point now I need to make my application aware of not only this connection string, but I also wanna create a connection to the database. And where are we gonna do that? We're gonna do that within our server.js file. So in order to take advantage of this, I need to do two things. I need to bring in my configuration, so I'm gonna say const config, or whatever you wanna call it. And I'm going to require, and now I need to specify the path to where that lives. And so since I'm in my server.js file, I need to go in the config database, or in the config folder, and get the database.js file. So I'm gonna say ./config/database, and you can leave off the .js, it'll figure that out for you. So now I've brought in that configuration file, and now I wanna create a connection to MongoDB using our mongoose library. And this is actually quite simple, so at the top of the file I'm simply gonna say mongoose.connect. And then within here, I can specify the path to where my database lives and that gonna be in that config. So I have config.database is the property that I want to pull that contains my connection string. Now you could leave it at this, but one thing that I would highly recommend, at least as you're getting started, is if you just do it this way you will see errors if bad things happen. But what I would urge you to do is, at least in your application, to add in some promise functionality onto this which is kind of built in when you first download and install it for Mongoose. I can specify when something happens successfully, I can say it's up and running and connected successfully. And if it doesn't, if there's an error, I can log that as well. So that's what I'm gonna do now, I'm gonna say .then, and what I can do in here, is I can pass in a function callback that's gonna do something. So in this case, all I wanna do is I wanna do a console.log. So I'll say console.log, and I will say mongodb connection successful or something like that. You could it call anything you want, but this way you can at least see that something is happening. Now also if something bad happens, I can use a catch and in here I can actually get an error. And then once I get that error I could go ahead and actually log it out or do something with it obviously. But in this case I'm simply going to just log it out, so I'll say console.error and I'll simply log that error, just like that. So now we have our configuration, and we also are creating our connection. And if it worked successfully, then we should see mongodb connection successful, and if it didn't work, we should see some sort of error. So now if everything has been saved properly, and we go back to our terminal, we should see our nodemon picking up our changes. And as you can see here, we're starting our server on port 3000, which is what we would expect. And we also see mongodb connection successful, so we have made it. Now we have created a configuration file to hold our connection string to our MongoDB database. And we've also added that connection using Mongoose into our server.js file, and we are able to successfully connect to our database, which is great. So now that we have all that up and running, we need to start kind of building out what we want our database to look like, and we're gonna start introducing the concept of database structure in the next lesson.


