
 Lessons: 14Length: 1.3 hours
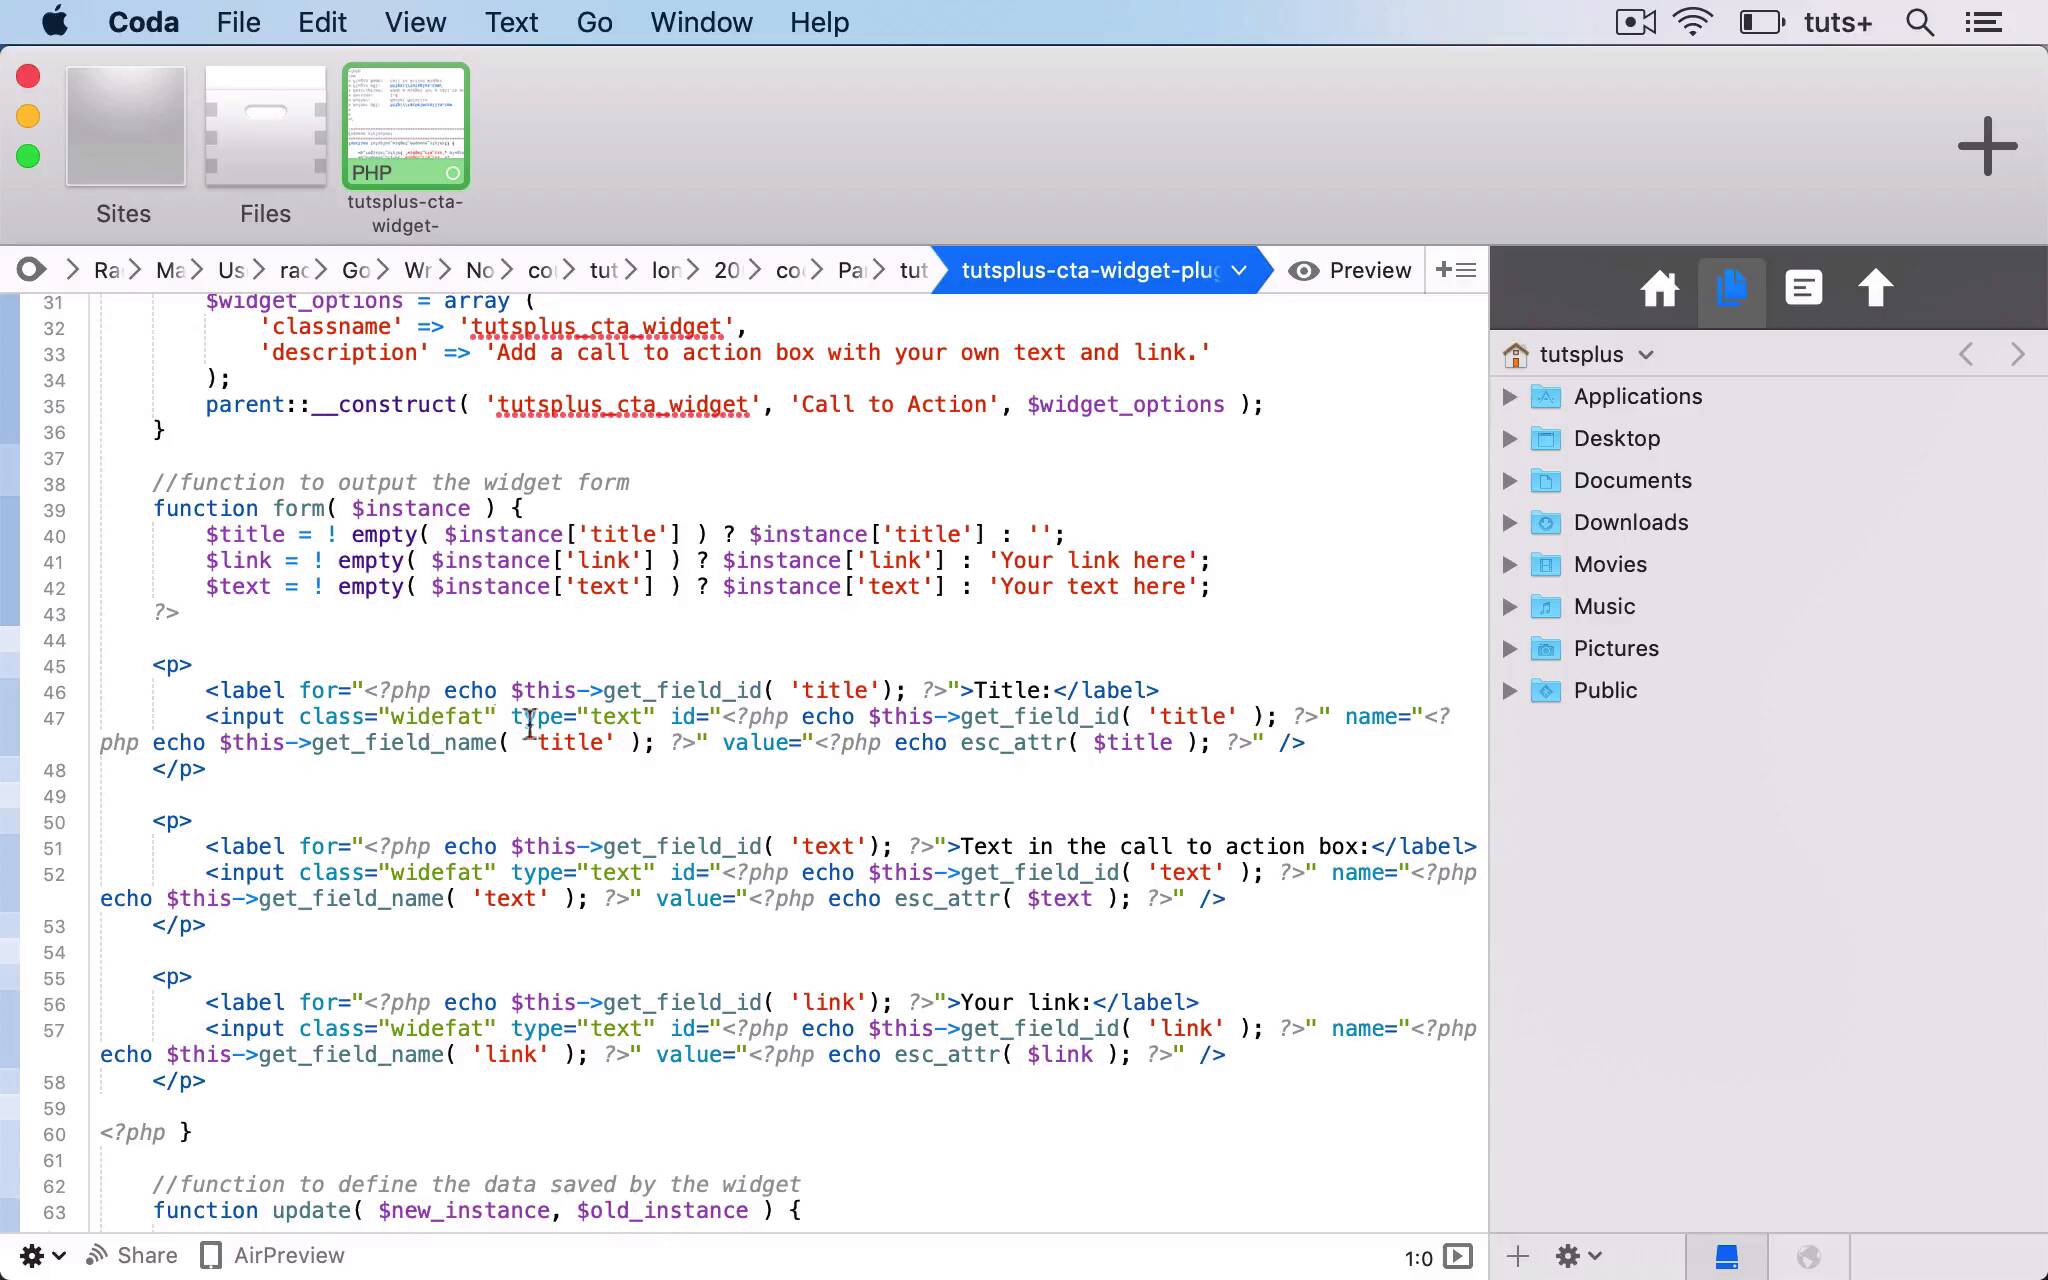
- Overview
- Transcript
5.2 Coding a Call-to-Action (CTA) Widget
In this lesson, I'll show you how to create a plugin for a simple call-to-action text widget.
Related Links
1.Introduction
1.1Introduction00:53
2.Understanding WordPress Widgets
2.1What Is a Widget?06:54
2.2Examples of Widgets13:05
3.Adding Widgets to Your WordPress Site
3.1Adding Widgets via the Widgets Screen03:38
3.2Adding Widgets via the Customizer05:59
3.3Adding Extra Widgets via Plugins07:43
3.4Adding Widgets to Posts and Pages05:11
4.Widget Areas
4.1Understanding Widget Areas05:50
4.2Add a Widget Area to Your Theme: Registering the Widget Area07:03
4.3Add a Widget Area to Your Theme: The Theme Template Files07:13
5.Coding Your Own Widget
5.1The Widgets API03:36
5.2Coding a Call-to-Action (CTA) Widget06:52
5.3Coding a Query Widget03:54
6.Conclusion
6.1Conclusion02:34
5.2 Coding a Call-to-Action (CTA) Widget
Hello, and welcome back to this Tuts+ course on WordPress widgets. In this part of the course, I'm gonna run through the code for a widget plugin for you so that you can see exactly how they're created. Now, I'm gonna use a widget plugin that I already created for this course, £ Practical Projects to Learn to Code WordPress Plugins. Try saying that fast. And this plugin is a widget that adds a call to action widget. So it's a plugin adds a call to action widget to our site. So you can see I've activated it here on my site. And then if I go to my Widgets screen, The call to action widget is available to me, so I can add it to the right sidebar. So I've added some text in the Call to action box, and I've added a dummy link there. So if I save that, which is already saved, and I look at it in my screen, you can see we have a box here, Drop us a line to find out more. So that is a link which I can click on. And it's shown up just in a widget box at the moment. And there is some styling that adds the colors, for example, in the plugin. But you could edit that and make it work exactly how you want to. So to fit with this theme, we might add some red and black, for example, to it. But what I'm going to do now is work through the code, and walk you through that code so you can see how it works. So here is the file for our widget plugin. So you can see it's called Call to Action Widget. I've got the information up here, and then I've got enqueueing the stylesheet for the widget, because there is a style.css file within the plugin. And then I've got the actual widget itself. So here we've got a class, tutsplus_Cta_widget, which extends the WP_Widget class. So we've got our own new unique class. But that references that WP_Widget class, and uses that from the Widgets API in WordPress. And we start with the widget constructor function. So this is always laid out in the same way function __construct(). And then I have an array of variables for my widget options. So I've got a class name for it, and a description. And that is within the code, bit like when we register a widget area. And this description is shown in the Widget Screen or the Customizer. So you can see here it says add a call to action box with your own text and link. And then we use this parent::__construct() function with the class name, a name for our widget, and then these widget options as the parameters. So that's the constructor function. We then have a function to output the widget form. So that is this form here in the Widgets screen, or alternatively, there's a form within the Customizer if you add it that way. So we've got three variables, the title, the link, and the text. Title, text, and link. They don't have to be the same way up. And so I've got three paragraph elements, each of which has a label and an input. And you can see the label and the input here. So I've got my label for my title field, and I'm outputting the word title. And then this code here is how I set up my input class. And I'm looking for a field using get_field_id. And that is referring to this field, the input field that we're in in our form. So then we repeat that for the text field. And again, you can see I've got different text here, a different label, and again, for the link. So this shows up text in the call to action box and your link. So that outputs the form in the Widgets Screen or the Customizer, so that's the second part. The third part is to update it. This update function is what will save anything I type in here to the database, so that it can be output in the site. Because if it's not stored in the database, it's not gonna be shown anywhere. So I have $new_instance and $old_instance, and $new_instance will be overwriting $old_instance if I've added something new in the Widgets Screen. So to start off, $instance is $old_instance, and then $instance then becomes $new_instance if anything's been added for any of those variables, and then we return $instance. So if there isn't a $new_instance, it stays as $old_instance. And then it will save that. We then have the widget function, which is what actually outputs it in the screen. So we're using the widget title, the text, and the link. And then we're outputting the before_widget arguments, which you'll remember are part of registering the widget area itself. And then we've got a div with the class of cta. So we can then target that in our stylesheet, and style that call to action, and turn into a button if we want to. And then if the title isn't empty, we're echoing out the actual text of the title. And it would actually be good practice to put that within h3 tags as well. And then we're echoing out a link, so an A element with href being that link variable. So we're echoing out the title, the link, and then text inside that link. Closing that div, the cta div, and then echoing out the after_widget arguments, which is part of the registering_widget area that we already looked at. So those are my four functions which make part of that WP_Widget class, or rather not the WP_Widget class, the tutsplus_Cta_Widget class that extends WP_Widget class. So I've created that, but that won't actually do anything unless I register the widget. So I then have my function tutsplus_register_cta_widget, within which I use the register_widget function to register this function here, which is the class I already used. And then I hook this function to the action hook, widgets_init. So those are the five elements of creating a widget. And here I've created a widget that mainly consists of text. Now you could create a variety of different types of widget. So I'm now going to show you another example. In the next part of the course, I'm gonna show you another example of a widget plugin. And that widget plugin will register a post type, and then query that custom post type, and output it in a widget. See you next time, and thanks for watching.


