
 Lessons: 14Length: 1.3 hours
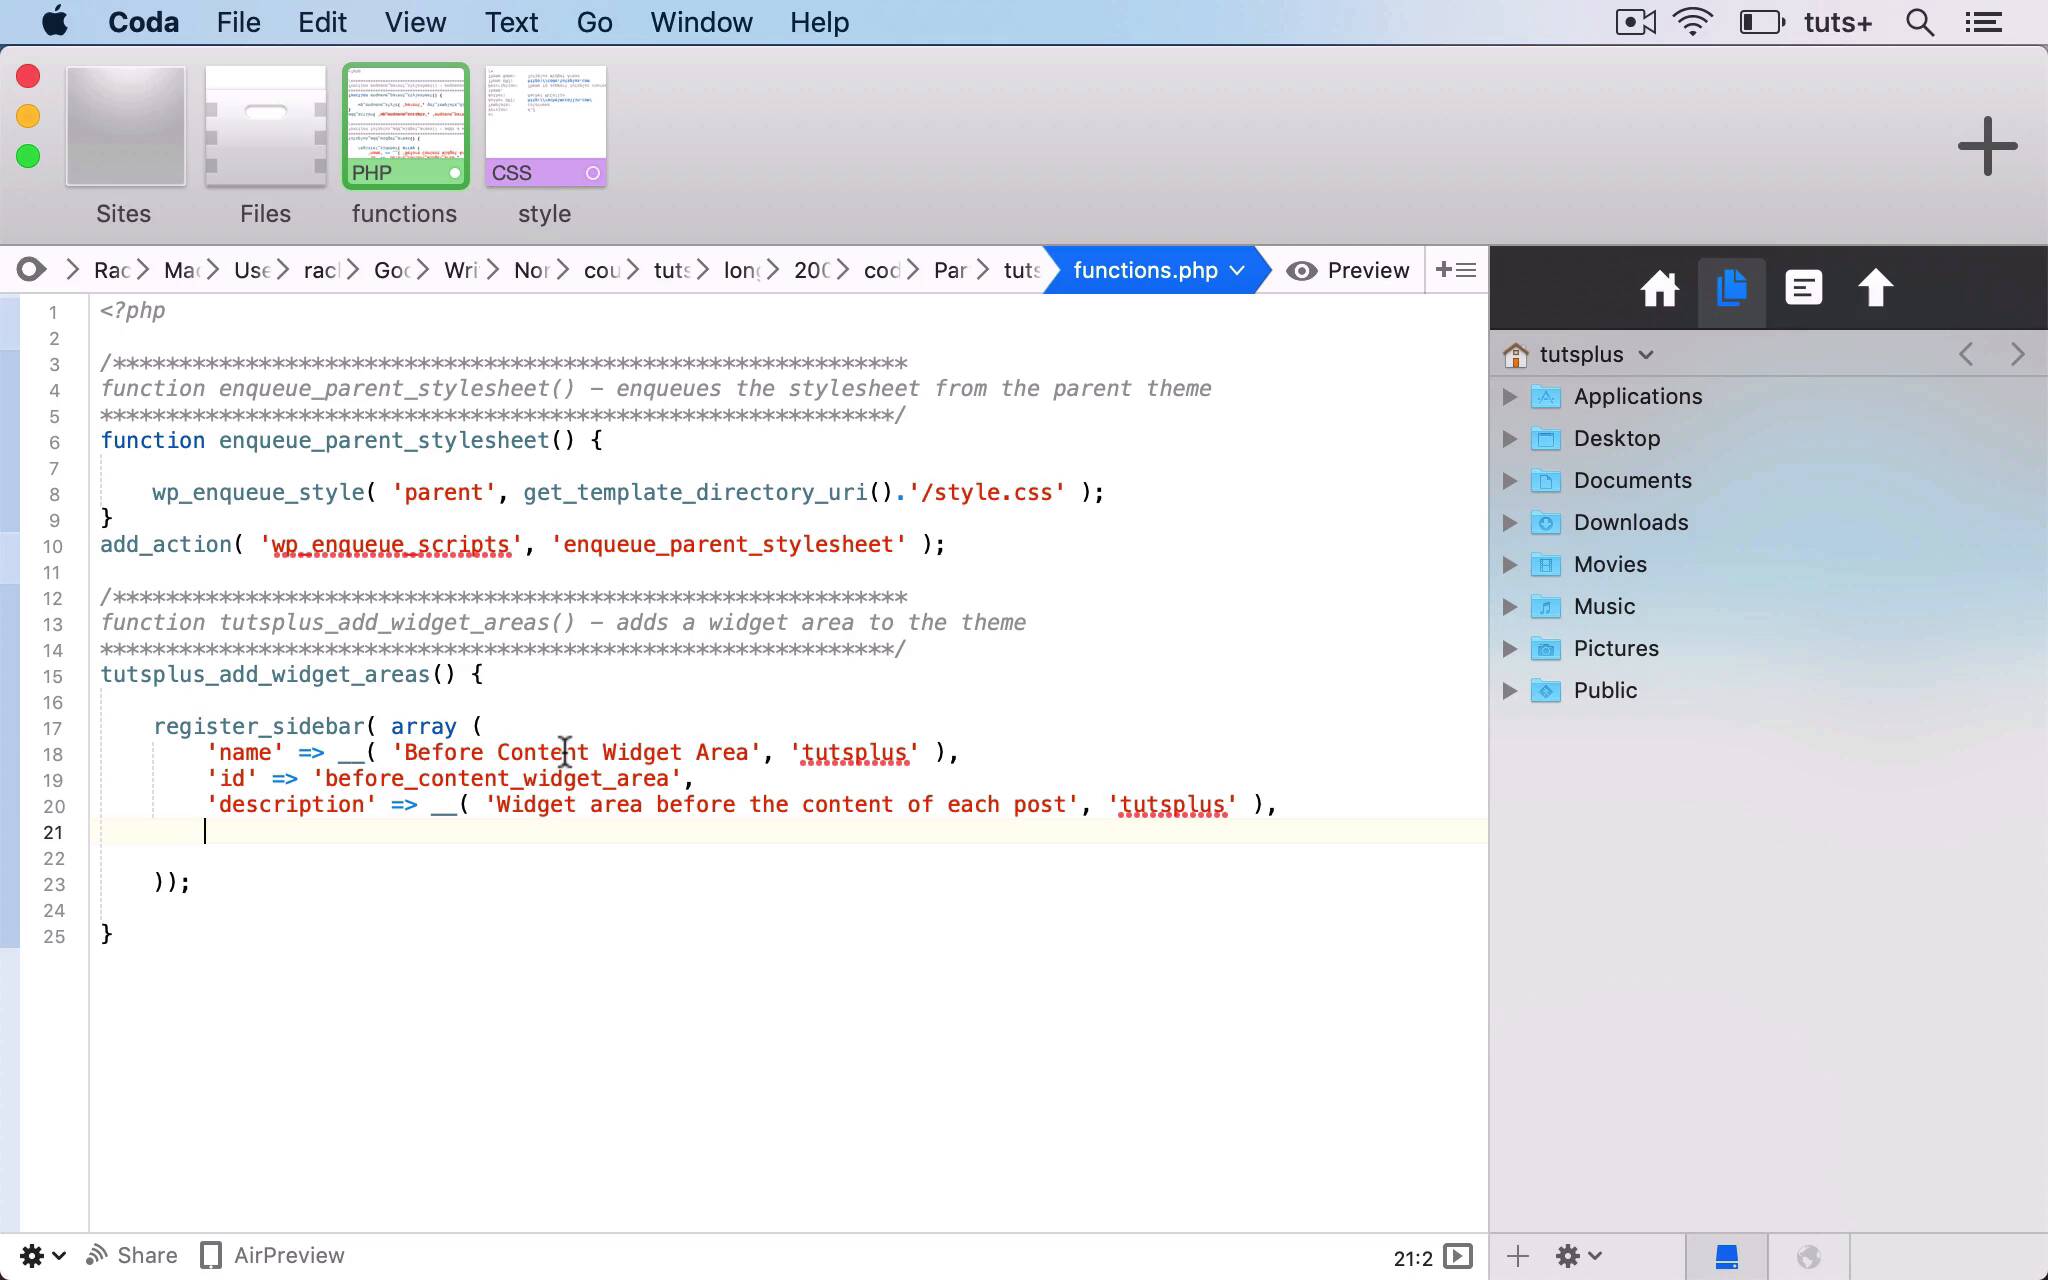
- Overview
- Transcript
4.2 Add a Widget Area to Your Theme: Registering the Widget Area
In this lesson, you'll learn how to add an extra widget area to your theme for more widgets. We'll start by registering the widget area in your functions file.
Related Links
1.Introduction
1.1Introduction00:53
2.Understanding WordPress Widgets
2.1What Is a Widget?06:54
2.2Examples of Widgets13:05
3.Adding Widgets to Your WordPress Site
3.1Adding Widgets via the Widgets Screen03:38
3.2Adding Widgets via the Customizer05:59
3.3Adding Extra Widgets via Plugins07:43
3.4Adding Widgets to Posts and Pages05:11
4.Widget Areas
4.1Understanding Widget Areas05:50
4.2Add a Widget Area to Your Theme: Registering the Widget Area07:03
4.3Add a Widget Area to Your Theme: The Theme Template Files07:13
5.Coding Your Own Widget
5.1The Widgets API03:36
5.2Coding a Call-to-Action (CTA) Widget06:52
5.3Coding a Query Widget03:54
6.Conclusion
6.1Conclusion02:34
4.2 Add a Widget Area to Your Theme: Registering the Widget Area
Hello, and welcome back to this Tuts+ course on WordPress widgets. In this part of the course, we're gonna create a new widget area for our theme. So I'll show you how you do that using this function, register sidebar. And you'll see this is one of those examples where the word sidebar is being used to refer to a widget area. So the widget area that you register doesn't have to be in the sidebar. It can be absolutely anywhere on the page, but the function is called register sidebar. So this theme has already got quite a lot of widgets, but I'm gonna add two more. I'm gonna add one above the content and one below the content, those will go above or below the content as you might expect. Now I find that quite a useful place to add a widget. Because I can add something like a call to action button, or a box with more information, or maybe a list of recent posts or something like that. So I'm gonna show you how to add those. Now the first thing we're gonna do is create a child theme for this theme. Because this is a third party theme that I downloaded from the theme directory, and you should never directly edit a third party theme. The reason being that when you update the theme, all the changes you made will be lost. So instead of that, I've created a child theme. So here's the style sheet for my child theme, and it's got the this Tuts+ widget areas, is its name. And you can see here it's got template as colornews, and that's the theme that I'm using on my site. And in my functions file, I've already got this function here in queuing the parent style sheet, which is the best way to set up a child theme in WordPress. You shouldn't be using a call to the parent theme in your style sheet. Instead, you should be enqueueing it properly in your functions file. So that's the child theme setup. The next step is to activate that child theme on my site. So I'll go to Themes, and then this is my theme. So I'll activate that, and then I'll go back to my widget screen, and go back into the code. So I'm now gonna add a function to register the widget area, or widget areas. So my function is going to be called tutsplus_add_widget_areas. So here I use the register sidebar function. So in my register sidebar function, I have an array of parameters. So let's add those. So the first three parameters there are the name of the sidebar, which is internationalized, the id of the sidebar or the widget area, and then the description. And the name and the description we'll see in the widget screen and in the customizer, the id we'll be using when we add it to the theme. So this HTML will go before each widget that's placed in this widget area. And in fact, I'm gonna change this class here just to widget. So we know that that is a widget, and this is a widget area. So these parameters here are the HTML that's output before and after the widget. So we've got an ID which is the ID of the widget itself, which will be provided by the widget code. And we've got a class which is widget. I change that from widget container just to make it a bit clearer. And the second class is the ID of that widget itself. So we can use those to target for styling after the widget closing that div, and then the title is wrapped in an h3 with the class of widget title. So I'll save that, but what I also need to do is attach that to an action hook. And the action hook we use is widgets_init. And I'm going to copy and paste my function. So that's my Before_Content_Widget_Area. I also want to add a widget area for after the content. So what I'm gonna do here is copy this and then edit it. So I now have my two sidebars being registered. And also because I'm using internationalization here, I need to add a text domain to my child theme, Making sure I typed that correctly. So now if I go back to my widget screen, and I've refreshed this, you can see I've got two new widget areas. Now right now, these widget areas are available in my widget screen, and I can add widgets to them, but they won't actually output anything in my theme. And that's what we'll fix in the next part of the course. So we'll create a function that adds the content of those widget areas to the right place in the theme. See you next time and thanks for watching.


