
 Lessons: 18Length: 1.7 hours
- Overview
- Transcript
2.2 AWS Lambda Walkthrough
Now you have a decent understanding of where and how to create a simple Amazon Alexa skill. But that’s only half of the puzzle: your skill also needs to have a back-end service to send messages to and generate a response. You’ll learn one way to do this, with AWS Lambda Functions.
Related Links
1.Introduction
1.1Introduction01:03
1.2Prerequisites06:17
2.Alexa Skill Basics
2.1Alexa Skill Kit Walkthrough08:25
2.2AWS Lambda Walkthrough10:14
2.3Creating the Hello World Skill08:00
2.4Creating the Hello World Lambda Function10:14
2.5Handling Multiple Intents and Slots07:03
3.Building a Real-World Skill
3.1Creating the Skill06:37
3.2Creating the Lambda Function03:48
3.3Creating a Node.js App for Your Lambda Function07:11
3.4Creating Your First Handler04:38
3.5Creating the Setup Data for Your Skill03:00
3.6Finishing the Get New Courses Handler03:49
3.7Create the `GetCourseTeaser` Handler07:08
3.8Create the `AddToWatchList` Handler06:30
3.9Create the `GetWatchList` Handler03:43
3.10End-to-End Testing03:37
4.Conclusion
4.1Conclusion02:33
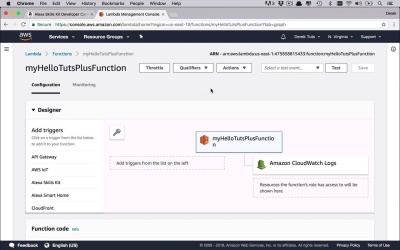
2.2 AWS Lambda Walkthrough
The next thing that you're going to need to have at least a reasonable understanding of or a little bit of background in before you complete your skill, is to have that backend service, that backend kind of server application that's gonna process your Alexa request or your intents. And the way that we're gonna do that in this course by the way is by using Amazon lambda functions, and how do we do that? Well, let's head over to aws.amazon.com. And once again you need to have an account. And in this case, if you've never been here before, it's pretty simple. It's a little bit overwhelming but you can get there and get an understanding fairly quickly. We're gonna go under products and as you can see there are a lot of products. But if you go under compute and about three quarters of the way down, you're gonna see something that says AWS Lambda. So let's go ahead and click on that. Now this is a nice portal that's going to talk to you about different features. The pricing, different things you can do to get started, good resources, all sorts of good information about what Lambda is and some of the things that you can do with it. So I highly recommend you spending some time on this site reading about Lambda, reading up on the documentation, and understanding how you can use Lambda functions. But, in order to kinda fast track a little bit, let's get into the process and see what it actually looks like. So I'm gonna come down to this button here that says Get started with AWS Lambda. And this is gonna take you over to the AWS console. And in here, you can see the different Lambda functions that you may or may not have already, and you can start to create them now. Once again, a lambda function is really kind of just a serverless application, so if you wanna think of it that way. You don't need to have a server. You don't need to have some web server somewhere and write up some full web application and deploy it and all sorts of stuff like that. All of that stuff is handled, and really what you're doing is you're creating kind of an event handler that lives in the cloud somewhere. That has a URL, that has a specific mechanism for communication. And it's gonna sit there and it's gonna listen for requests. And once those requests come in with information about those requests, some context and some things that are going on, then, once that information comes into your function, you can process it as you wish or as necessary. So let's go and see what that looks like. I'm gonna go up to the Create function button. And there's a couple different things that we can do here. We can author one from scratch which is what we're gonna do now. We'll take a look at the blueprints in the upcoming lesson because those are very, very Interesting and kind of give you a lot of out-of-the-box functionality, which I'm always a huge fan of. But in the beginning, let's go ahead and author one from scratch. So let's come down here and we're gonna give this function a name. And we'll call this myHelloTutsPlusFunction. Now I'm just going to use that because I want the naming convention to be somewhat similar to my Alexa skill. What you're gonna find here is that if you create a bunch of lambda functions and a bunch of skills, and you give them all kind of different names, you're gonna forget which ones you're trying together. So I just like to name them so that they're roughly similar, so that I know what I want to point to what function. Then once again you're gonna choose the run time. In this case, remember we talked about using Node.JS in this case but you can use all sorts of different other things. You can use C# as part of .Net Core. You can use Go or Java. You can use Python. So basically, you have this kind of free reign to use any of these that you want to use. So in this case I'll just leave it as 6.10. You could up it to the 8 version if you would like to use some of the additional JavaScript functionality that has been added in to or supported, as that part of Node.JS, but this should be fine. Now when it comes to the roles, these basically are the roles under which The execution of this function is going to happen. There's some really different things in permissioning and things that you can do along with this. I'm not gonna get that deep into that in this particular course, but definitely something that you can learn more about through some of the links on this page. So basically what I would recommend you doing at this point cuz selecting this drop down and say I want to create a custom role. This is going to open up the IAM management console. And it's going to allow you to create a brand new role, and I would highly recommend that you create this basic execution role under create a new role policy, policy name. And then just click Allow, and it's going to create that new role with inside the context of this function. And then it's going to assign that role to this particular function that we're authoring from scratch. Now let's go ahead and click the Create function button. And then this is going to take us to a bit of the developer's console once again. Now, a couple things to pay attention to. Up on the top right is the ARN. This is a unique identifier that is specific to this function that you're gonna need to know how to get to later on when we start to link these things together. When we link our skill to our function, so just so that you know where it's at. And we'll talk a little bit about some of the tooling up here, mostly the testing section, once we start to tie our skill to our function. But we'll get to that point later on. So most of the things that you're gonna see or need to deal with is going to be in the designer section, and then the function code section. So let's go ahead and take a look at the designer section first. Now what you're seeing here is my particular function, myHelloTutsPlusFunction. And here you get to determine what is going to trigger this function or what it's listening for or what's ultimately going to be communicating with this function. It can be a number of things but we're only going to be using one in this particular course. And then ultimately, what we're gonna be doing, we're basically going to be writing out to some logs. Which we're not really too concerned with in this course, once again. So what I'm gonna do is I need to add a trigger that's going to communicate with this function. And if you look over on the left, there are some prebuilt triggers. It just so happens that one of them is the Alexa Skills Kit. Well, I already know that that's what I'm going to be using in this course because we've already started doing it in a previous lesson. So I'm gonna add that in as you can see here. It has some configuration required, but we will get to that. Now once we come down here to the next section, as you can see, because I've selected the Alexa Skills Kit, the next section underneath changes. If I go back here To myHelloTutsPlusFunction you're going to see the function code. So this is all context specific. You can see different information about whatever you have selected. So once I've selected this, I can come down here, and I can take a look at configuring my triggers. Now, in order for this to work, I'm going to need to tell my function. Who from an Alexa Skills Kit perspective, what's the unique identifier of my skill that's gonna be communicating with this function. And then ultimately, they're gonna have to do it back the other direction as well as I'm gonna have to tell my skill what function it's talking to. So what I'm gonna do is I need to get my Skill ID verification. So in order to do that, I'm gonna head back over to my skill. I'm going to go back to my skills. And as you can see here, I have this very long, very similar to the number or to the string value that you saw up on my Lambda. I can come back in here under myHelloTutsPlus. And I'm gonna click on this little icon right here which is going to copy it to my clipboard. And then I can come down here and I can go ahead and paste that skill ID in here. And then once I've done that, I can click the Add button. And now I need to make sure. As you can see here, it says there are unsaved changes, I need to go ahead and save that. So it's gonna go ahead and save that. Now I have fulfilled all configuration requirements for my skills kit. You can see what is going on who is going to talk to this, I can enable and delete this and change it if I want to. But now I'm gonna head back over to my actual function itself. And now it's gonna take me down to my function code. Now this is where I was mentioning before that you are able to do pretty much all of the development for this Skill and the server application behind it in your browser. This is a fairly decent text editor kind of development environment for your lambda function. As you can see I can create folders and a structure over here in my environment. Right now I only have a single file index.js, which is where the entry point into my code is going to be. So, I can determine if I want to do in line code editing, I can upload a zip file which we'll do later on. And we can also upload a file from Amazon S3, which it was just a storage mechanism in Amazon, in the cloud and I could go ahead and specify where I want it to get My code from there as well. Once again I can see my run time, I can take a look and change that. And then I can see my handler. This is not something that I'm going to mess around with, but just to understand that this is going to be the handler of your particular lambda function where index is gonna be the name of the file. And .handler is gonna be the name of the function that's gonna be doing the handling. So as you can see, I'm in index.js which is specified here and then handler here is the exports.handler function that is going to be doing the handling. So just something to kind of keep in mind. And then once we're done, we can come in here and start to play around with the actual function itself. Now I'm not gonna do that here, we're gonna start to build this up very slowly in a hello world type context, when we start to put these things together from the skills kit all the way into the lambda management console. But I just wanted to show you the different features here. Just one more thing. Once you start to edit this and change code and all that stuff, make sure you are constantly making saves up here using the Save button. Because nothing is worse than writing a bunch of code or making a bunch of changes, and then forgetting to save it and ultimately losing that work. So just remember, save early, save often. Okay, so that's basically all I wanted to show you in this particular lesson. As far as the lambda functions are concerned in the next couple lessons we're going to finish building out the hello world scenario. So you can see the full end to end communication between a skill and a lambda function


