
 Lessons: 19Length: 2.4 hours
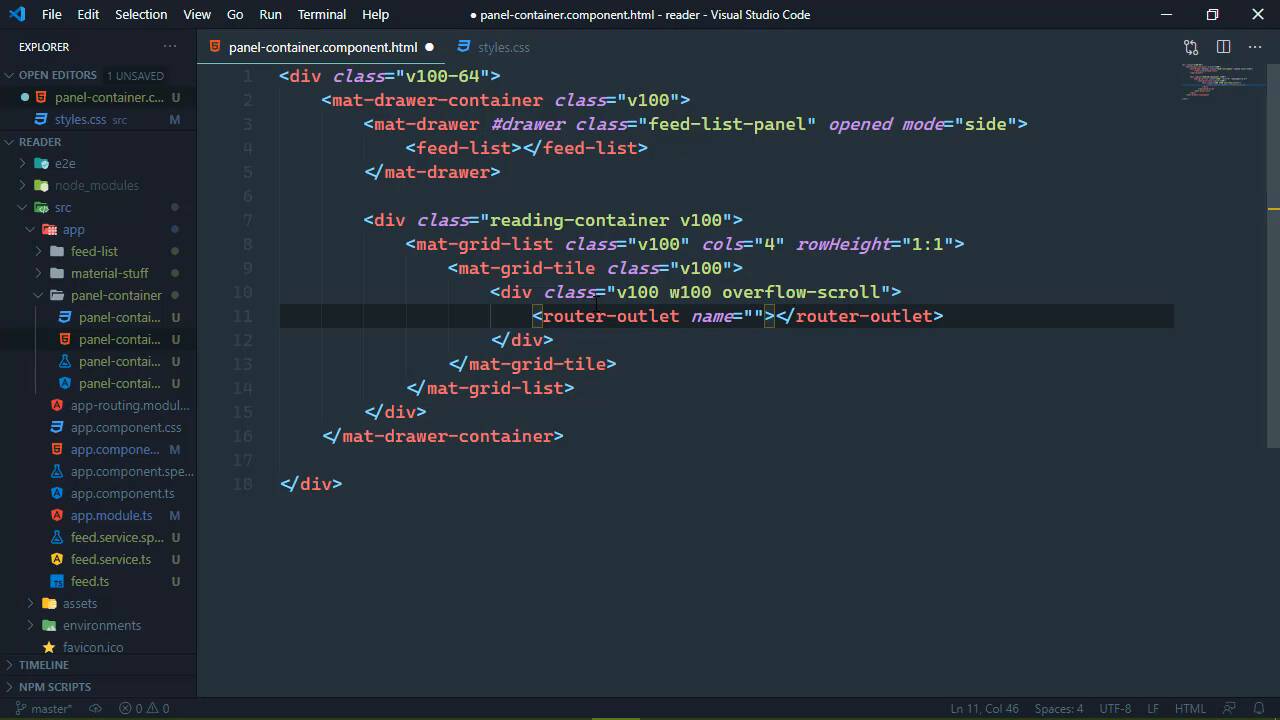
- Overview
- Transcript
3.4 Using Named Router Outlets
Angular's Router is very powerful, and it allows us to define and navigate different outlets with different content. We'll use this functionality to load the selected feed.
1.Introduction
1.1Introduction01:23
1.2What You Need06:14
2.Getting Started
2.1Creating the Project08:21
2.2Designing the Basic Layout08:50
3.Writing the Basic Functionality
3.1Fetching the Feed List08:48
3.2Displaying the Feed List07:06
3.3Toggling the Feed List Drawer05:53
3.4Using Named Router Outlets09:22
3.5Displaying Feed Items09:11
3.6Displaying the Content12:16
4.Adding Settings
4.1Designing the Settings Panel10:03
4.2Using Services to Manage State07:13
4.3Finishing the Settings11:02
5.Managing Screen Sizes
5.1Using the `BreakpointObserver`08:03
6.Authentication and Authorization
6.1Refactoring08:24
6.2Authenticating With the Server07:58
6.3Sending the Token04:19
6.4Authorizing Routes07:05
7.Conclusion
7.1Conclusion01:06
3.4 Using Named Router Outlets
Now that we are finally adding functionality to our application, we need to focus on the action of clicking on one of our feeds. That is supposed to go out to our web service, retrieve the items for those fields, so that we can display them in the middle panel, which I will refer to as the items panel. So let's start logically. We need data first of all to work with. So, let's go to our service and let's add a method that we will use to fetch the items for a feed. And really we want more than just the items, we want the feed itself so that we have all of the extra information about that feed. So we're going to have a method called fetchFeed, we will supply the id of the feed that we want to retrieve. And it will be a lot like what we have for the fetchFeeds method, except that it is not going to return an array of feeds, it will just return a single feed. And our URL needs to also include a segment for the given id, so we will just do that there. Other than that, we're good to go. Now, I do want to modify our FeedItem interface because each FeedItem also has an id. So we will add that to the interface, and we are done with the service, so we can close that. Now let's go to our panel container because we do need to mark up our panels, and we're going to do so using a grid list. This is a component from the material library, and the selector is mat-grid-list. Now we're going to add some styles to this, so I want to be able to easily do that. And we're going to add a class of reading-container to this parent div element, just so that we can use that as a starting point to style the things that we need to style. Now as far as the grid is concerned, we also want this to have a class of v100 so that it fills up the available vertical height. And we also get to define the amount columns that we want. In this case we're going to use four. Now that might seem weird considering that we really only need two panels, we need one for the items and one for the actual content. But defining the columns also allows us to span a column across multiple columns just like in a table, and so we will use that here in a few moments. There's also something else that we want to specify and that is the rowHeight which is a ratio basically. We only want one row, so our ratio is going to be 1:1. Now if we wanted two rows, what we would do is have 2:1, that's basically two rows per one column, but in our case, we just want 1:1. And the inside of a grid list, we have a grid tile, the selector is mat-grid-tile, and once again, we are going to apply the v100 class to it, and this is going to be our items pane. So we're gonna have a div element here, and we are going to apply some classes. One of them is going to be v100, we'll also write one called w100, for specifying that this will fill up the entire available width. And we also want this to be scrollable, so we're going to define a class called overflow-scroll. So, let's go ahead and define those. Let's open up the styles CSS. Once again, this is the global stylesheet, and we will add in first of all that w100 which we will simply set width to 100%, and then we will define overflow-scroll. Now, this is kind of misleading because you can scroll vertically or horizontally and I hate horizontal scrolling, so we're going to just overflow the y axis up and down, and we're going to specify that as scroll. And there's a few other things that we might need to add here, but we will cross those when we get there. So, we will have this div element that is going to serve as our items panel. And inside of this, what we are going to use is a router-outlet except that this is going to have a name. So unlike just normal router outlets to where we navigate to within our application, this is an auxiliary outlet, which essentially allows us to control what we can load inside of this outlet, and we're gonna call this feed items. And we might as well go ahead and define the other title for this grid. So let's just copy and paste what we have because we still want this to have a class of v100. But we are going to use the colspan property, and we're gonna bind that to the value of three. So, the reading panel is going to span across three columns, and the items panel will just be one. We'll still have a containing div element that will stretch both vertically and horizontally, and it will also allow us to scroll, but this router outlet is going to be called content. So, let's change that value. And so, then we have our two panels. Now let's go to our app routing file because we want to start defining our routes and the first route that we're going to define is for displaying our items. The path is going to be items/ and then the second segment is going to be the id of the feed that we want to retrieve. Now, we don't have a component yet for our item list, but let's go ahead and let's define that. Actually, no, let's not, let's do this, we'll say outlet, and this is where we get to to define the outlet that we are going to use. So the router behind the scenes is going to know that we want to load our component that is going to be our items list component, and display that wherever we have defined this feed items outlet, that is the one that we just created. And so finally, let's hop on over to the command line. Let's use the angular CLI to generate a component and we'll call it item list, this will of course create that component. Let's hop on over back to the code editor because I want to modify the selector. So once it pops up, there it is, item list, let's go into the type script file, we will change this from app-item-list to just item-list, and then let's go back to our routing file. So now that we have that component, we can specify that here. And that is going to be the ItemListComponent, and we can rely upon Visual Studio Code to automatically import that. And the only other thing is actually performing the navigation, so let's open up our feed list. We want the marker, and we are going to specify the routerLink and we are going to bind that to an array and we're going to specify the path as just the route. Now that's not going to be very important right now, but it will later on. But we also want to specify the outlet, so that we can perform a navigation on our items list outlet, so that we will display the items. So, here we will simply specify the outlets that we want to navigate in, and we only want one that is going to be the feed-items outlet. And the path is made up of two things, we have the items segment, and then we have the feed id segment, and that's it. Let me make sure the syntax looks good, we have matching braces, okay, I think that that's good. So, if we go to the browser, well, we already see some differences here. If we click on FirstFeed, we should see items-list works, and you can notice what the URL says. Feed-items, which is the outlet, followed by the path that we defined within the route file, so we have items/1 that was for the feed with an id of one. If we click on the secondFeed, we will see that the URL changes to the number 2 for the second segment there. Of course, we're not seeing anything different because we aren't doing anything different in the item list component, but that's perfectly fine because we will get started with that in the next lesson.


