
 Lessons: 19Length: 2.4 hours
- Overview
- Transcript
6.1 Refactoring
Refactoring is a normal part of software development—especially when you start writing new features. We'll refactor our UI some to allow us to easily incorporate a login view.
1.Introduction
1.1Introduction01:23
1.2What You Need06:14
2.Getting Started
2.1Creating the Project08:21
2.2Designing the Basic Layout08:50
3.Writing the Basic Functionality
3.1Fetching the Feed List08:48
3.2Displaying the Feed List07:06
3.3Toggling the Feed List Drawer05:53
3.4Using Named Router Outlets09:22
3.5Displaying Feed Items09:11
3.6Displaying the Content12:16
4.Adding Settings
4.1Designing the Settings Panel10:03
4.2Using Services to Manage State07:13
4.3Finishing the Settings11:02
5.Managing Screen Sizes
5.1Using the `BreakpointObserver`08:03
6.Authentication and Authorization
6.1Refactoring08:24
6.2Authenticating With the Server07:58
6.3Sending the Token04:19
6.4Authorizing Routes07:05
7.Conclusion
7.1Conclusion01:06
6.1 Refactoring
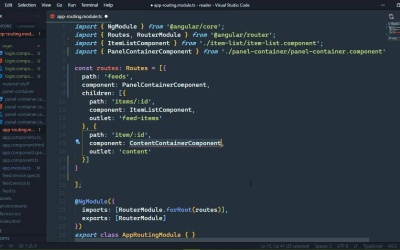
The last thing that we're going to look at in this course is authentication because most applications require authentication, and if yours doesn't, then we all envy you. Now for a single page application like what we have been building, the server is primarily responsible for everything. It's responsible for authenticating the user, it's responsible for making sure that the incoming requests have everything that's needed in order to authenticate the user. All we really need to do is store a token that the server gives us whenever we log in, and then provide that token every time we make a request, and we will get there. But first, there are some things that I want to change to our application to make that transition a little bit better. The first thing I want to do is, of course, add a login form. Now I want to change our URL scheme so that the root of our application is going to display the login form. With a real application, it might be the landing page or something like that. We don't really care about doing that in this particular case, so we're just gonna skip that and use a login form instead, so the route will be a login. And then after we log in, we will be able to go to /feeds and that will display our URL that we've been building, that's where we will work with and view our feeds. So it's very simple on the surface, there's quite a few changes that we need to make though. So let's just jump right in and get started, and really, let's create a new component. So we will generate one, I'm just gonna call it login. And I'm just going to copy and paste what I have because you don't want to see me type out all of this markup, and it's such a simple thing. So, yeah, now we are, of course, using the material library. So there's a little bit of extra stuff going on, but that's a lot of typing for essentially just two fields, a username, and password, and then a button. Now I have set these up so that we can access the username and the password. And right here in the templates whenever we click on the button, we call a method called login, and then we pass in those values. So the once again, this is a very naive implementation, we would want to make sure that the username and the password were provided, but that's all basic stuff. I want to get into the authentication as quickly as possible. There's also this error here so that if the server responds with some kind of error that occurred when we attempted to login, that will display up there at the top. So let's go ahead and open up the typescript for this component. And let's go ahead and stub out that login method where we have the user name, which is a string and then password, which is a string, and we'll just leave that alone. Then we also have that error property, which is a string, and let's initialize that as an empty string. And there we go, we have our LoginComponent. So now let's go to our routing file because we do need to make some modifications here, because right now we just have these two little routes for our named outlets. These are going to become child routes for our feeds, and let's just do the feeds first. So the path is going to be simply feeds, don't put a slash there at the beginning because Angular will complain at you, and the component for that is the PanelContainerComponent. So we'll go ahead and add that, that was not what was supposed to be there. There we go, import panel there, it helps if you select the right thing. All right, and then the third thing for this route is the children. And then we will paste in those previous routes, although we did need ContentContainer, didn't we? Well, that's easy enough to do, we can just import that, and there we go. So we have this all ready to go, we do need to add a route for our login. And this is going to be very simple, the path is just going to be an empty string, the component will be the LoginComponent. And of course, we will be revisiting this when we come in and actually add in the authentication. But for right now, this is exactly what we need. So our routes are all set up, at least they should be, we do need to address the UI as a whole. Because right now, our main UI is made up of two things. We have the toolbar, and then we have the panel-container. And you can make the argument that we don't really need the toolbar whenever we log in, and I would agree with that. So what we're going to do is open up our templates for the app-component, and we're going to take out the toolbar, and we're going to put it inside of the panel-container. In hindsight, we should probably name that something a little bit better, but well, hindsight's 2020. And this also means that we need to adjust our click events for a showing of the feed list and the settings. But this is really going to simplify things because here we have these drawer objects already available to us. We just need to change the object, and then the method that we call, so we no longer need these specialized methods behind the scenes, and we can get rid of those, which anytime we can get rid of code is a very good thing. So that will simplify that, let's go ahead and go to the panel-container's code. We no longer need the drawer and settings properties, so we'll get rid of that. We don't need these toggle feeds and toggle settings methods either, so we can get rid of that as well. And that means that inside of app-component, we are no longer going to have our panel-container because this is where we need the main router outlet. So this is all that is going to be inside of the app-component. And whenever we go to the root of our application, which it looks like we have an error, and it's because I cannot type the word outlet correctly. And I forget what I was saying, but the router then is going to supply the appropriate components for our router outlet based upon the URL. So now here we go, we are at the root of our application, we see our login. If we go to /feeds, then we should see our main UI. And there we go, although, we do need to make some changes to the feed list component, we also need to make changes to the item list. And really, we just need to change the router link instead of the primary route going to just the route. We'll say /feeds for both of these, and that will make those router links work, so that's now, let's see, it's going to refresh. After that's done, we should be able to click on any one of these items, and everything works as it did before. Let's make sure that all of our drawers work, they do, so that's great. And so in preparation for the following lessons, I want to stop our server, not the Angular server, but our feed server. And I want to run the serve script, that is going to set up our server so that it now wants us to authenticate. So if we want to go back to our application, and if we go to feeds, well, it's not gonna work because we need to authenticate in order to get our feed list and do, well, everything else. But first we need to focus on logging in, and we will get started with that in the next lesson.


