
 Lessons: 16Length: 2 hours
- Overview
- Transcript
2.9 Style the Header
To this point in the course, the header has really been nothing to brag about. Now we'll make it a little more attractive by adding a background image, a logo, and some other basic styling.
1.Introduction
1.1Introduction01:07
1.2Prerequisites07:24
2.Building a Custom Theme
2.1What Are Themes?07:29
2.2Create Your First Theme06:55
2.3Regions, Blocks, and Debugging10:59
2.4Introduction to TWIG14:00
2.5Add Custom CSS05:47
2.6Add External Libraries07:35
2.7Add Basic Styles08:16
2.8Create a Main Page05:57
2.9Style the Header14:13
2.10Style the Navigation06:46
2.11Using Partials05:02
2.12More Partials and Content07:23
2.13Adding Styles to Views07:25
3.Conclusion
3.1Goodbye01:12
2.9 Style the Header
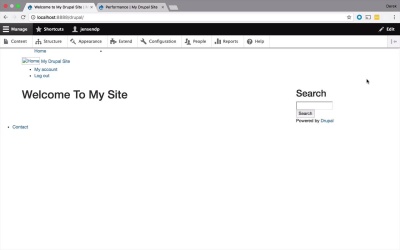
What I'd like to spend a little time focusing on now is the header of this site. Now to this point, you have definitely noticed that even with the tweaks we have done so far, it's kind of a mess. A hot mess, actually. So what we wanna do, is we wanna introduce the idea of creating some styling and really formatting or at least starting to format our header. And over the next couple of lessons, I'm gonna show you a couple of a neat little tricks that we can do, not only to style the header. But to also make some of that custom logic and custom stylings that we're gonna do reusable, across different parts of the site. And actually, some other little nifty tricks as well. So right now, the header's pretty busy right now. And we're actually gonna trim this down a little bit over the next couple of lessons because there's I think a little too much going on in here, as far as blocks living within the header region. So we're gonna kinda start to tease those things apart just a little bit to make our customization and our styling logic a little bit easier. So the first thing that I wanna do though is I wanna focus on a couple of things. So to this point in the course you've noticed that this home has pretty much been broken the entire time. What that is right there is the logo that is going to be associated with your theme. There's a couple of different ways we can handle the logo and I'm gonna show you one that I like to do but there is definitely a couple of different ways that handle that. We also kinda have the title of our site here, which is something that's configurable within Drupal as well. And then what I also wanna do is aside from in doing a little bit with those I want to introduce a background image to the header to make it kinda stand out a little bit, make it a little bit more visually interesting. And then we'll kinda move on from there. So the first thing that I want to talk about is, where exactly is this information coming from? Where are we getting this from? So if I were to right click on my Drupal site and check out Inspect, we're gonna see here that all of the logic and all of the markup that is associated with this area is coming from the stable templates block and block system branding block twig file. So let's take a closer look at that file. So if I switch over to my text editor here, you'll see that I've already gone in to Core, like we've done before. I've gone into Core, Themes, Stable, Templates and Block, and I've grabbed that file, the block-system-branding block. And I've dropped it into my local Templates folder. Just like we've been doing to this point and now, I have it in here and so, we can kinda start to take a look at this a little bit. Now, there's some extra things going on in here that you haven't seen yet before that you really don't need to worry about, to this point. But, what you do need to pay attention to is a couple of these available variables. So, we have the site logo. We have the site name and we have the site slogan. Now, all of these things are configurable within the Drupal application itself, so I'm gonna show you how you can tweak those types of thing. But it's important to know that they're there because they're kinda peppered in here a little bit. So if the site logo is present, if we are using the site logo, then we're gonna use this block of code here. This a tag and this image in here as well. And then if we have a site name then we're gonna go ahead and use that site name. And there's some interesting things going on in here as well, that within this logic here we're actually going to use a path function here to go and actually get the path to the front of our site. So basically this is dynamically generating a link to our home page which is pretty nifty as well. And then you're also gonna see this kind of periodically in the pre built templates as well, that you'll see some text. And then you'll see this kind of vertical bar and a t. And that basically means translate. So this is a filter this pipe here is a filter that's going to run this text through the translate engine. And so basically what this allows you to do is if you have done localization or globalization on your site to make it support different languages then this is how you would handle that from a code perspective. But for this course, we're not gonna worry about that too much, just kind of know that that's what that is doing. So right now what we wanna take a look at is the site_logo, site_name and the site_slogan. So if you were to come back to your application here, and if you would head into structure. And block layout, right now all of this is living within site branding, so that's what that template is that we've been looking at. So if I go ahead and hit Configure here, you're gonna see the site logo, site name, and site slogan. The nice thing here is that there's also links to where you can set this information. So if I wanted to change what the site logo looks like, which we're going to do and I'll show you that in a few moments. You could go to either appearance or theme settings and then the site name and site slogan are all in site information that we have under configuration here. But what you can also do is you can toggle these. So let's say I wanted to turn of the site logo, and I hit Save block and I go back to my site I'm gonna lose that logo. So I don't have to use a logo if I don't want to, but that's one of the nice things about using this if block is that, if there is a site logo go ahead and do this but if not, don't worry about it. But for our site we do want to have a logo, so let's go ahead and go back into our site branding. Hit Configure and let's leave it in there for now. And we're gonna customize that in just a few moments. So what I wanna do is, I want to adjust this a little bit. So let's go ahead and start by going through the process of creating a background image for our site or at least for our header. So what I've done actually to this point is I have created an images folder, and I've put two files in there, background.jpg and logo.png. You can use whatever sort of logos you want or images you want and all, include these within the source that you get for this course. Basically, I created a little bit of a custom header image here. So I pulled down a free image and just kinda cropped it a little bit so we could use it as the header. And then one of the popular logos for Drupal sites is actually the little Drupal guy which is kind of a cool image. So we're just gonna use that as a sample here, but once again feel free. To use whatever sort of background images or logos you would like. So what I wanna do now is I want to start with the background. So what I wanna do now is I want to get a hold of that background and I want to start to tweak the things that are going on in there. So let's take a look at that from the front page perspective first. So right now we have this div block here that has our page header in it. So what I want to do is I'm gonna grab this, and I'm actually gonna pull it outside of the container. And if you're familiar with Bootstrap, then you'll know that, that container kind of puts that with restriction on your content. So it gives it this kinda indentation here on the left and the right, so that's what that container is doing by default. But what I want my header to do is I want the image to spread all the way from edge on the left, to edge on the right. So the easiest way for me to do that, is to pull that outside of the container but I still want this header, to live within the same kinda width restrictions. So the trick I'm gonna use here, is I'm gonna create another div in here and within this div, I want this to be a container again so it's gonna have those same restrictions. And then I am going to put my header in there. Now, that might seem kinda silly, but what that allows me to do now, is within some custom CSS, I can get a hold of this blog header here and then I can use a background image in it. So here's what I wanna do now. Remember previously, when we started to add some CSS, I created a style.css file, but to this point, it's been blank. But now, we're gonna actually start to add a little bit to it. So what I wanna pay attention to now is this blog header class, so let's start with that. Let's say, blog-header, like that. And so what I wanna do now is I want to give this blog header a height. So I'm gonna restrict this a little bit, so I'm gonna say its height is gonna be something like 250px. I think that ought to be good. And then I wanna set the background as well, and I'm gonna use a url(). And now you have to remember where you are within your structures. So right now this CSS file lives within this CSS folder, and I wanna go to this background.jpg right here. So I need to go outer level, so I'm gonna have to say this is going to be ../ and then I wanna go into image, and then I wanna get background.jpg. And then this is going to be no-repeat, and then I think that should be good to start. So let's go ahead and save that. Let's also save our pagefront.html. And let's come back, and let's refresh this. So now obviously that may not work because we start to play around with some of the structure and the files here so we need to clear our caches. We'll come back and we will refresh, and there we go, now we're starting to have a little bit of a header here. So you see we have a background images. And it's decent for my styling skills, but it's at east giving us a little something with a little bit of flair. So now we've got that, now we want to play around with our home image here. And maybe do a little something with my Drupal site. It's a little tight there, I wanna give that a little bit of spacing. So what I wanna do now is I wanna start to tweak this Home image here. So the first thing I'm gonna do is I'm actually gonna go into Appearance. And I wanna go into the Settings of my theme and I wanna come down here to Logo Image. Now Logo Image is where you can specify what image you want to use. Now, by default, it says use the logo supplied by the theme. So what you could do and what a lot of designers will do, is they will put a logo.svg in the main root folder of their theme and a lot of times that'll be picked up by Drupal, and you'll see that on the screen. But what I wanna show you is how you can customize that. So I can come in here and uncheck this, and you're gonna see that I've kinda cheated a little bit and it's got a pre-populated in here. But you can do is you can specify a path to your custom logo, anywhere within your theme. Now, typically when I'm creating websites or when people that I know, designers are creating websites. They like to use proper structure and they'll usually put all the images kind of together in an images folder kind of like I've done here. Maybe nest things a little bit but typically you'll see the images in an images folder like that. So that's why I have that here. So we have themes/thebest/images/logo.png. So what I wanna do now is I'm gonna Save that configuration. I will come over heer and I'll clear my caches again, and then I'll come back to my site and we should see a nice gigantic image of the little druple mascot here. Now that's a little bit big, you might wanna tweak that a little bit so let's go ahead, and get into some stylings on this guy as well. So if I were to come back over here to my block system branding block, you're gonna see right here we have this image and this is where that site logo is coming from. So what I wanna do now is introduce a class here, so I can style this a little bit, and we'll just call this how about main_logo, something like that, whatever sort of name you might want. So that's what we're gonna put in there and then we wanna come into my style, and we'll just say, I want to create a class here for my main_logo. And we'll just do a little zoom trick here, we'll just zoom 50% like that. So let's go ahead and Save that, and if I come back and refresh, obviously that's not going to work. Let's clear my cache and then I will come back to my site and let's go ahead and refresh. And now we've shrunk it down a little bit. So now we're starting to make this a little bit more aesthetically pleasing, whether or not that actually jives with the color scheme of the site is irrelevant. But you can start to see how you can play around and style where this logo is. Whether or not it exist, you could put it on the right side, you can leave it on the left. Either way, we're starting to look pretty good here. Now also what I wanna do is I wanna introduce a little bit of space in here. This My Drupal Site thing is pretty tight right here. I just wanna space that off to the right just a little bit. So let's come in here to our block system branding again. And we're gonna see here that if we have a site name, then we're going to create this little site name a tag right here. So I'm going to introduce a class here again. And we'll call this main_site_name something like that. That should be good, let's go ahead and copy this. We'll head over to style, and then we will paste that in here and let's just go ahead and may be give this a little bit of padding. So we'll say padding-left and we'll give it about 30 pixels. That should be good, that should give it enough space. Let's go ahead and refresh and clear our cache here. Come back to our site, refresh. Okay, and now we're kind of off a little bit. Maybe that could be a little bit too far. But I think, for the most part, that's gonna do just fine. So now we've gone through the process of being able to add a background image to our header. We have our logo, we've kinda got our site title here. We're starting to kinda come along a little bit. Now the next thing that I wanna spend a little bit of time talking about is going to be the navigation on our sites. We've kinda got a lot of busyness going on in here. We have kinda like the sections of the website here so if you had additional pages home, about us and things like that, you'd see those here. And then we also kinda have the user stuff in here, the user links, My account, Log out, Log in those types of thing as well. And I think I'm gonna separate these out a little bit but in the next lesson, I'm gonna show you how we can start to work at formatting the menu.


