
 Lessons: 16Length: 1.1 hours
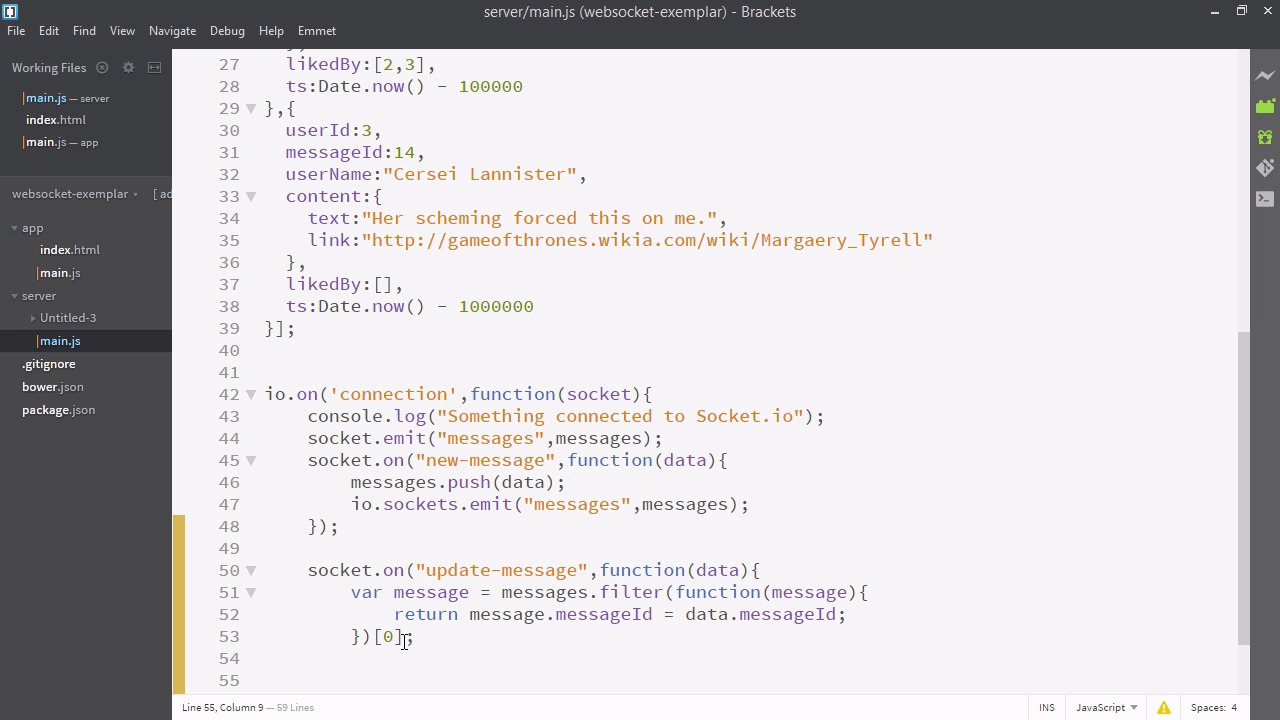
- Overview
- Transcript
3.7 Propagating Like Counts to Connected Users
To complete the app’s functionality, we’ll propagate the updated like counts to every connected user using Socket.IO.
Related Links
1.Introducing WebSockets and Socket.IO
1.1Introduction01:23
1.2What Are WebSockets?04:43
2.Scaffolding a Socket.IO Application
2.1Installing Node.js and App Dependencies02:59
2.2Creating an Express Server04:35
2.3Adding WebSockets to the Back-End03:00
2.4Connecting the Front-End Application to Socket.IO04:47
3.Building the Front-End Application
3.1Receiving Socket.IO Events03:20
3.2Displaying Messages06:22
3.3Creating Messages and Updating Collections07:50
3.4Displaying Likes02:31
3.5Providing Users With Unique Ids03:41
3.6Updating Like Counts05:03
3.7Propagating Like Counts to Connected Users04:12
4.Completing the Application
4.1Adding Moment.js04:13
4.2Adding Styles03:09
5.Conclusion
5.1Conclusion05:52
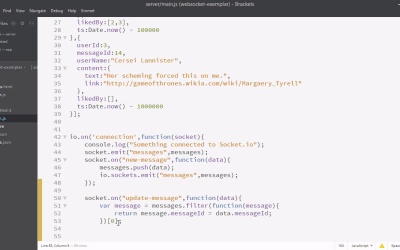
3.7 Propagating Like Counts to Connected Users
In this video, we're now going to persist the items we like to the back end, using WebSockets. So first, to our add message function, let's add a new field called messageId. And we'll make that equal to invoking our randomId function. Now all our messages will have IDs. So let's go to server/main.js. So the only place we have a reference to our socket is inside the io.on block. So we're actually just going to copy this socket.on for new message. Paste it below and we'll just change this to update message and erase what's inside, so what are we going to do when the updated messages comes? Well, basically, we have our own collection of messages here on the backend. So first, we'll find the message on the backend that is equivalent to the one that's sent in. How? We'll use the message ID field. So, we'll filter through all the messages. And we'll make that equal to the first element of that array, so we just want one thing. So we now have a copy of the message that was sent in from the front end in data. And we have our own copy in message. So let's make our own copy on the back end. Have a liked by, and we'll just copy the liked by property from our new data object. And now that this is updated we need to inform all the other browsers of this. So we'll emit on messages. I'll just copy it from above. Now, let's be sure to restart our server and have a look. Whoops! And we've made one tiny mistake here. Let's see if you can spot it. It's right there. Yes, inside this return statement this should be a double or triple equals. That's one of the tricky things about JavaScript. In another language, we definitely would have received a compile time error when this happened. But luckily we don't receive such an error in JavaScript because writing JavaScript is just too much fun. Okay, here I am with my chrome browser and Firefox browser opened right next to each other. Let's see what happens if I like one of these events. Very cool, so we can now like or dislike items in each browser. You can see it's treating each of those sessions independently and in addition they update instantly. I do recommend you try this out because this is very, very cool. Very nice. So now our app is essentially complete. In the next videos, we're just going to be adding a little bit of style to it and making it look more complete, but if you've gotten this far, you've learned a massive amount of stuff about sockets.io that you can use.


