
 Lessons: 16Length: 1.1 hours
- Overview
- Transcript
2.3 Adding WebSockets to the Back-End
In this lesson, we’ll build the server back-end with Socket.IO, allowing browsers to connect in real time to our server.
Related Links
1.Introducing WebSockets and Socket.IO
1.1Introduction01:23
1.2What Are WebSockets?04:43
2.Scaffolding a Socket.IO Application
2.1Installing Node.js and App Dependencies02:59
2.2Creating an Express Server04:35
2.3Adding WebSockets to the Back-End03:00
2.4Connecting the Front-End Application to Socket.IO04:47
3.Building the Front-End Application
3.1Receiving Socket.IO Events03:20
3.2Displaying Messages06:22
3.3Creating Messages and Updating Collections07:50
3.4Displaying Likes02:31
3.5Providing Users With Unique Ids03:41
3.6Updating Like Counts05:03
3.7Propagating Like Counts to Connected Users04:12
4.Completing the Application
4.1Adding Moment.js04:13
4.2Adding Styles03:09
5.Conclusion
5.1Conclusion05:52
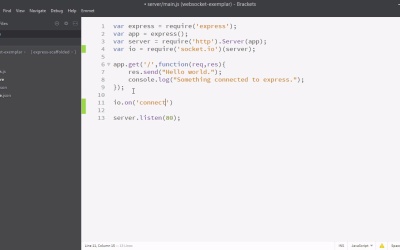
2.3 Adding WebSockets to the Back-End
All right, welcome back. Have you been remembering to save your work frequently and update your get repository? I hope so. So now we're going to take our hand at installing socket.IO. So the first thing we're going to do is require Socket.IO. We already installed it in the first video. So here at the bottom we'll create a new variable called io, and we'll make that equal to requiring Socket.IO. But we're actually going to take that and invoke it on server that we defined above. Now I know what you're thinking. There's a lot of variables at the top and they're all interlocking quite a bit. Yes, that's how to get a Socket.IO app to work. There's actually a number of different ways you can go directly with express without http or go directly Socket.IO. This is just the route we chose for this series of videos. Now we're going to listen for something to connect to our io. So we'll say io.on. And we're going to pass it this special string connection. And we'll pass it in a function and the function has a socket argument. Now whenever a Socket.IO thing connects to our application this function will run. So we'll give it a console a log to make sure it worked. And now we'll say socket.emit. Now the socket is the argument that came in in this function. So the first argument is the type of our mission. And we'll just call this messages since this is a message rating app. And the second argument will just be an array and we'll just make a dummy array of simple messages. Pretty simple but it'll work for now I think. All right, so this is working, but we're not going to actually be able to see this code run until something connects to Socket.IO. We'll do that in the next video.


