

- Overview
- Transcript
3.4 Organizing Views
Typical applications have multiple controllers and views for those controllers. Naturally, you'll need to organize your views. You'll learn the conventional way to do that in this lesson.
1.Introduction
1.1Introduction01:53
1.2Set Up Your Environment05:37
2.Basic Routing
2.1Routing Requests07:07
2.2Working With Query Data09:37
2.3Route URL Parameters07:24
2.4Routing to Controllers08:22
2.5Creating a View08:10
3.The Blade Templating Engine
3.1Introducing Layouts08:15
3.2Working With Static Resources05:03
3.3Generating URLs for Routes03:26
3.4Organizing Views09:41
3.5Using Blade Directives07:37
3.6Showing and Linking Data07:31
3.7Setting Up the Database03:57
4.Working With Data
4.1Creating Migrations and Models10:08
4.2Saving Database Records08:57
4.3Validating User Input07:38
4.4Updating Data07:04
4.5Using Type Hints and Request Classes08:50
4.6Using Mass Assignment06:08
5.Conclusion
5.1Conclusion01:03
3.4 Organizing Views
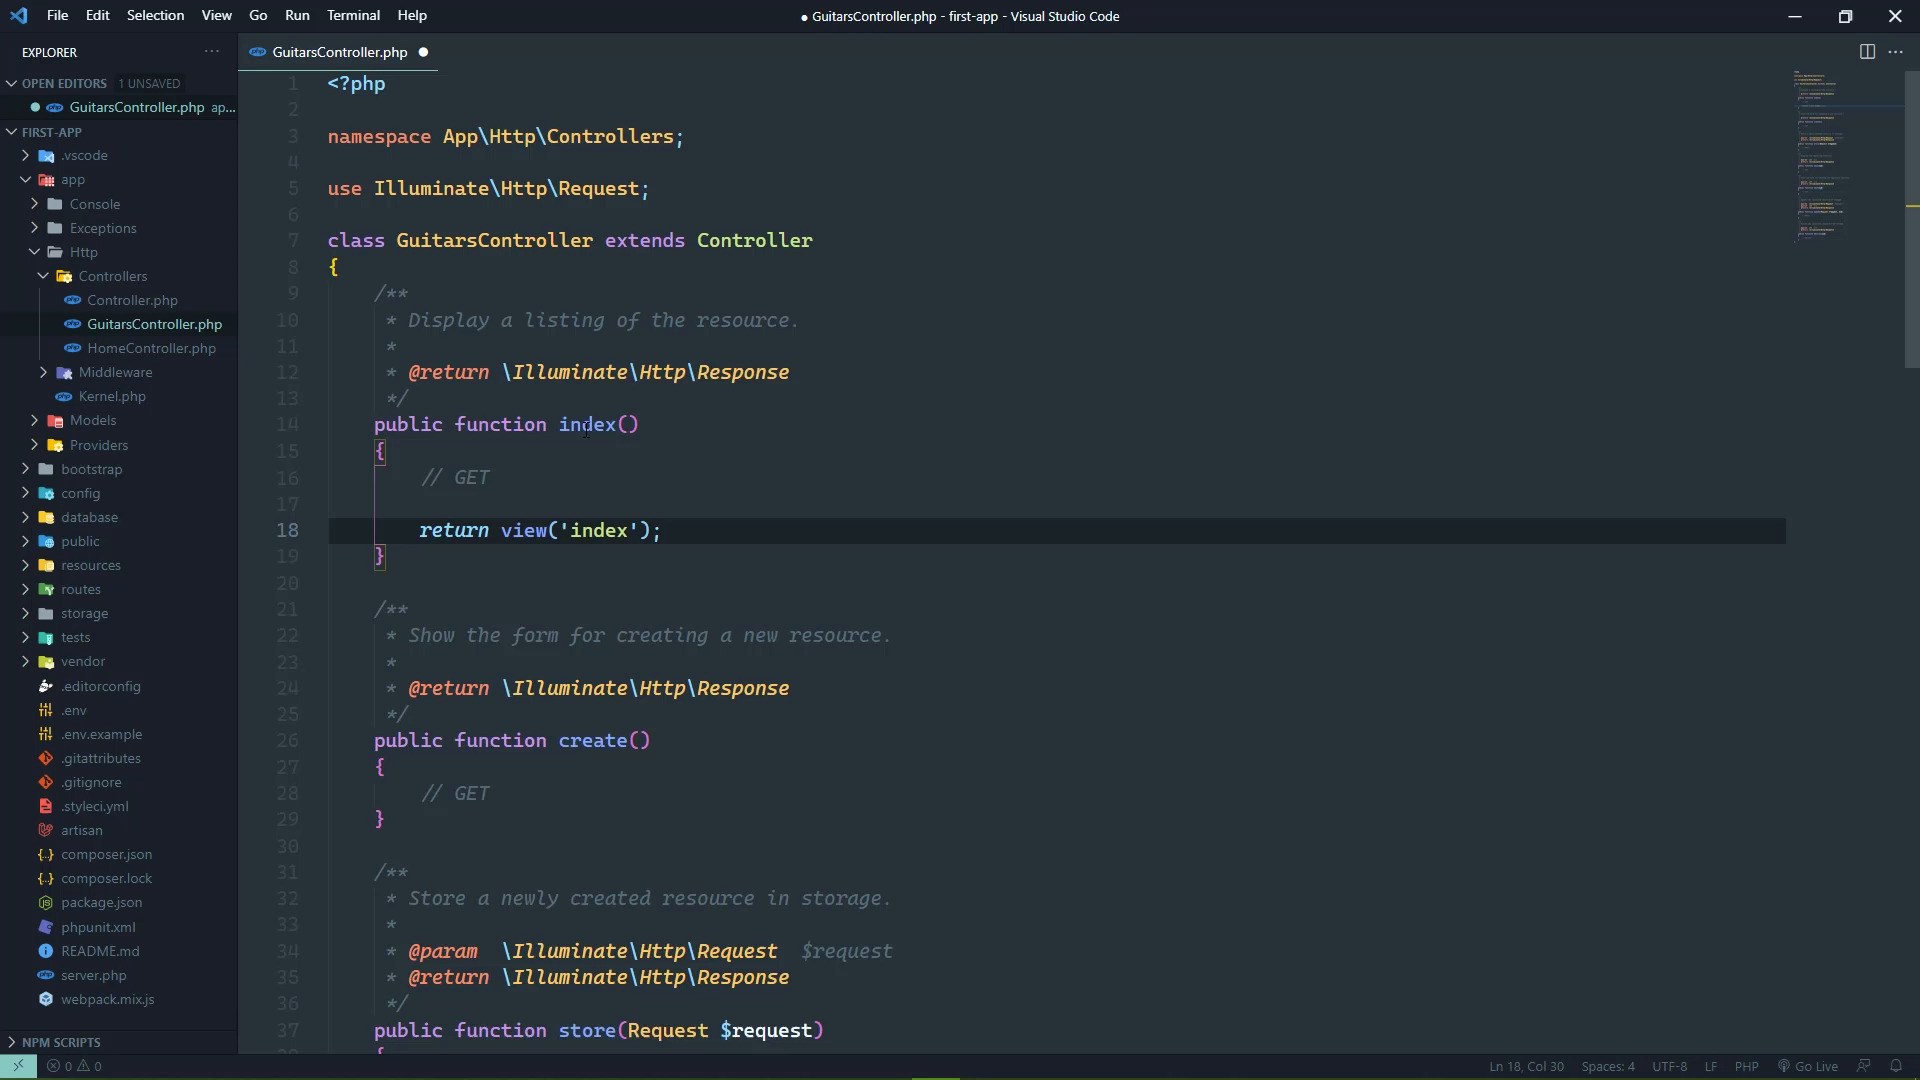
We need to start moving towards working with data. So in this lesson, we are going to create a resource controller, and we will also talk about what a resource controller is. But we will also wire everything up as far as the routes, as well as the first few views that we are going to use to display some things. So let's start by creating a resource controller. We will use artisan to do that because well, it just makes it so much easier to do it especially with a resource controller. And you'll see why. And I could explain to you what a resource controller is, but it's just a whole lot easier just to show you and that's what we're going to do. So the command is PHP artisan make controller, and then the name of the controller that you want to create. This is going to be a resource controller for guitars and then the resource flag. The option is to have just dash r but I like verbosity when it comes to commands like this, because as I'm looking at the screen, I want to see that this is a resource. What the heck is -r? So, here we go, we have just created our controller and it's going to end up in the same place as our home controller. So that is app HTTP controllers, and then there's guitars controller, and there's gonna be a lot here. So this is why artisan makes this so much easier because if you're going to create a resource controller, then you would have to implement all of these methods. Okay, so what is a resource controller? Well, a resource is really nothing more than a single type of data that your application is going to work with. And the controller contains all of the action methods, for working with that particular type of resource. So what do we do with a resource? Well, it's primarily four things, we create, read, update and delete. We refer to that as CRUD and a resource controller provides everything necessary for cruding a resource. So in this particular case, a resource is a guitar. Now, it'd be great if it was an actual guitar but no it's just the information about the guitar. Things that we would store in a database, such as the name, the manufacturer, the year that it was manufactured and things like that. So I'm going to mark some of these with the types of HTTP requests that are used. So index would be for showing All of the particular resource. So since this is a guitars controller, the index action method would be for displaying all of the guitars in the database. So that is a get request. Create is a get request, because when it comes to creating a resource, you essentially need two things. You need a get request for showing the UI for creating that resource, and then you need the method for actually creating that resource in the database. So the create method is for showing the UI for creating a resource, the store method is for actually storing or creating that resource in the database. Then there's the show method which is for showing an individual resource, so this would use the provided ID to fetch the appropriate record out of the database. And then this would show that information. The edit is a get request for showing the UI for editing a particular resource with a given ID. And then that is followed up with update which is for actually updating the item that you want to edit. Now, this is a little bit different because the update action method will execute differently based upon what was actually requesting it. If it was a request from the web browser from the the actual web form, it would be a POST request. Because browsers don't support any other kinds of requests except to GET and POST when it's coming from a form. Now, if it's coming from JavaScript, then it can be a PUT or a PATCH, it depends upon the type of update that you are going to do. But since we will be dealing primarily with just a form, it is going to be POST, so we'll just leave it as POST, and then destroy, which is for removing or deleting a resource. So this would be deleting a record from the database. And that is the delete HTTP method. Let's start with the index and we are going to return a view. We'll call that view index, because me personally when it comes to views, I like to associate the views with the action methods just because it makes it easier for my brain to link those two things together. So let's go ahead and let's create that view. We'll go to the resources views folder. But before we create this file, let's think about the future, because any application is probably going to have multiple controllers. Some of those controllers will more than likely be resource controllers. So that means we will have multiple index action methods, which means that we will have multiple index views. So it makes sense to start organizing our views according to the controllers that are going to use them. So inside of the views folder I'm going to create a new folder, simply called guitars, the idea being that this is the folder that contains the views for the guitars controller. That's the typical convention, you can use whatever convention you want. And then inside of this guitars folder, we'll create a new file called index.blade.php. Let's go ahead and extend the layout. Let's also go ahead and define the section for the content. And we'll just say that this is content. In the next lesson, we will actually provide some content here. And we of course need to close out that section. So that's our view, we'll close that for now. But since our view is inside of a different folder, we need to change the name of the view that we want to use. It can't just be index anymore, because that would be a file directly inside of the views folder. We need to specify that it is in the guitars folder, and we do that just with guitars followed by a dot and then the name of that view. So guitars.index, when it comes time to implement the create UI or the creates view it will be guitars.create. Then we would have guitars.show and so on and so forth. So with that setup, all we have to do is wire up the routes. So let's go to our routes. And we could define each individual route for each individual action method. But no, I mean, you can if you want to, but times valuable. We are going to use a method called resource, and it is going to do all of the workforce. It's not only going to create the routes, but it's also going to give them unique names, so that we don't really have to worry about anything. All we have to do, is pass in kind of the URL prefix that we would want to use. So by using guitars here, this means that all of the routes are going to be based upon slash guitars. So our index is just going to be slash guitars, but the create method would be create, the edit method would be edit. In order to display an individual guitar, it would just be the ID from the database. So we don't have to worry about any of that at all. Calling this resource method passing and guitars, is going to automatically do that for us. So that then all we need to do is specify what controller is going to be used. And that is simply guitars controller, plus and we do need to import that, don't we? So let's just copy what we did for home controller and then make the necessary changes there. And there we go. So let's add a link. Now remember I said that this is automatically going to name the routes for us. We don't have to worry about that. And it's very simple. It's going to start with guitars, which is the name that we passed as the first argument, followed by the action method. That's it, guitars.index will be the name for the index route guitars.create, guitars.store, guitars.show. So it kind of falls in line with the naming scheme for the views as well. So let's open up about, let's add a link to guitars. Let's put this after home. And all we need to do is say, guitars.index, we will have our guitars there. So as long as I saved all of the files, this should work. Let's refresh here, inside of our menu we should see guitars, we do. If we click on guitars, everything should still be there. And then this is content. So we are seeing the content from the guitars index view. So in the next lesson, we are going to actually display information. We're going to pass data to the view so that we can work with that data to display the information.


