

- Overview
- Transcript
3.4 Viewing Messages
Our app lets us create messages, but now we need to display them. In this lesson, I'll show you how to use our Eloquent model to retrieve the data from the database and pass it on to the view.
1.Introduction
1.1Introduction02:09
1.2What You Need07:42
2.The Static Site Project
2.1View and Routing Basics10:22
2.2Layouts and Sub-Views07:58
3.The Shoutboard Project
3.1Database Configuration and Migrations14:23
3.2Creating the Model09:38
3.3Creating Messages14:20
3.4Viewing Messages07:41
3.5Adding a Message Title With Migrations07:07
4.A Ticket System
4.1Introduction to Controllers09:02
4.2Setting Up Our Database16:09
4.3Viewing a List of Tickets08:51
4.4Viewing and Editing Individual Tickets13:08
4.5Adding Authentication10:01
4.6Linking Tickets With Users14:58
5.Conclusion
5.1Conclusion01:22
3.4 Viewing Messages
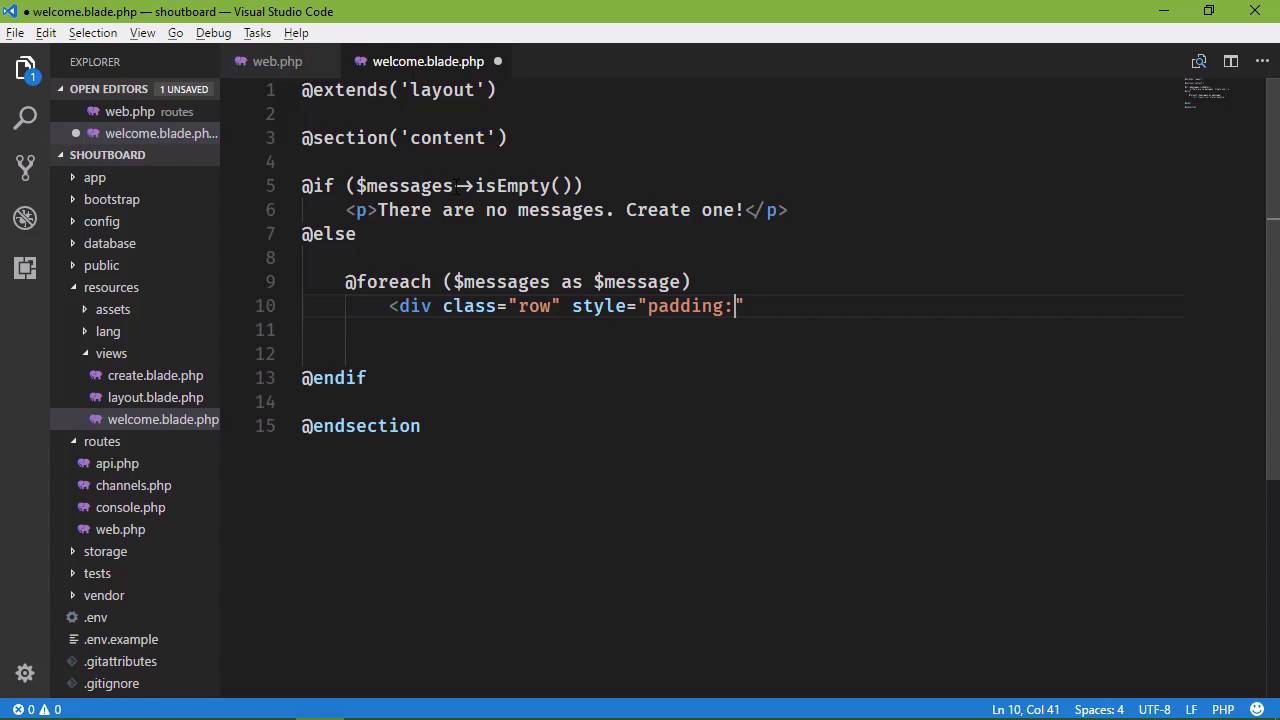
In the previous lesson, we set up our application to receive information from the user, we validated that information, and then stored it within the database. So now, we just need to be able to display our messages, because right now, we aren't. We just have this placeholder content. So we're going to start in our routes, because that's really where we need to start. We need to retrieve our information, and then send that information onto the views, so that we can display that information. So let's go to routes webphp and we want to go to our index route, which is the root, the one without any path there. So we want to retrieve our messages, and then send them on to the welcome view. So we do that, with our message class. Now, we're not going to create an object, instead we're going to call a method, simply called all, that's going to retrieve all of our messages, so that we can then pass them on to the view. But let's do this, let's store them within a variable, I'm going to simply call that model because that is essentially what we are retrieving here. And then, we want to pass that on to the view, and we can do that in several different ways. But the way that I like to do it is to simply pass in another argument to the view method. And it's going to contain two things. The first is a variable name that we want to use inside of our view. So since we are dealing with messages in this case, let's just call this messages. So that inside of our view, in order to refer to our messages, we will use a variable called messages. And then we want to specify what our messages are. And that is going to be our model. So we're done here, this is all that we need to do for this. All of the other work that we are going to do is inside of our view. So let's go to the resources folder, let's go to the welcome view, and let's get rid of this placeholder. So the first thing we want to do is display a message if there are no messages. That way, we are at least displaying something. So we're going to use an if statement here. So @if, and then we get to use our messages variable. Now, once again I want to point out that what we are using here, messages, is defined here, whenever we pass data on to the view. So we could change this to foo, and then inside of our view, we would refer to our messages as, foo, if we wanted to do that. I don't, because that doesn't make sense. We're going to use messages. So we have messages, so we say, if messages isEmpty, then we want to display a message saying that there are no messages. So let's close out our if statement, and then we'll just have a p element that says that, There are no messages. But then we will say, hey, Create one! That sounds good. So if there aren't any messages, that is what is going to be displayed within the page. But if we do have messages, then we, of course, want to display them. So we need to loop over our messages because we have more than one. Well, right now we just have one. But ideally, we would have more than one. So we're going to use a, foreach, and messages as, let's just call the individual message what it is, a message. And then we will have a div element, let's set the class to row. Let's go ahead and set some inline style because we want to be bad. And let's just set some padding so that messages are spaced nice. And we just want to display our message. So here, we will say, message, but this is an object. This object has all of the properties that our model has, and our model has the properties from our database, so we have an ID property, we have an email, message, created_at, and updated_at. So here we want to display the message, and ideally, we would display the email addresses, but you know, in the real world we don't want to display people's email addresses. So we aren't going to do that. And we will end this for each loop, and now, whenever we go to our web application, let's refresh the page. We see our first message, let's create another message. So this one is going to be foo@bar.com, this is our second message. And let's submit that. So that now on our main page, we see both of our messages. This is our first message and this is our second one. But really, we want to display our messages in reverse order. That makes the most sense, so that the most recent messages get displayed first. So that means that whenever we retrieve the information from the database, we need to sort that information and we can do that with Eloquent. We have the ability to build a query, but thankfully, we don't have to do so using SQL. So instead of using the all method here, we're going to say, orderBy, and then we get to specify the column that we want to order by. Well, let's look at our database. We want to order by the created_at field because we have those two fields, we have created_at and updated_at. So we want to order by created_at and we want to do so in descending order and then we will execute our query by calling the get method. So now, let's go back to the browser. Let's refresh the page. And now our messages are in reverse order. We have our second message first, followed by our first message. Now, if you wanted to inspect each individual message object that we are working with, we could get rid of the message property whenever we display that. So if we just specify message here and we refresh, we're going to see all of the information about that message. So as we are developing, if wanted to quickly see that the date might be something that we want to use, then we can do that. And let's do that. So we'll have two things, we'll have our message. And in fact, lets put that inside of a p element, and then we will have our heading as the date and time. Let's have something not too big, like an h4, and we will say, message and then created_at. That will display the date and time that our message was created. So that now we have a heading, and a message. And if there was any question as to the order in which our messages were being displayed, we could just simply look at our headings. It's not the perfect solution. Ideally, we would have a title, as well, so that we would have the email address, the title and the message. And since we are using migrations, we could actually easily do that, so in the next lesson, we are going to add a title column to our model.


