

- Overview
- Transcript
4.4 Viewing and Editing Individual Tickets
Next, we'll write the controller methods and views for editing and viewing an individual ticket. In this lesson, you'll also learn about route parameters and how to use them in your controller methods.
1.Introduction
1.1Introduction02:09
1.2What You Need07:42
2.The Static Site Project
2.1View and Routing Basics10:22
2.2Layouts and Sub-Views07:58
3.The Shoutboard Project
3.1Database Configuration and Migrations14:23
3.2Creating the Model09:38
3.3Creating Messages14:20
3.4Viewing Messages07:41
3.5Adding a Message Title With Migrations07:07
4.A Ticket System
4.1Introduction to Controllers09:02
4.2Setting Up Our Database16:09
4.3Viewing a List of Tickets08:51
4.4Viewing and Editing Individual Tickets13:08
4.5Adding Authentication10:01
4.6Linking Tickets With Users14:58
5.Conclusion
5.1Conclusion01:22
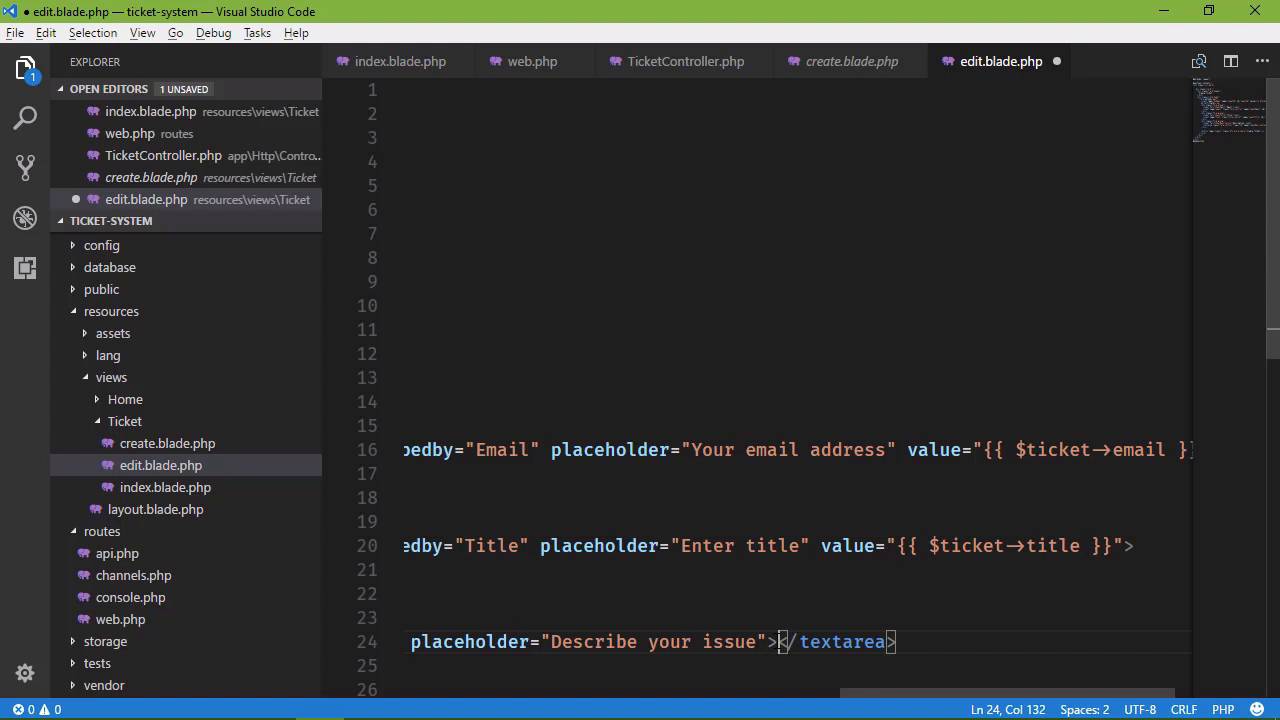
4.4 Viewing and Editing Individual Tickets
Well, now we need to be able to view and edit an individual ticket. So let's work on that in this lesson. Now in the previous lesson, whenever we worked on the index view we went ahead and generated the url for this. So let's look at that. If we go to index. The url is tickets/ and then the id. Although let's do this, let's add edit in there. So it will be tickets and then edit and then the id of the ticket that we want to edit. So what we want to do first is go to our routes, because we already have the url set up, so it makes sense to go to our routes to go ahead and define that route. And then go to the controller and write the necessary code there. So let's go to routes and then web.php. And we need a get and a post request. So I'm going to take what we did for the create resource, and then make some modifications for edit. Now this is not enough for us. I mean yes, we want tickets in edit, but we also need to know what the ticket id is. So we can't realistically come in here and a add a route for every new ticket. That means that we would have to add edit/1, edit/2, edit/3 and so on and so forth. So this is a dynamic value. And in programming whenever we have a dynamic value we typically use variables. So when it comes to routes and dynamic values we have routes parameters. So we will have tickets and edit, those are, of course, static values. But then for our dynamic value, or a variable, if you will, we use a pair of curly braces and then whatever name we want to give it, ticketId. So whenever a request comes into our application and it has tickets/edit and then / a third segment, then that is going to match this route url. And so it's going to go to whatever method we specify. Let's have showEditForm. Now, we could get away with using the showCreateForm view. We could do that, but there are some differences between creating and editing. So we´re just going to create a whole new view. Now, we are going to use the create view as a basis, but we will have a new view there. And then, as far as performing the actual edit, we´ll just have a method called edit. And once again, we will have a ticketId route parameter. So let´s go to app, Http, Controllers and then TicketController, and we are going to add in those methods. Let's just grab what we have for the showCreateForm and the create methods, and we'll use those as a basis. So for our showEditForm, we are now going to receive a ticketId. So Laravel is going to see that there is a url parameter, or a route parameter, within our route. It's going to grab that value and pass it to our method so that we can then use that inside of our edit form. And we will do the same thing for our edit method. So we'll have a ticketId and then we will also create a form request class for editing a ticket. So when it comes to editing a ticket, we want to take that ticketId and find the ticket within our data store. So let's do this ticket = we're going to use our Ticket model, and then we can use one of two methods. The first is called simply find, and then you pass in the primary key, in that case it is our Id column. And that would find a record with that given primary key and that would be fine. However there's also another method called findOrFail. And this is nice because if it doesn't find a record with that id, then it's going to return a 404 not found. And that's very useful because we don't have to do any type of checking or anything like that, it just automatically happens. So if we have a ticket with a given id, that's great, we have ticket, otherwise, a 404 is returned. So then we're going to return the view, we're gonna call that edit. And then we are going to pass in our ticket. And we'll just call it ticket. So we'll say ticket and that's going to be ticket. So let's go ahead and create this view so that we can at least see how this is going to work. So let's go to our create view and let's copy and paste and we'll change our copied version to simply edit.blade.php. Now the thing here is that we need to know what ticket that we are going to edit. That's the main difference between editing and creating. So we do have the id in the url but that's not enough. We need the id inside of the form itself. Because that way, whenever we submit the form, we can ensure that we are editing the ticket that we are supposed to edit. So we will compare what we have in the url with what we have from the form. If they match then we edit, otherwise we don't. This way we can protect ourselves from malicious people making requests to overwrite our tickets. So we're going to add a hidden input. So type hidden, let's set the name equal to inputId. The id is going to be inputId. And then the value is going to be the value of the id property. So we will say ticket and then id. And we need to do that same thing for our other fields because we want to populate our other text boxes with their respective data. So let's do the same thing for the email address. This is of course going to be email. And we will do the same thing for title, so let's do that there. But the description is going to be a little bit different because this is a text area. We don't have a value attribute there. Instead, we specify the content of the element itself. So ticket description and really that's it. Although we do need to change the text for the header, as well as the button from Create to Edit. But that's really it, it's just the inclusion of this id. And we could write a single view and then writes some logic in there. Is the id present? Okay, then it's an edit form, is it not present? Then it's a create form. But that just adds complexity to your views. And let's just keep things simple. That makes sense to do so, because simple things are easier to maintain. So we have our edit view. Let's go ahead and create our edit request. And we going to use the CreateTicketFormRequest as a basis, because it just makes sense to do so. We're going to reuse a lot of this code. So we're going to change the name to EditTicketFormRequest, and we also need to change the name of the class itself, so let's do that. And we need a new rule because we have this inputId now. And we want to make this required because if we don't have an id then there's nothing to edit. So that is of course required. But we're also going to do something in the authorize because this is where we are going to take the id from the url, and compare it with the id from the form. And so, to get what we have in the url, we're going to use a method called route. And then we will specify the route's parameter that we want to retrieve. So this ticketId is what we used whenever we defined our route, ticketId there. So that is how we are going to get that value. But we also want the value from the form. So we're going to use the get method and get the inputId. And then we will simply return the result of comparing these two values. So if they are equal then we of course wants to edit, otherwise we don't. So we have our request object, or rather our request class, and we have our views. So let's close those files and let's go to our controller because this is really the last place that we need to go. Now we do need to change our type hint. We are now using the EditTicketFormRequest for the edit method. We also need a use statement here, so let's go ahead an add that. And then, we will change our code. So when it comes to editing a ticket we want to first of all retrieve the ticket from our data store, and then we will update that ticket. So we'll say ticket = and then we will use our ticket model. We can use the findOrFail method and then we can pass in our ticketId. Because remember that if this request is valid, we're going to have a value here for ticketId that is coming from the route. So we can findOrFail and then we can do one of two things. We could update each property individually, so we could say ticket email =, and then request get and email and so on and so forth. And whenever you set it up this way, assigning each property individually, then you have to call save. But we can also do this. We could use the findOrFail method and then we can use a method called update. And then we can use what is essentially mass assignment to set our values. And since we already have our code for that, let's just do that. So let's get rid of that, let's uncomment this, so that we can just grab where we pass in that array. And we will pass that to the update method, and that's going to be it. We don't have to call the save method in this case, and we will be good to go. However, let's redirect to tickets. And since we copied this from the create method let's also change that there. So the moment of truth. Let's go to our browser. Let's click on the Edit link for any one of these, it doesn't matter what it is. And let's edit, This has been edited! And then let's change the description to, This has been fixed! Now, in hindsight, we should have had a status field, something that we could perhaps store an individual character. So that we could have O for open, C for closed, H for hold, you know, things like that. So that we could keep track of the status but we'll just leave this as simple as possible. So we will edit the ticket and there we can see that it was edited because we have the text, This has been edited! If we edit this again, we see all of our changes. However let's do this, let's change everything back to how it was. But let's inspect, and let's change the input field for our id. Let's change it to something other than 2. Because this way we can test to see if our authorization for the request is going to work, and whenever we submit, hopefully, yes. That is what we get. This action is unauthorized because the id and the url did not match the id from the request. And so therefore, we did not want to perform that edit operation. So we now have the ability to view a list of all of our tickets. We also have the ability to view an individual ticket, as well as edit that ticket. But now, we need to start incorporating user authentication. Cuz we don't want just anybody to submit a ticket, we just want our customers to submit tickets. And we will get started with that in the next lesson.


