
 Lessons: 14Length: 1.1 hours
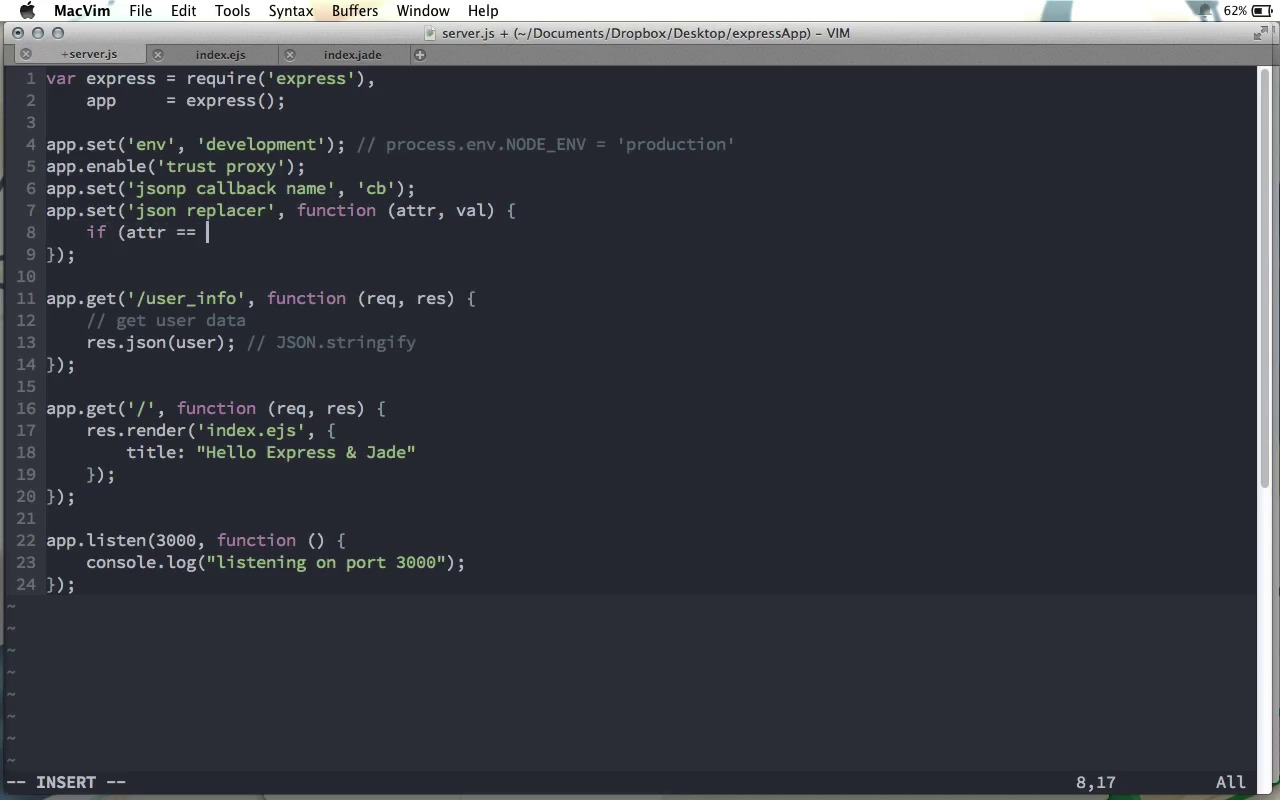
- Overview
- Transcript
1.6 Application Settings
While the default configuration for Express is very good, there are several settings that we can work with to customize exactly how our Express application works.
1.Learning the Basics of Express
1.1Introduction01:09
1.2How to Install Express 401:11
1.3Your First Express Application04:09
1.4Views and Templates07:37
1.5The Verb Methods09:10
1.6Application Settings09:47
2.Understanding Request Flow in Express
2.1Middleware and Request Flow06:25
2.2Custom Middleware Based on Route Parameters04:59
2.3Grouping Routes with app.route02:46
2.4Router Objects05:59
3.Request and Response Objects
3.1Request Object04:13
3.2Response Object04:15
3.3Formatting Requests02:43
4.Conclusion
4.1Conclusion01:35
1.6 Application Settings
Now as we've seen Express works really well right out of the box. However, if you'd like to, there is some configuration that we can do. So, in this screen cast we're going to look at what that configuration is. Here in our application, let's do the configuration up above any of our actual routes. Now there are a couple of methods that are usually used for configuration. First is the app.set function, and this is used to set a given option. If an option is Boolean, however, we could use app.set and set it to true or false, but the other option is to use app.enable, or alternatively, app.disable. These are the three main methods that are used for setting options and parameters in in our Express application. There are also methods for getting them. Obviously the counterpart to app.set is app.get. You might wonder, well, isn't this exactly the same as this method we're getting down here? It is the same method name, but Express is smart enough to know that if the app.get method gets a single parameter that is one of the option names or maybe it's just another custom option that you set on your own because you can do that with app.set, then it won't actually create a route but it will return that value for you. There are again two specialized Boolean ones and these are app.enabled and app.disabled. And of course, if the given property that you pass to these functions is enabled or disabled, the appropriate response will be returned either true or false. So now, let's go through and look at the different configuration options that Express gives us. First, there is the environment, and this is shortened to ENV. Now, you can set this to whatever you want, and this might allow you to do different things in your application, depending on what the environment is. For example, you might want to use a different data base server when you are in development mode than when you are actually in production. So you could go ahead and set this to development, for example, and then get this later on when you're doing the database setup, or something like that. If you do not set this option, by default it is set to the value of the node process object, process.env.node_ENV, in uppercase like that. By default this value is actually undefined, so you can go ahead and what is often done is just before your application is started up on your production server, often what developers will do is set process.env.NODE = production or something like that. And this way you can use this almost like a flag within your application to change different settings based on the environment. The next one is app., and this is a Boolean one, so I'm gonna use enable just as an example here, and this is the trust proxy. Now, this is some advanced stuff that you probably won't need in a basic web application, but this is if you want to be using a reverse proxy In your web application, you'll have to let Express know, and it's as easy as enabling trust proxy, just like that. Of course, by default, this is disabled, because it's not something you would need by default. Another one that is probably more useful to you is the jsonp callback name. By default, this value is callback, but it could be whatever you want. So in here, for example, I'm using cb. And this of course used when you want to send a jsonp response back to the server. As you probably know a jsonp is json with padding. Basically, what it is, instead of sending just a json object like this back to the browser, you send a response where it is actually wrapped in a callback function call, so that it can be run when it is loaded back onto the browser. And so by default, this callback name will be callback. However, you can change it to whatever you want. Another interesting one is the json replacer value. And this actually takes a function. And to understand exactly what this function is supposed to do, you have to understand something about the json.stringify method. It takes an actual Java script object, and it outputs a json string. But what you can do is pass a second parameter to json.stringify, which is a json replacer. And this function is run on every attribute and value that is in the object that you passed to json.stringify and this is a great way to easily alter a java script object before converting it to JSON. here's what might be a very practical use of this. Let's imagine you have a web application where at some place in your API, you wanna send user account information back to the browser. Let's create a bogus route here, we'll just say app.get('/user_info'. So first what you're going to do is get the user data from your database. But then, eventually you're going to do a response dot json and you're going to send that user object back to the browser. Now, what's going on here in response dot json, it's actually converting this JavaScript object that you pass it into JSON using behind the scenes You guessed it, json.stringify. But, this user object came directly from our database, right, so it probably has a password hash attribute or something like that, something that you don't want to send to the browser. Well, this is where the json replacer function comes in. This function takes an attribute name and the value of that attribute and what we can do is say if the attribute name is equal to passwordHash, then let's go ahead and return undefined otherwise we will go ahead and return the value. So the way this works is if we return undefined then this attribute and value will be removed from the object that will be eventually turned into the JSON string. However if we go ahead and return that value then it will stay as it is. Of course we could use this to change the value as well. For example we could go ahead and do toUpperCase or something like this. The point isn't that we return that same value but we return some value and that will become the value or we can return undefined. And this attribute will no longer be in that object. So that is a simple use case for using the JSON replacer value. A couple of other good Boolean ones that you may want to use, app dot, let's do enable here, case sensitive routing means that uppercase and lowercase routes are not the same. So in this case, for example, /hello and /Hello would be considered different routes. However if we disabled case sensitive routing then these two routes would be considered the same. There's also, let's do app.enable, strict routing. Strict routing is enabled by default. And I should say that case sensitive routing here is disabled by default so that hello and Hello will be treated the same. However strict routing is enabled by default. And that's a good thing. Because strict routing treats paths with trailing forward slashes the same as paths without them. So for example /hello and /hello/, since strict routing is enabled, will be strict and will send both of these to the same route. If you want to disable strict routing then hello and hello with a trailing slash, will be treated as two separate routes. Another one is app.enable to view cache. This actually makes your application run just a little bit faster and is recommended to use in your production environment. Basically whenever we render a template as we're doing down here, when the user requests that page, we have to actually convert that template from the template to the actual HTML that we want to send. And that can take a little bit of time depending on how many values we have have to interpolate and that type of thing. If we enable the view cache, then that render view will be stored for awhile so if it's requested again soon, the express server won't rerender it thus saving the user a little bit of time in that request. Now for a few options about views. In the previous screencast, we saw how we could choose which view engine to use just by providing the file extension. However, the file extension is only required if we're not explicitly telling Express somewhere what engine to use. So if we're doing app.setview engine. Then we could set this to jade. Or if not jade, ejs. Something like that. And if we chose our view engine up here, then we don't need to set a file extension down here. So up here we have view engine ejs, down here we can just say Index and it will know that we mean index.ejs. However if you wanna use two different view engines then whichever one is set as the default up here doesn't need the file extension, but we can still do index.jade to go ahead and use jade for Individual templates where we want that. Now you'll remember that this index.ejs file here is stored in the views directory, because that's what Express expects by default. However if you would rather name it something else, then you can go ahead and set views equal to, for example, templates or something like that. Unfortunately this isn't called the view directory, it's just called views, but this is the folder name. So if we did this, we'd have to go ahead and change the folder name from views to templates. And there's one more option that Express gives us, and this has a Boolean, I'll say enable, and it's x dash powered dash by. If this is enabled, every response that we make will have a header called the x powered by header which will tell the browser that Express is the web server running behind the response that it just got. Basically, this is just like a little advertisement for Express. By default, Express sends this little ad so that maybe other curious developers could tell by looking at your website's responses that you're using Express. This is enabled by default but you could go ahead and disable it. And it will remove that header from your responses. This isn't really going to save you that much time but it is a little less data that will be sent between your server and the browser. So there you have it. That's a whirlwind tour of the different options that are available in Express. I think I mentioned earlier, but I'll say it one more time, that you can create your own options that you use in some way in your code. You could go ahead and say app.set some counter, for example, or some other value that you want to keep track of. And then you can use app.get to get that value later on. And of course, if it's a Boolean value, you can use the shortcut methods, enable and disable, to set that value, or enabled and disabled to check to see what its current value is. So that is configuring your Express application.


