
 Lessons: 14Length: 2.4 hours
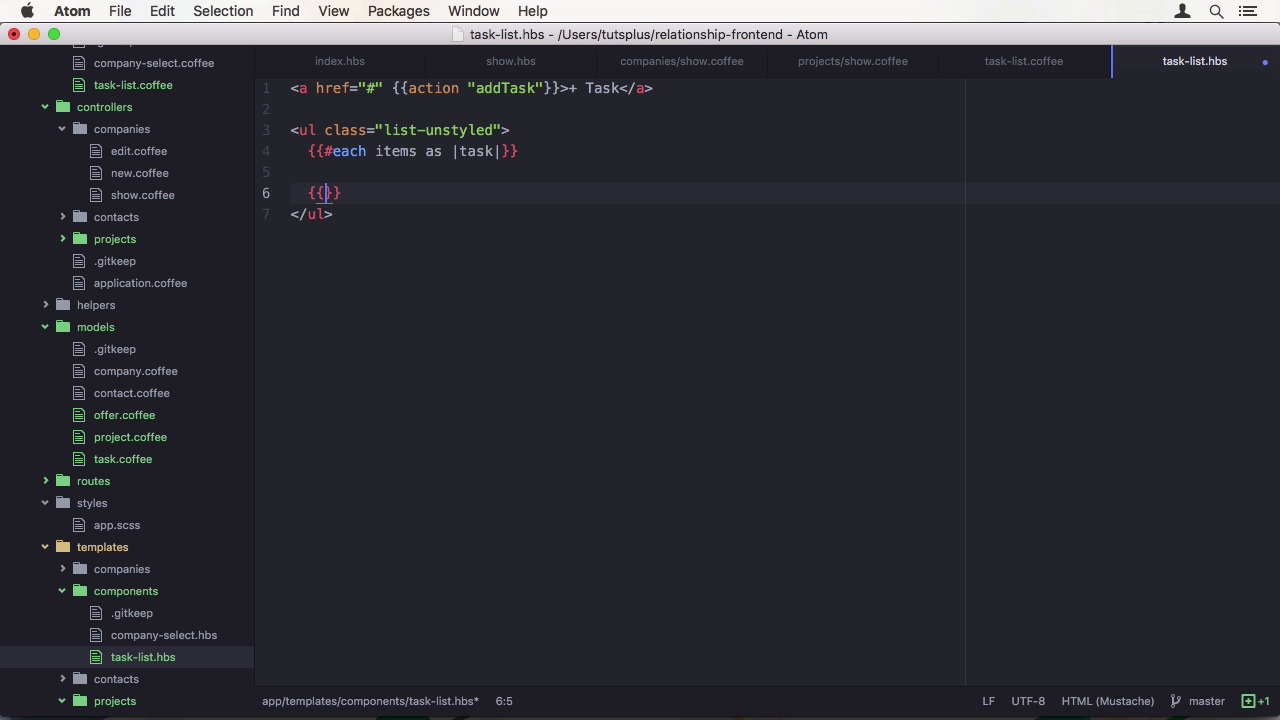
- Overview
- Transcript
3.4 Manage Projects, Tasks, and Offers
In this lesson, we will compare notes about the contacts implementation. I'll also teach you about Ember Components, one of the main new features for future Ember releases. We'll use Ember Components to create a task list for projects.
1.Introduction
1.1Introduction01:05
1.2Project Overview03:23
2.Rails Back-End
2.1Generate and Prepare the Application09:19
2.2Create Companies and Contacts10:35
2.3Add Projects, Tasks, and Offers14:47
2.4Track Customer Interaction12:01
2.5Secure API Access07:46
3.Ember Front-End
3.1Generate and Prepare the Ember-CLI Application08:34
3.2Application Layout and Authentication15:36
3.3Manage Companies and Contacts15:54
3.4Manage Projects, Tasks, and Offers19:18
3.5Add Customer Interaction14:11
4.Deployment
4.1Deploy to Heroku and Amazon S308:28
5.Conclusion
5.1Conclusion03:02
3.4 Manage Projects, Tasks, and Offers
Hi and welcome back to create a full stack rails and amber. In the last lesson we created our first pages in amber. And i gave you the task t`o create pages for contacts yourself. Well, here are my results. The index page is quite similar to the companies. I just moved the link to the detail page to the name to save space. On the detail page you can see that I added Font Awesome to the project and made the display more concise. I also added links to the phone number, email address and website. And now only display information when the data for it is present. I also moved their buttons to the top right. When a contact is assigned to a company. It will be his title and a link to the company's ditto page below its name. In the process, I matched my changes to the company's page as well to make the user interface a little bit more uniform. When we had a contact you will also see the use of Bootstraps great system and I the big new thing here is the select box. It lets you choose which company to contact its assigned to, if any. I'm going to show you the code now that made this possible. So the first thing i added was found also a stylesheet, directly from the cd and The environment config. I had to add the URL to the font source and style source attributes. I also allowed style attributes directly in the tax. The contacts routes look exactly the same as the ones for companies. Next up is templates. First, let's have a look at the index template. It is essentially the same as for listing the companies. The only thing I added is a button on the top right to create a new contact. Now the show template. There are a lot of if statements that check if a value is present before displaying markup around it. Like for a company, then there are the icon tax, the address, and the contact data. All the links to phone, email, and website. You can see, I'm using un-escaped outputs, with three curly braces so URL's don't get escaped. You might have noticed that there aren't any templates for new or added it's just a form template. Since the form is exactly the same, it makes no sense to duplicate it if you don't have to. And the summit button, I added a conditional to check if the model is new, meaning not persisted and then output either create or update as the path. Now for a select field here is an odd call the company select. This as a so called component Ember moves away from controllers and towards components. So this concept is very important. There is a components folder in the templates folder where I have defined the component. It displays a select field and loops through its content, which we passed on the form template. To determine if the option should be selected or not there is equal help. The little thing just compares to world leaders against each other to see if they are equal. Helpers have their own folder within app and are defined like any other object in the folder. The only other thing to notice, although you might want to pass multiple parameters to your helper, they will get stored in an array and passed as a single parameter. That is for unnamed parameters. If you pass named parameters like class in the import helper they will be present as a second parameter inside the hash. If you have your component not to do any special actions you will be fine with just a template. In our case though, we want to set the company on our model when it changes. So we have to create a component object inside the change action. We essentially grab the selected company from the content and call the action property. We passed in the form template with this company as a parameter. The action parameter is actually a neat little trick. This allows us to set the value without creating any other functions. The mute helper is just an explicit expression to say this property is mutable. This technique was featured in the deprecation guide and I took it from there. To finish up the review I want to show you the new route. There are three differences to our company's route. First, the model now returns a promise hash. Since we need to get ahold of all possible companies, we can't trust fetch to contact to create a new one. The hash holds multiple promises and marks itself fulfilled after all its items have done so. When having only a single model you don't have to overwrite to set up control function in our case, we do though. First we need to call Super and then we can set our model, then a context, and also set a company's property. The last a friend's history and the template function. Yeah we can say don't render a new template render the form template instead. Yet a drought looks exactly the same. But instead of creating a record it is fetching one from the server. So this is my solution for contact management. I know I cheated a little bit by using stuff you didn't learn yet, but you should be up to speed now, and don't worry, we will create more components on camera, even in this very apposite. To manage the project of our task resources we can start by defining the models as before. Let's create a file for the project model. Then we just have to set the attributes and the relations. I will speak this up in the interest of time in the author model. You can see we didn't just use string attributes as before. We also have the possibility use numbers or dates for instance. Now the status attribute and raves wasn't enough, but over the APU, it will be passed as a string, and we are going to work with this as is. Nowin the router we can use the same structure as for the other two resources. Then i'll also duplicate the contact trout and to companies in the extra and adapted. They used the project model. We can also change to navigation link to point to project. Finally we need a template to display the project which we can take from the companies as well. We just have to adapt the table to just show the name and the actions and change the naming. Now on to the detail page. We need to add show templates for that. I'm just presenting the project's name as a title here and for now. I'll be skipping the edit and delete actions. Understood till page, we want to manage tasks that belong to this very project. To do so, I'm going to start with a new component called, task list. The component gets an items property and a callback function to call, when a new task gets added. We have to define this in the show controller. I'm just going to duplicate the company's show controller and at the at task action. It is very easy. We just talk to the store create a record of type task and set the project to our model. And right now, I'm hard coding the description for the component itself we need two files. The first is the component object task list coffee, and the second is the template task list.hps. Let's start with the template. I want to link to the new task to the list that binds to the at task method beneath I want to display a list of tasks. If there are none it just displays an info text. Otherwise we show the task item's description. Before we can look at it in the browser we need to satisfy [INAUDIBLE] and add some basic scaffolding to the components objects file. In the browser you can already see some tasks that are present in the back-end. Your list might be empty, but stay tuned. I know that two of these tasks are already completed but there is no indication of it here. In this case, I'm going to split this into two lists. For the first one, we are going to use a property called active items. For the second one, it will be called, completed items. To also visually indicate the state. I'm going to add some CSS styling to our completed tasks. The two properties we just used are on set right now. But we can use inverse computed properties feature to dynamically calculate the values whenever the items property changes. Here it is going to be a filter. We filter the items property. You have to isComplete value on it, and have it be false for active items. For completed items it is going to be true. There isComplete property on a task is another computer property. This time an equal one. It is true if the status is completed. When we go back to the browser the tasks are now split upon two lists. The next bit is going to be adding a check box so we can actually mark a task as completed. It is going to be an input field of type checkbox. The checked attribute respond to that is complete property, and when clicked the update task action will be called the task item and the component object. We have to define this action. It takes a task parameter and on this task I'm going to set the status property. If the task is currently completed I'm setting it to active, otherwise to complete. The last thing to do is to save the task so it is stored on the server, and also going to add this to the second list. Now back in the browser, we have our check boxes and when we click one, the tasks get moved around. Upon the reload they stay, so saving works as well. Next on the list is task editing. If we are editing, we want to show an input helper that binds to the task description, and add a class in the placeholder as well. I also need some callback's here. First, the enter call back, to the update task description action. The same goes for focus out. Upon hitting escape that should revert tasks description. If we are not editing, it should just displayed a description as before, but have an added task action on to it that gets called when double-clicking. And I also should call is editing on the task. Now for implementing the callbacks, whereas the update action. Since we don't have a reference to the task, we need to work around this. I'm going to use an editing task property on the component that holds to task that it's currently editing. On the task, I'm setting is editing to false, and saved to task. Then I also unset the editing task property on the component. Yet a task action is going to be very similar, fast and going to set this editing to false if there is a task already editing. Then I'm taking the past asked and said, is editing to true, and also set the editing task property. When we try this out we can double click on a task and rename it. After pressing return it will get stored and after reloading it is still changed. So communication with the server works too. If I'm editing the task again. Let's hit Escape. Nothing happens. We need to implement the revert action. The revert task description function is basically a copy of the save method. But instead of calling save, we call rollback attributes. All that is remaining for the component is the addTask action. First, I'm going to reset the editing task, rollback the attributes, and also unset it. Then, I'm calling sendAction and addTask and if you're remember this is the callback reuse when calling the component in the show template. Also my if statement is not the extensive enough. So let's just edited here. When we click add task in the browser we get the new task with the preset description, but it is not in the editing mode. To change that we can get rid of the description and add this editing as true. Now we can enter a new description upon creating the task, but the call back won't work. Since we don't have a way to set the new task as the editing task I'm going to introduce a new property called newTask. It will be computed based on the isNew property of all the tasks. Then I'm using this in the update task description method to use it after there is no editing task. Another change I want to make is to only save if there is a description present. This will delete a new task and revert a persist as one. Now it would be nice if we could see our tasks on every page on the right side. Since we just built a component we can easily reuse it. Before we do that I want to show you another neat feature of components. You might have noticed that on if statements or each loops there are hashes before the keywords. This indicates that the following will be a block. We can use this functionality in our components as well but in the component we can say that we want a task description displayed. In the task list template, we have to change every occurrence of task that description. With the key virt you know from rails year old. We also have to provide task variables to the block. To use it, we have to add the asked task statement in the component call. We can now copy the whole block and add it to the application here, I went to prepare the project's name to the task. The templates are set up, now we just need to set the tasks we want to display in the application route. There is a strange error with that prevents us from using Coffee Script for this file. I'm going to import the application route mix in as well. Since this route will be loaded, regardless if the user is logged in or not. We have to safeguard fetching the tasks to prevent an authentication error. I'm also going to fetch all tasks, not just the ones for single project. We also need to set up control of function like before. Back in the browser you can already see both lists on the left side without the project name and on the right side with it since it is an offer, it's quite similar to a project, at least in this application. I'm leaving it as an exercise for you at the start of the next lesson. I'm going to show you my implementation. This time I won't use anything you haven't learned already, I promise. In the next lesson we will finish our application functionality by adding customer interaction. See you there.


