
 Lessons: 14Length: 2.4 hours
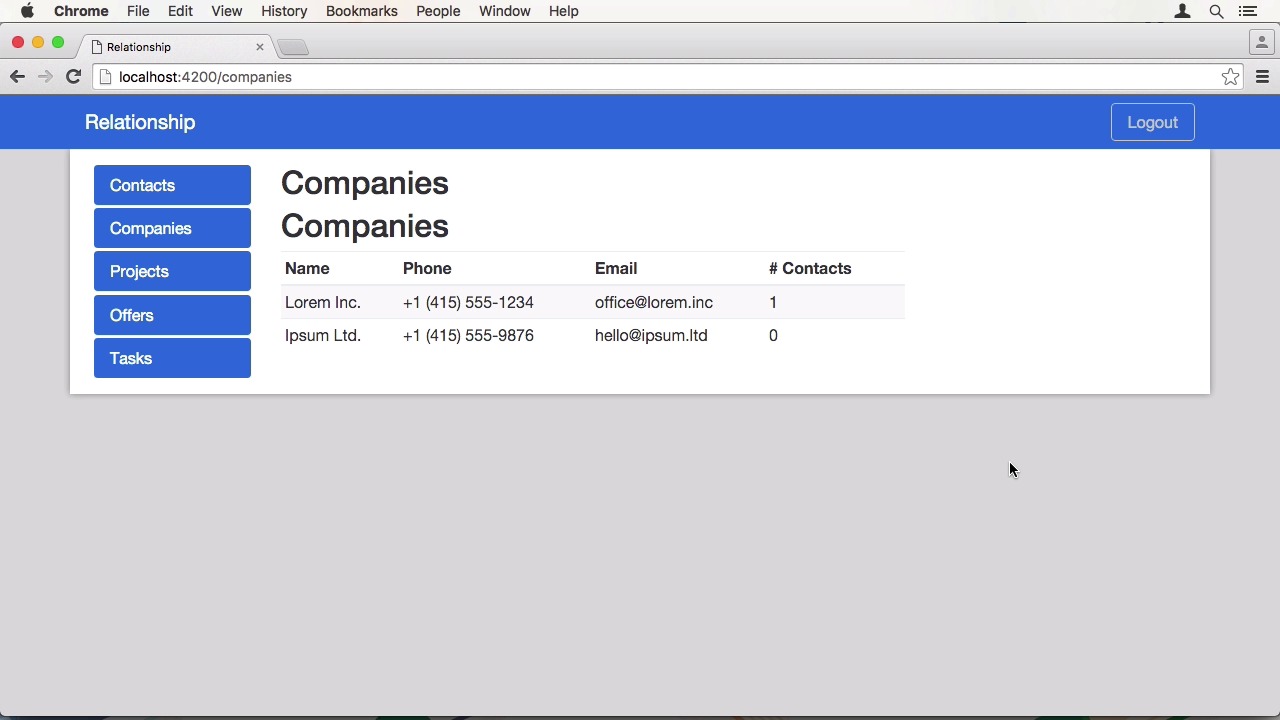
- Overview
- Transcript
3.3 Manage Companies and Contacts
Our first resources to manage will be companies and contacts. I’ll use these to explain the Ember routing and templating architectural model with examples.
Related Links
1.Introduction
1.1Introduction01:05
1.2Project Overview03:23
2.Rails Back-End
2.1Generate and Prepare the Application09:19
2.2Create Companies and Contacts10:35
2.3Add Projects, Tasks, and Offers14:47
2.4Track Customer Interaction12:01
2.5Secure API Access07:46
3.Ember Front-End
3.1Generate and Prepare the Ember-CLI Application08:34
3.2Application Layout and Authentication15:36
3.3Manage Companies and Contacts15:54
3.4Manage Projects, Tasks, and Offers19:18
3.5Add Customer Interaction14:11
4.Deployment
4.1Deploy to Heroku and Amazon S308:28
5.Conclusion
5.1Conclusion03:02
3.3 Manage Companies and Contacts
Hi and welcome back to Create a Full Stack Rails and Ember App. In the last lesson we added authentication to the application so we can actually use it. In this lesson we will create our first models, routes and templates to manage companies and contacts. Let's start by defining a route in the router file. It is going to be a route to the company's resource which is going to be a wrapper. Well more specific once. Those are get wrapped with a function where I can create a route for the index section. To not have to route the companies slash index I can manually define a path which is going to be a forward slash. So it will just be companies. To use as a next route we first need a template. Since this is nested I have to put it inside the company's folder. In the index route we want to display all of our companies. I think it's best to do this in a table. So let's create one here. For attributes we want the name of the company, maybe the a phone number and email address, as well as the number of contacts that are associated with a company. And an empty column to hold links to actions. In the tables body we need a loop. Provides to each helper here. So we want to grab a list of companies which is stored in a property called model. The item in the block will be called company. So first, we want the company name. Then company phone, email. And then we need to count the number of contacts. This can be done by reading the length of that relationship. Each helper has a very handy feature to also provide an else block that gets rendered when there are no items in the array. We will be just outputting a notice about not having any companies. Let's see what ember does with this template when we visit in the browser. Well it just works without the route or a controller class or even a model that correctly renders the template. It has no items yet, but it doesn't show an error either. Whenever you have no route or control object or even template in Ember, it falls back to the base one. Now we want to display some data. So we have to define a route class. After adding the standard imports and definitions, we need to set the model in our controller. We can do this in the model function the route provides. Here we can place a call to our data store and find whole items of type company. Of course the export must not be missing as well. Working our way back, we have to create a model now. Of course you can create all these files with a generator but since Ember is filling in the blanks automatically your files normally are quite short, and it is very fast to do it manually. Our company needs some attributes. First the name, then the phone, as well as the rest we defined in our backend. All of them strings. Since the company and contact model are almost identical, I would just duplicate the file and change the attributes that are different. I'm also going to rename the company variable to contact even though this is optional. Since it is just used in this file and everything else. That's what the default expert. So let's change to has many contacts to company and it belongs to relationship. And change the name to family name and add given names as well. When we have a look in the browser we can see an error in the console that tells us that the end point wasn't found on the server. We need an adapter that tells Ember data to use the correct host. You can specify a different adapters for different models, or do you want to change every model? So we need an application adapter, here we can import Ember data. Our environment file and a mix in from Ember simple auth. Since the backend conforms to json API, I am going to extend the json API adapter with the mix in that takes care of setting the authorization header field. And also set the host to ENV.apiHost. Finally, we also need to set an authorizer. Even though this conforms to the standard and doesn't need any changes, we still have to sub-class it from the ember sample of one. So we need to create a new file in the authorizers directory. Simply import the OAuth2Bearer from ember-simple-auth, extend it, and export it again. When we go back to the browser we can immediately see some data. Live Reload kicked in, and since there weren't any errors it loaded, displayed the companies. Our API backend is already secured with a token, but we can use a mixin from Ember simple auth to also reflect this in the front end. Therefore, we can create the wrapping company's route, and include the authenticated route mix in. This works for all routes inside companies. Since there is a hierarchy. To demonstrate that I'm going to use a chrome extension that is a must have when developing M labs, the Ember inspector. The Ember labs inspector has a route section where you can see all the routes in your application. I'm going to limit this to just the current route. Here you have the active hierarchy. First the application route, that is always the root, then the companies route and at the end companies.index. This also applies to templates. While rails layouts are somewhat special, this isn't the case in Ember. It is just a template and a hierarchy. I am going to create the company's handlebar file and add a heading to it. When I save this, you will see that the content is missing. I didn't define a place to render the next template. This can be done with the outlet keyword. Now the content is rendered. But the heading is there twice now. I'm going to remove the one in the index file. I also want to add some actions to the table now. So on one side, the user should be able to view the details of a company as well as directly edit it. So I'm going to add a link that accompanies show route, passing the company to it and labeling it Details. The other one is companies not added. In the router we have to add another route to make this work. So we need one for the Details page. In the path argument I'm going to add a dynamic parameter. Defined by the leading column. This will get passed to our route's model function. I'm also going to duplicate this line and just append edit to the path. Now we need a route file for a show action. In the model function, we now have a params argument that holds our company ID. We also have to use Find record this time and pass the ID as the second argument. Next is the template. Let's start by adding a header, this time model holds a single company. It is always what your return from your model function in the route. Well, almost always. But we'll get to that. In the interest of time, let me speed up the creation of this show template. Since it's just, setting text, and outputting attributes. So here's our show page in the browser. The address doesn't really look right. It has the new lines in the source code but that doesn't translate to HTML of course. We could either use a helper, which I want to in this lesson just yet. Or use additional properties on our model. You can define those very easily by giving it a name, and a function that returns something. In our case, it takes the address and replaces the new lines with breaks. Since it is HTML, we also have to return this as a save string. Which isn't the best option, but it will do for us. Now we can define a property around to function. And tell it that it depends on the address attribute. So wherever the address changes the formatted address will get recalculated as well. In the template we can just use the property and it format in the browser correctly now. It would also be nice to list all contacts that belong to this company. So let's copy the index template and at the horizontal line and the heading before pasting it in. Once again I'm going to speed the process of changing the attributes up. For the loop I'm going to use model.contacts to access the data we want. As you can see in the browser, it looks quite good. Only the title is missing. I might have forgotten to set it in the model. Yes indeed. On to edit. We can duplicate the show route because it is exactly the same. Then we need a template. I'm going to wrap this in a form tag and use the same HTML wrappers as in the show page. Here, we need another helper, the input helper. It creates an import field and binds a value to it. There is also a text area helper for, well, text areas. They all accept the attributes you are used to from HTML. Again, the rest is just adding the same fields for the other attributes. Back in the browser we can go to our Edit page and we have all the information here. When I make a change to the name and go back to the previous page, you can see that it has changed here as well although we didn't save it. This happens due to the fact that those helpers are bound to the model. And locally, the actual model gets changed. When I hit reload though, you can see it didn't change on the server. How can we prevent this now? In the edit route, we can use to deactivate callback. It gets called when the route transitions to a new one. Here we can fetch the control s and call rollbackAttributes on it to change all attributes back to the version on the server. While we're at it let's also change the navigation to link to the company's index page. When I make a change now the attributes get reset when I leave the page. Good, but we don't have any way of saving it. Let's add some buttons. First, a submit button that calls the action save. As well as a cancel button, that's calls to cancel action. To handle these actions, we need a controller that defines them. For save, we are going to get our model, and simply call save on it. Afterwards, we want to transition to the index route. In the cancel action, we just transition, as the router already takes care of rolling back the changes. So once again, we can make our changes. And we get redirected to the index page. All that's left to do is to add some actions to the show page. So we can also delete the company. I'm going to set a link to the added page first. And then add another one that calls the delete action and passes the model with it. We can duplicate the edit controller for the show page and replace our actions with the delete method where it calls destroy record and then redirects to the index page. To create a new record, I'm just going to show you how the route looks since this lesson is already pretty long. Everything else, control and template, is exactly the same as for the edit page. In fact,the new route is pretty similar as well, because instead of finding it, It will just create a record locally. When we leave the new page without saving, rollback attribute takes care of cleaning up the unsaved model. I know I didn't show anything about managing contacts. Do this as a practice step yourself. At the beginning of the next lesson, I will show you what I did. Leave out assigning a company to it for now though. We will talk about this in the next lesson as well. See you there.


