
 Lessons: 12Length: 1.4 hours
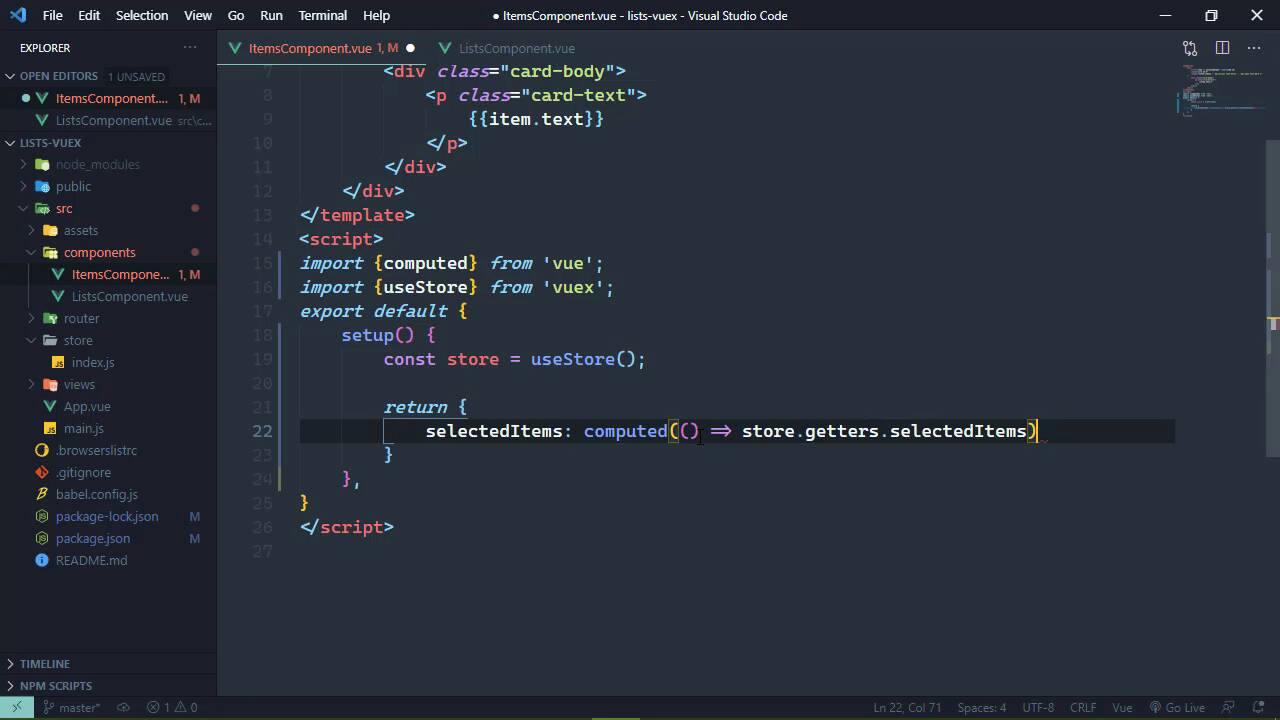

- Overview
- Transcript
3.1 Using Vuex With the Composition API
In this lesson, you'll learn how to use Vuex with components that use the Composition API.
1.Introduction
1.1Introduction01:25
2.Using Vuex
2.1Setting Up the Project05:54
2.2Displaying a List07:03
2.3Adding State04:57
2.4Committing and Tracking Changes09:03
2.5Using Getters to Compute Values08:44
2.6Dispatching Actions to Perform Asynchronous Work06:53
2.7Using Mapping Functions08:14
3.Advanced Vuex
3.1Using Vuex With the Composition API08:17
3.2Getter Methods09:04
3.3Don't Track Everything and Make Your Actions Chainable13:21
4.Conclusion
4.1Conclusion00:57
3.1 Using Vuex With the Composition API
Vue 3 brings in a new feature called the composition API. This is a new feature that I really like, and in fact, in all of my new projects, I exclusively use the composition API, because in my opinion, it makes our JavaScript much cleaner. Now, if you're not familiar with the composition API, that's okay. We're not going to go too deep into it, and I will explain things as we go on. But basically, it gives us a different way of defining the JavaScript inside of our components. So in this lesson, we are going to rewrite the JavaScript for our items component using the composition API. So I'm just going to delete the JavaScript there and I'm going to add in what we need for the composition API. So all we have is a setup method, we don't have what's called the options API. So we don't have computed, we don't have created, we don't have methods, we don't have anything like that. We have this setup method. Inside of the setup method, we do not have access to this. So this means that we cannot get to our data store like we have before with this $store property. We don't have this, we don't have any properties. So in order to get values that we can use inside of our template, the setup method has to return an object, and then the properties and methods that we define are going to be available inside of the template. So here we are returning an object that has a property called selectedItems, which is going to be an empty array right now. But that is going to make selectedItems available in the template so that we can use it there. Of course we don't see anything because our selectedItems is just an array. Now because we can't access our store using this, we have to do it differently. And it's very simple. We need to import a function called useStore from Vuex, and then we are going to create a variable. You can call it whatever you want. I'm gonna call it store, and we call the useStore function. And then from here, everything else is the same. So if we need to access our state, we can getters. If we need to dispatch an action or commit a mutation, everything is the same from here on out. So we could do something like this to where we would get our selectedItems from the getters. Let's see if it works. Let's do a hard refresh. And it doesn't. The reason being, because right now selectedItems, not from our gutters, but the selectedItems property that we are returning in this object is not reactive. That is why we don't see anything whenever we click on one of our lists here. So in order to make it reactive, we have to essentially turn it into a computed value. Now this is not a computed property. It is essentially a computed property if you're thinking in terms of the options API, but it is a computed value. So we have a helper function called computed that we need to import from Vue. And this accepts a function that is going to do the work. So in that sense, it's a lot like the computed option, do we have something? Well, we don't really have a good example here. But if you wanted a computed value called foo, that would be a function. And then inside of that function would be the code for computing that property. It's essentially the same thing. So the function that we pass to compute it is going to compute the value here. And we are simply going to return the value from our selectedItems getter. So this is going to make the selectedItems property reactive, so that now we can go back, we can automatically see that everything is working okay. But let's just do a hard refresh and we see that everything is working as it did before. Now for our mutations and our actions, all we really need to do is just wrap them within a method. So it's very much like a typical component except that we can't use the map mutations or the map actions helper function. So our next task is to add the ability to mark an item as complete. So we would be setting the status property to true. So for the items that are not complete, we will add a button on the right-hand side so that whenever we click that, we will be marking that as completed. So let's get some of this out of the way so that in the next lesson we can actually implement that functionality. So we are going to have a method called completeItem and it is going to accept the item that we want to complete. And then it is going to dispatch an action. We can call it updateItem because that is exactly what we are going to do. And we'll just leave it as that. In fact, let's just go ahead and comment that out just so that we don't mess anything up. Now as far as our markup is concerned, I do want to make some changes here because we do need to add a button to the items that are not complete, and they need to be over on the right hand side. So what we're going to do then is make this element that has the card text, that's going to be a div element. And then we are going to set the display to flex, and the items are gonna be justified at the end. So what we'll have is justify-content-between, that's going to, of course, justify the whitespace in between all of the children. And then we also want to align-items-center, that should have put everything vertically center within the div element. So our item.text then is going to be inside of a div element, and then we will have a button here. And let's use just the primary class, and we are going to use an icon, which we will install here in a minute. But first of all, we only want to show this button if the item is not complete. So that means that the status property is false, and then we can go ahead and wire up the click event listener as well since we already have that method. Now as for the icon, we are going to use Bootstrap icons which are fairly new, I think, as of version 5 of Bootstrap. It's a separate package. So we have to instal it separately. But we can go ahead and add the icon that we are going to use here. So the class is bi for bootstrap-icon, then there's another one called bi-dash check. And then that is going to be our icon there. And of course, if we view this in the browser, there's nothing being displayed, but let's do this. We need to go to the command line, and we want to install bootstrap-icon, and we of course want to save this, and it's bootstrap-icons. I did not pluralize that as I said that. So it's a very simple package, doesn't take any time to install, and it's very easy to use. So when that is installed, we can just run the serve command again, then we can hop back into our code. We do need to import this inside of our main file. So let's copy the line where we are importing the bootstrap CSS, and we'll make a few changes. So the path is going to be bootstrap-icons/font/bootstrap-icons.css. And that should give us everything that we need. So that by saving that, we can go to the browser and let's do a refresh here. Hopefully, we will see the check boxes, and we do. So with all of this setup, in the next lesson, we will add the functionality for updating an item.


