

- Overview
- Transcript
2.2 Adding a Serializer
While model classes are very important in a Django application, when we are building a REST API, models only tell half the story. We also need a way to take a concrete instance of a class and turn it into something that can be shared over the network with different platforms. The standard format used in this situation is JSON. In this lesson, I’ll show you how to translate instances of our invoice model class into JSON with a Serializer.
Related Links
1.Introduction
1.1Introduction00:53
1.2Prerequisites05:48
1.3Setting Up the Development Environment07:41
2.Building the Rest API
2.1Creating the Invoice Model08:10
2.2Adding a Serializer05:06
2.3Getting All of the Invoices07:52
2.4Getting an Individual Invoice07:58
2.5Creating a New Invoice08:49
2.6Updating an Existing Invoice05:21
2.7Deleting an Invoice02:59
3.Conclusion
3.1Goodbye01:19
2.2 Adding a Serializer
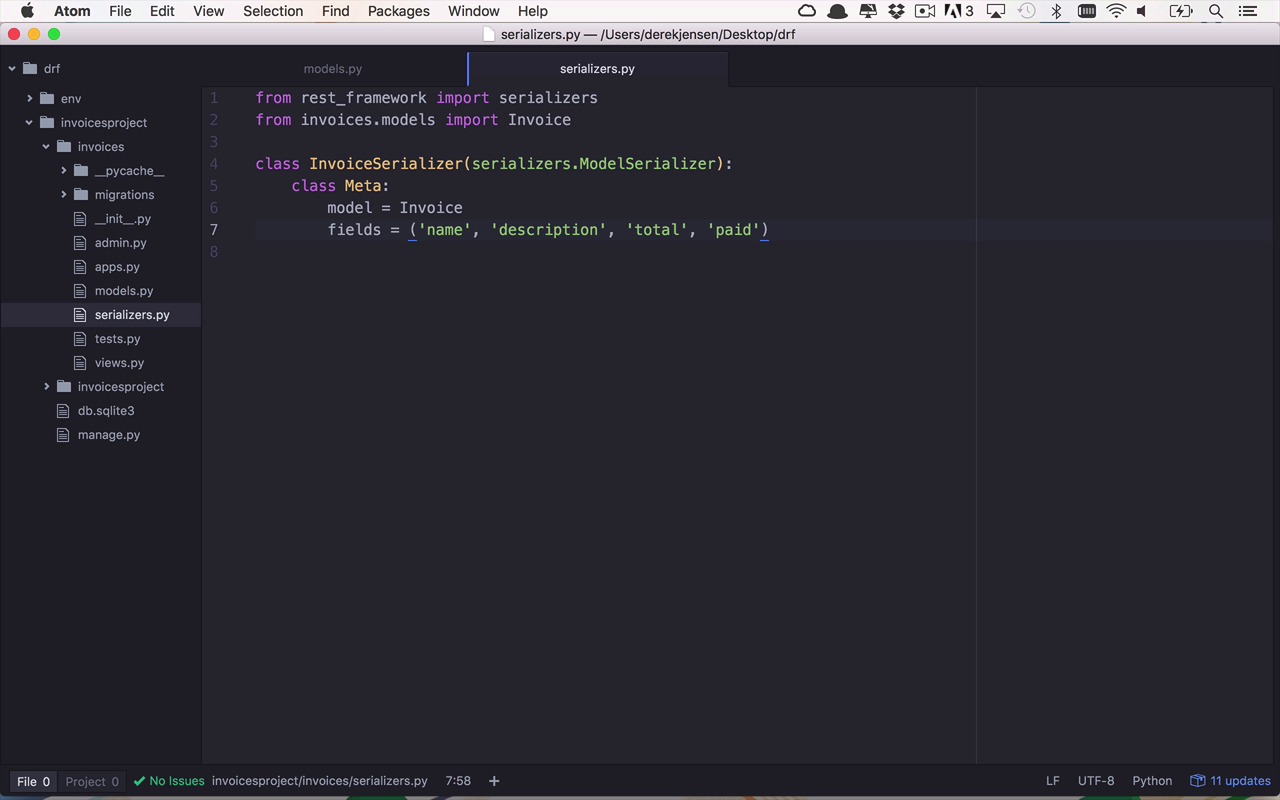
So now that we have our model here, it's time to translate this into something that's a little bit more useful. Not only to us and to the consumers of our API, but also to applications to be able to do something with this data outside of our own. Now within the realm of Python there's a number of different ways to do this, as well as within the Django REST Framework. But I'm gonna skip right ahead to the, probably, easiest way to go about doing this via a Serializer. So I'm gonna go ahead and create a new file within my invoices folder here, and I'm gonna say New File and I'm just going to call this serializers. Now I'm gonna leave it plural cuz you could add a bunch more things in here if you had several models. You could put them together in here, that would be fine. So what we're gonna wanna do here is we're going to want to do our imports, and then we'll go ahead and create our serializer class. So the first import that we're gonna wanna do is gonna be from the rest_framework. And then from there, we want to import serializers. So in here there's gonna be a number of helpers that are designed specifically to handle the serialization from a model into a JSON format. So once we've imported that, we're also gonna need to import our model class. So I can say invoices.models and I want to import, of course, Invoice, okay? So now that we've done that, I can go ahead and create my serializer class and this couldn't be any easier without the help of something called a model serializer. So there's other flavors of serializers but the ModelSerializer is really where it's at when it comes to simplicity to actually go through this process. So let's go ahead and create a class, and this is going to be an InvoiceSerializer. And this is gonna be of type serializers.ModelSerializer. And within this class, we're gonna create a nested class that's called Meta. And then within here we're going to set two properties. We're going to set the model property. And the model property is to tell the class what is the model type that we ultimately want to serialize. And in this case, it's gonna be an Invoice. And then we also wanna tell the fields for which we actually want to be able to serialize. So we need to tell this a little bit about the fields that are found within Invoice. And since we already know what that is, there's gonna be name, description. There's gonna be total and there's also going to be paid. And we'll go ahead and save that. Now this doesn't seem like very much work but really there's a lot of things going on behind the scenes to handle the serialization and deserialization of this Invoice type. But I'm gonna show you how we're gonna work with this here in just a moment. So let's make sure that we've saved all of this and then we can head back over to our terminal. And in our terminal, we want to go back into our shell. So we're going to use manage shell. And now within here, we're going to do a similar exercise to what we did with our model before, but this time we're going to bring our serializer into the picture just a little bit. So let's start by doing our imports, I can say from invoices.models. Once again, I want to import an Invoice. And then I also want to bring in my serializer, so I can say from invoices.serializers, I want to import my InvoiceSerializer. And now if you remember, last time I did go through the process of actually creating an invoice and saving it in just to show you that it does persist. I can go ahead into Invoice and I can say objects.all(). And once again, as you see, I get a QuerySet that contains a single invoice. Well, if I wanted to get ahold of that single invoice, I could set a new variable. And we'll call it invoice = Invoice.objects. And let's just go ahead and do get(), and that's gonna give me that first one. And now I can take a look and say invoice.name. And once again, this is really good but it's not really useful to any application outside of my own to be able to consume this information, which is ultimately where we wanna get to. So now that I have this object, I want to use my serializer to translate this into a string representation, a JSON representation of this invoice object, and it really couldn't be any easier. So all we have to do is create a new instance of a serializer, and we're going to set this equal to an InvoiceSerializer, and that's gonna take in our object, our invoice object. So now that I've done that, I can simply use my serializer and check the data property on this. And you're gonna see that it will translate or transform that invoice object into a string representation here. And you can see all of our fields listed here in this JSON object, we have a bunch of key-value pairs. Here we have name, which is My First Invoice. Description, a very detailed description. The paid amount is 0 and the total amount is $100. So as you can see here, with just a couple lines of code creating a very simple class, we can now translate this concrete object into something that's a little bit more flexible to send in and out of our application.


