
- Overview
- Transcript
2.2 Creating the Product Admin Panel
Now that we have categories to organize products with, it’s time to build out the functionality for creating new products. During this process we’ll create another admin panel page for managing products and we’ll learn how to upload and resize images for those products. Luckily for us, we can actually reuse a lot of the code that we previously wrote in our Categories controller and view file for our products.
1.Introduction
1.1Introduction00:51
2.Getting Started
2.1Creating the Categories Admin Panel29:14
2.2Creating the Product Admin Panel29:40
2.3Displaying Products16:53
2.4Displaying Products By Category10:57
2.5Searching Products06:51
3.Security
3.1User Authentication26:05
3.2Protecting the Admin Panel05:14
4.Payments & Conclusion
4.1Shopping Cart & PayPal21:54
4.2Contact Page & Conclusion03:55
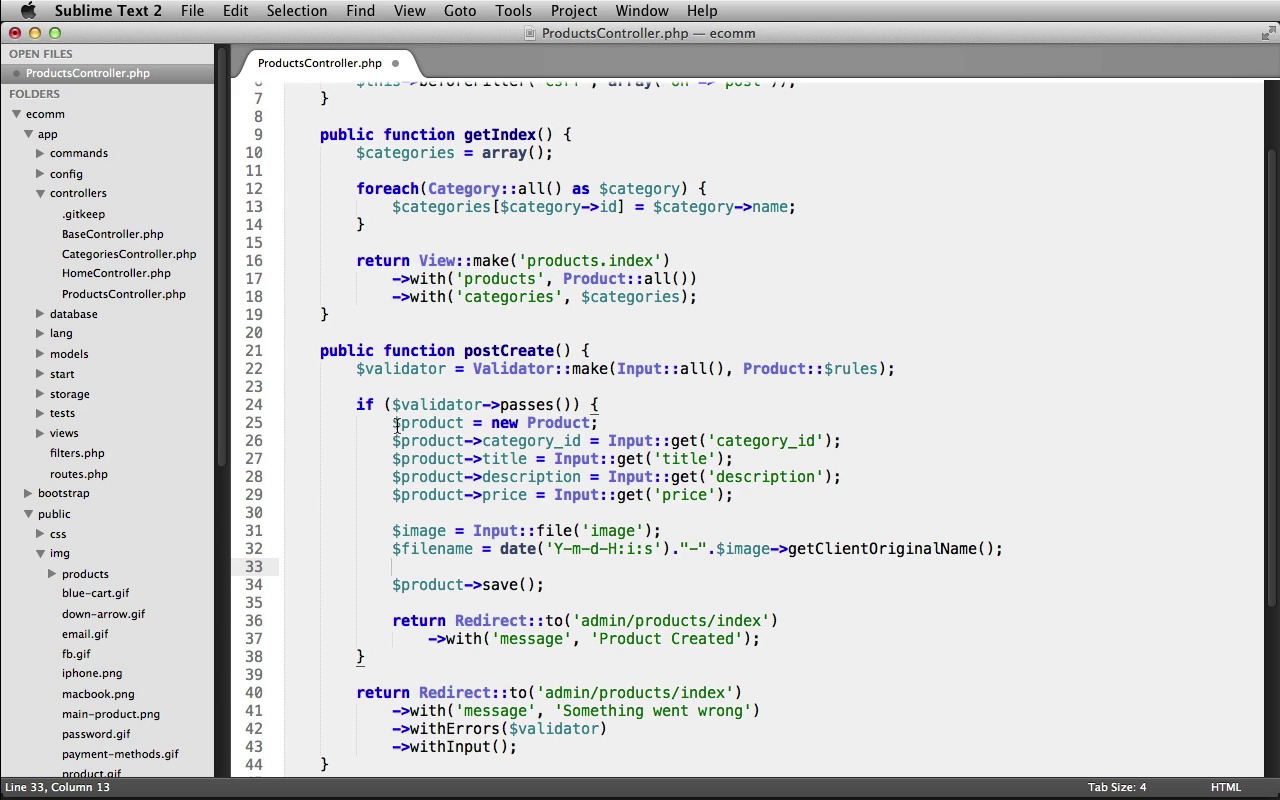
2.2 Creating the Product Admin Panel
Now that we have categories to organize products with, it's time to build out the functionality for creating new products. During this process we'll create another Admin Panel page for managing products and we'll also learn how to upload and resize images for those products. Luckily for us we can reuse a lot of the code that we previously wrote in our Categories Controller in the View file for our products. Now, to upload images for our products, we'll be using the intervention image class, and the easiest way to get started with it is just by loading it in via Composer. So, open up your application into your text editor, and let's open up the composer.json file. And inside of require, right after the Laravel framework, we can just put a comma here, and we'll load in intervention/image, dev-master. We can save the file and close it out. And let's switch into our Terminal and make sure that you're inside of your ecomm application. You just hit L S, you can see that you're in the correct directory. And from here we'll just run composer update and that'll install the new dependencies. Okay, image intervention is installed and composer has finished. Now we just need to make sure the Laravel auto loads it for us. So let's go back into our text editor. Under app > config, open up app.php. And if we scroll down to the Autoloaded Service Providers area, right here, you can see we have this providers array. Right at the end, let's just put a new line in here. Intervention\Image\ImageServiceProvider. And then just a little further down in the Class Aliases section, we need to add another line in here. So the first part is Image. And the second part is Intervention\Image\Facades\Image. And that's it for setting up the intervention image class. Now we just need a location to store uploaded product images. So we can close out app.php, we'll close up the config folder, and inside of our public folder, then inside of image, let's create a new folder named products. And this is where we'll store our uploaded images. All right, we're now all set to begin creating products and uploading images for them. We're first going to need a products table, so let's create a new migration. I'll bring up my terminal here, and we can run php artisan migrate:make create_products_table. Now let's just go back into our text editor, and under database > migrations, let's open up that new migration file. And let's start in the up method to create our table. We'll use Schema::create. The table name will be products. We'll pass in our closure, and our table object. And we'll start off by creating our auto incrementing ID. So that's $table -> increments, and field name will be id. Now we also need a field to hold the foreign key for the relationship between products and categories. So we need a category ID field. Let's create a new integer field, named category_id. And now let's set up that category id foreign key. We can use table. Call the foreign method. Pass in our category_id as the foreign key. Then we can call the references method, to tell it that it references the id field on the categories table. Next, we need a field for the title of the product so we'll use the string method and that field will be named title. We also need a field for the product's description. This time we'll call the text method and we'll name the field description. Next, we need a field to hold the product's price. So we'll create a decimal field. This will be named price. Now for the length of the price, we're going to allow six digits and two of those digits will be before the decimal point. So this will allow us to have products with a price of $9,999.99. Next, we need a boolean field to hold the availability of the product, so we'll be able to have a one in there if it's available, or a zero if it's out of stock. So we can use the boolean method. We'll name the field availability and we'll give this a default value of 1. That way by default the products are in stock. Next, we need a field which will hold the path, where we confined the uploaded image for the product. So again we'll just use the string method and I'll name this image. And then lastly we'll call the timestamps method so that we have a few time stamps. And that's it for the up method. Let's just go down here to the down method and we'll call the drop method to drop the products table if we ever need to reverse this migration. All right, that's it for the migration. We can close it out. Let's switch into our terminal and we'll run this, php artisan migrate. There we go, our products table has been created. Now we just need to create our product model. We'll close up the database folder, and under models, let's create a new file. I'll save this as product.php. We'll open up our php tag, we'll create a new class named Product. And this extends Eloquent. And just like we did for the category model let's set the fillable array here to protect ourselves from mass assignment. This is a protected property named fillable. We'll set this equal to an array. So the fields that we're going to allow to be mass-assigned will be the category_id, the title, the description, the price, the availability, and the image. Next, let's set up our validation roles. I'll create a new public static property named rules. We'll set this equal to an array. And let's break this down to a new line since we're going to have multiple fields that we're validating. We'll first validate the category_id. This will be required, as we want to make sure anytime a new product is created, that there is also the category_id to associate it with. And we also want to make sure that this is an integer only. Now, let's validate the title field, we'll make sure that this is required. And it will have a minimum length of two characters. Now we'll do the description field and this will be required as well. And this will have a minimum length of 20 characters. Now we'll do the price field. This will also be required and we'll make sure that it's numeric. Then we need to do the availability field and this one's not going to be required, as it has a default value. But we do want to make sure that when it is submitted through the form, when we update the product's availability, that it comes in as an integer. Now lastly, let's validate the image field. We're going to make sure that it's required. And that it is an image. And we'll also validate the mime types as well using mimes. So we can set the mime types that we'll accept. We're going to accept jpeg, jpg, also jpeg, bmp, png and gif files. And that's it for our validation rolls. Now we need to establish the product belongs to category relationship, which occurs between a product and a category so that each product belongs to one category. We do that by creating a public category method. So let's create a new public function named category. And then we just return, and we call the belongsTo method. And tell it that this product belongs to category, and that completes our product model. Now we just need to make a small change to our category model to set up the inverse relationship of a category has many products. Let's open up the category model. And after our validation rolls, let's set up that relationship. We do that by creating a public products method. We'll create a new public function named products and we'll return. And this time we call the has many method and pass in product. All right, that's it for our models and our relationships. We can close both of these out. Now we need to create our products controller. So to save ourselves a little bit of time, what we're going to do is just copy all of the code from our categories controller. And then we can paste it into our new controller, and just change that up to make it work for our products. As we're going to use, essentially, the same code. So we can close the models folder, and under controllers, let's open up the categories controller. And then we'll just select all of this and copy it. We can close it out, and let's create a new file in the controllers folder. We'll save this as products controller.php, and we'll just paste this in. Let's scroll up to the top, and we just need to change over everything in here to reference products. So first of all we'll change this to be a products controller. Instead of rendering an index view file from the categories folder, this is going to use a products folder. And instead of sending a variable of the name categories, we'll use products. We'll instead use the product model, and then down here in our create action. Instead of creating a new category, we're going to be creating a new product. So we need to make sure to change all of these variable names to use product. And then in our redirect, we're going to redirect to the product index page. And our flash message will say product created. And down in the second re-direct, again we go to the products index page, and that looks good there. Now let's go down to the destroy action. We'll call the product model. Let's change this variable to use product. And the URI for our redirect will be products, and the flash message, again, will say product. We'll change this URI as well to products. And that looks pretty good. Now we need to write the code that's specific for our product's controller. So let's go up to the index action. And we're going to need to pass in an array of categories containing the categories ID and its name, so that we can populate a select menu with it. That way we can associate new products with a category whenever we create a new product. So inside of the index action, at the very top, let's create a categories variable, and we'll just set this to an empty array for the moment. And then we're going to use a foreach loop, we're going to call our category model, and it's all method. And we're going to loop over those results as category. Now, as we're looping over each category, we can store it's ID as the key for our categories array. And then it's name as the value. So we can use our categories array from above. We'll set the key equal to the categories ID, and then we'll set the value equal to the categories name. There we go. And so, now we have this categories array that we need to pass to our view file so that we can use it in our new product form. So let's just chain on another with method call here. We'll call the with method, we'll set a categories variable to be available in the view, and then it will hold the value of our categories array from above. All right, that finishes up the index action. Now let's work on our create action. So the first thing I see is I left the category model here where we're referencing it's roles. But instead, we wanna make sure that we're referencing the product roles. And down here where we create the new product, we need to make sure that we save in all of the information for a new product and not the category. Remember our product information, we don't even have a name field. So we'll just get rid of this line real quick, and we'll start off by setting the category ID. So we can use our product object, set the category ID, use the input classes get method to grab the category ID that will be submitted from the form. And that will associate this product with the chosen category. Now let's set the product's title. We can use Input, call its get method, and grab the title. Then we'll set the products description, again using the get method to grab the submitted description. Then we can set the product's price, there we go. And now lastly, we need to process the uploaded image for the product. So we're going to resize it first, and then save it into that image products holder that we created a little bit ago. So let's first get a reference to it. We can create an image variable. We'll use the input class, and call it's file, method, grabbing the image field. Now, we want to make sure that our images have a unique name. So we're going to take the original name of the file that was uploaded, and we're going to pre-pen the current date and time to it. That way just in case someone uploads an image with the same name, it will still be unique because it's very unlikely that they would upload it at the exact second that someone else does. So I'll create a new variable named file name. We'll call the date method, and we'll set the year, the month, the day, the hour, the minute, and the second. And then we'll just concatinate a string onto here. We'll put a hyphen to separate the date and time from the actual file name, and now we can get the original file name of the file that was uploaded using our image object and calling b get, client, original name, method. There we go, so that creates our unique image file name. Now we can use the intervention image class to re-size our image, and then save it into that product's folder. So we can call the image class, and it's make method. And this just takes the image that you're wanting to make. So we can use our image object, and then we just need to get the real path to it. We can do that by using the get real path method. And now we want to make sure to resize this image, so we can just chain on the resize method. And we'll tell it to resize images to 468 pixels wide by 249 pixels tall. Now we just need to save the image, so we can chain on the save method. And we just need to tell it where to save it, and then give it its file name using our file name variable. So this is going to save into the public folder, then into the image folder, and then into that product's folder that we created. And then we can just concatenate on the file name that we created above. Now, make sure that you don't forget to put this trailing slash here on the end, as that is important. So now we've resized the image and saved it. Now we just need to store the location of the image into the image field in our database. So we'll use our product object, and set its image to be img/products, and then another forward slash at the end there. And then we just concatenate on our file name, once again. So now whenever we upload an image and then we want to display it, we can grab the product's image field from the database and it'll contain the path to that image, and we can just pass it to Laravel's HTML image helper, to display that image. And then lastly, we just save the product into the database. All right, so that's it for the create action. So now, we need to update our destroy action. So that before we delete the product from the database, that we also delete the product's image as well. As we don't want to keep unneeded images around. So inside of our if statement, right above where we called the product's delete method, let's also delete the product's image. We can use the file class, call its delete method, and then we just need to provide at the path to the file that we want to delete. That's going to be the public folder, then a forward slash. Then we just need to concatenate on the product's image fields value, and that's it. Next, remember that our products have an availability field. So on our admin page, I'm going to have a select menu, so that we can toggle the product between in and out of stock. So we're going to need another action to process that form submission and toggle the product's availability. So after our destroy action, let's create a new public function. We'll preface this with the post http verb and I'll name it ToggleAvailability. Now we need to start off by getting a reference to the product that we're going to be toggling it's availability. So I'll create a product variable. We'll call the product models, find method. And we'll use the input class's get method, to grab the submitted id for the product that we're toggling. Now we need to make sure that we actually found a product before we attempt to toggle it's availability, so we use an if statement and we'll check if we have a product. And if so, we'll set the product's availability equal to the value from the select menu. So, we use input, call it get method, and we grab the availability. Afterwards, we just need to save the product by calling it save method, and then we'll return, we'll call the redirect classes two method, or redirect them back to the admin/products/index page. And we'll call the width method to give the user a flash message. Letting them know that the product was updated. Now if a product wasn't found, we'll just return. All the redirect classes to method again, redirect them back to the Products Index page. And we'll give them a flash message, and this will just say Invalid Product. All right. That's it for our product's controller. Now we just need a set of routes. So we can close out the controller and let's open up routes.php. And we can just duplicate our category's route statement here. And we'll change this over to go to admin/products and this uses our products controller. All right, that's it. We'll close it out. And now, lastly, we just need to create our index view file for the product's admin panel. So under views, let's create a new folder. We'll name this, products, and inside of products, we'll create a new file, we'll save this as index.blade.php. And now just like we did for our controller, we're going to reuse the code from our categories index view file, so under views, categories, open up index.blade.php, select all of this, copy it, close it out, and we'll paste it into our products index view file. Now we just need to update all of the text in here to be for our product, so we'll start with the h1 heading. This is the product's admin panel. We're viewing, deleting, and creating new products, we'll change the h2 heading to be products. We'll change the loop, to loop over the product's variable. This will be a product object. This will display the product's title, not the name. Our form is going to submit to the products/destroy action, our hidden form field. It's going to use the product object to grab the ID. Then our h2 heading will be, Create New Product. And then our form at the bottom, will go to products/create. And we'll just leave the form field as is for now, and we'll come back and update that later, once we finish up, up top. But for the submit button, we will change this to say create product. All right, let's go back up here to our unordered list, and now what we want to do is just modify this, to first, display a small 50 pixel wide image of the product and then we also need to create that form, for toggling the product's availability. So let's start with first displaying a small image of the product. So inside of our list item, right above the product's title, let's use the HTML classes image method, and we just need to pass in the path to the image that we want to display. And remember, if a new product was created, we stored the path to the image in the image field. So we can use our product object, and grab the image path. Now we need to set the ALT text. We're just going to use the product's title. Then I'll also pass in an array as a third argument, so we can set the width for this image and it will just be 50 pixels. Now after the image, I'm just going to put a space there, so that it separates the image from the product's title. Now after our delete button, I'm going to put a space, a hyphen and another space. Now just break this down into a new line. And we need to create another form that we'll use for toggling the products availability, via a select menu. So let's create our new form. We'll call the form classes open method. We'll pass an array, we'll set the URL, this is going to admin/products/toggle-availability, and I'm also going to set a class, the form-inline class on the form. Now we need to create a hidden form field to hold the ID of the product that we're updating. So let's create a new hidden field for the ID, and its value will be the product's ID. Now we need to create our select menu. We'll call the form classes select method. This will be for the availability. And we just need to pass in an array to set the options for the menu. So we just need to set key value pairs. The first one being the value of the option. And then the second one being what you actually see in the select menu, when your viewing it on the page. So we're going to need one for in stock and out of stock. In stock should have a value of one, and out of stock should have a value of zero. So we set one, its value should be in stock. And then we set zero for out of stock. Then we just need to pass in the product's current availability as the third argument. And that will populate our select menu appropriately. Next, we need our submit button. So we'll use the form classes submit method. And we'll just have this say update, and then make sure to close your form. So that handles displaying our product with an image, a delete button, as well as a form to toggle the products availability. Now, we just need to go down here and fix up our form for creating new products. We just need to add in several new fields to accept all of the data for a new product. So first we need to allow the user to choose the category that this product belongs to and again, we'll use a select menu here. So let's change this first fields label, this is going to be for the category_id and then the actual text on the label is going to say Category, and we'll change the method to use the select method. And this is going to be for the category_id. And then to populate our select menu with the categories, we already built that array up inside of our controller. Remember we passed it in from our index action using that categories variable. Let's create our next field, I'll create another paragraph tag, we'll create our label, Form label. This is going to be for the product's title and we'll create our text field for the title. Now, I'm just going to copy this one and we can reuse it for the other fields. So I'll paste it below. And this is going to be for our description. We're going to use the text area method instead and this will be for the description then I'll paste it once more. This one's going to be for the product's price. And we'll change the input field to be for the price as well. And we'll se the value to null. And we'll pass in an array as the third argument. So that we can set a class here. So that it styles it appropriately and the class will just be form-price. After the price we need another input for accepting the image that's going to be uploaded for the product. So the label is going to be image and then the actual text on the label is just going to say, choose an image. And then we just need to change the method call to use the file method. And we'll change this to image, then after our image we have our submit button and then the form closes. And then lastly, we just need to update the form itself, so that it can accept file uploads. That's really simple, we just pass in a second value to our array here, in our form open method. We just set the files key equal to true. And that completes our products admin panel. We should now be able to create new products. Let's test it out. Make sure that you've started up your server. I'm just going to switch into Firefox, and we should be able to visit localhost:8000/admin/products. Here's our Products Admin Panel. It looks pretty good. Of course, we don't have any products to display at the moment. So let's try creating a few new ones. We'll first set our Category. I'm just going to chose Tablets. We'll give this a title of iPad, and I'll just give this a Description. There we go. Now, we need to give our product a price and I'll just set this at $599.95. And now, we just need to upload an image. So we can click Browse. And now, you should have access to this sample upload images folder which contains several different images. They are of a different size than what our application is going to resize them to so that you can see that it actually resizes them. You can see here they are 600 pixels wide. Now, if you're going to use your own images, you'll want to make sure that they are around the same aspect ratio as these images. That way they display properly within our design. So I'm just going to pic the tablet upload image. And click Open. And now, let's try creating our product. So just click the Create Product button. And excellent, we get our success message saying Product Created. Our product shows up here with our little 50 pixel image. We have our delete button, and we have our select menu here to toggle it between in and out of stock. You can see by default it was set to In Stock. Let's try setting it to out of stock, we can choose Out of Stock and hit Update. There we go. It says Product Updated, and it's now displaying that it is out of stock. So I'm gonna turn this back to being in stock. And let's also just make sure that our validation messages are working. So I'll just hit the button without filling anything in. There we go, we get our error messages and I also want to take a look at the actual image itself that was uploaded. So I'm just going to switch into my finder. And if we go into our Ecom project, we go into Public > Image and then into Products. You can see here's our image and it has the time stamp as well as the original file name here. Let me just change the view here, so we can see it a little better. There we go. There's the time stamp and its original name and you can see that the dimensions have been altered as we resized it down from 600 pixels down to the 468 by 249. And that's what will work well for our sites design. So lastly, let's try deleting a product. We can just hit our Delete button and perfect. The product has been deleted. So feel free to create a bunch of different products. Next up, we'll work on displaying these products to our customers by displaying all of the products details.


