
 Lessons: 13Length: 1.2 hours
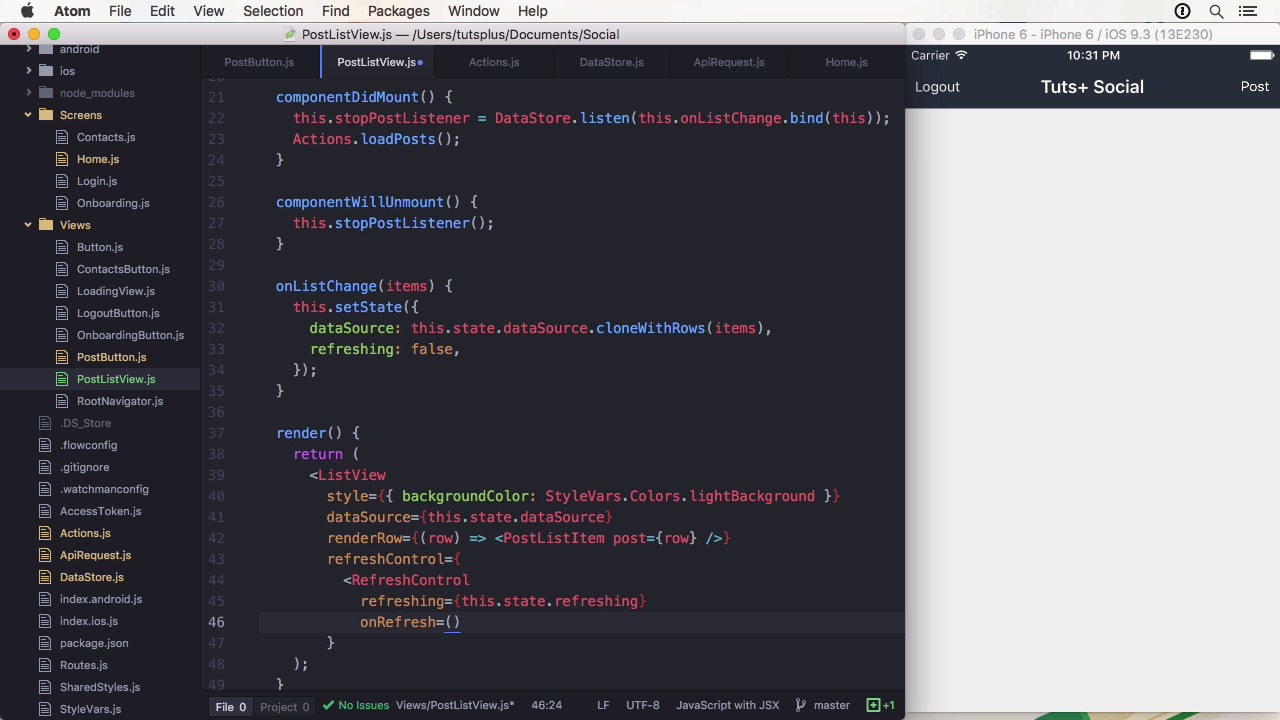
- Overview
- Transcript
3.5 Show the Timeline
Every good social app needs a timeline. We've already posted photos, but we can't see them yet. That will change in this lesson!
1.Introduction
1.1Introduction01:03
1.2Project Overview02:01
1.3Installation and Setup06:50
2.Set Up the Project
2.1Create a Firebase Back-End06:22
2.2Design Your UI With React Native Elements06:08
2.3Create a Navigator With React Navigation07:30
3.Create the App
3.1Create the Login Screen13:42
3.2Add a Sign-Up Screen07:30
3.3Follow Contacts From Your Address Book07:37
3.4Post Images to Firebase03:32
3.5Show the Timeline04:20
3.6Add Location to Posts03:54
4.Conclusion
4.1Conclusion01:29
3.5 Show the Timeline
Hi and welcome back to Build a Social App With React Native. In this lesson, we will display the photos we have uploaded to the back end in our app. It is quite easy with React read x file base since it handles retrieving the images for us. And we'll also receive live updates whenever a photo is updated by another user. So to properly get every data we need we have to change the file base connector a bit. This time we want to populate user id field with the actual user data. In retrospect, I should probably have named it just user, but well. So first of all we have to specify the path which is /posts as wells as some queryParams orderbyChild=created_at and limitToLast=5. So we only receive the last five images initially. Now, we want to populate the user. First, we have to create a constant populates with an array and an object. That specifies the child which is the user_id in our case as well as the root, where we take the data from. Here it's profiles. This consent will be passed into the object. In a connect decorator we can now get the post with populated data to pausing the file object, the post path, and to populate its constant. This is all we need to do to fetch a post and populate them with additional data. And then run the method, we can show all the posts now. First we are going to change the return statement to be a ScrollView to render as a variable post. This variable will be set if the posts are loaded. Since the post prop is returned as a hash, we want the values that contain the post data. I'm also going to sort them descending by created_at, which will be necessary when new posts are added. The final return will be the result of a call to map. We'll reiterate over the posts. To parse the date, I'm going to start a JavaScript object, in a variable. I'm not going to formulate it, to a special date format, but you can certainly do that. Then we are going to render view, that needs to have a unique key. I'm using the index from the map function for that. Handsome styling to make it look a little bit nicer. Then we are going to display a text, also a little bit formatted. I chose to use his name. We are getting that from the populated user_id on the post. Now it's time to show the image. Since we are storing the image as base64 data, we can't really use the builder methods to determine the image size. So I'm just going to use 250 here. Finally, on the bottom, I'm going to display the date by simply using toString on it. Now, the images will get displayed on the timeline. When we add a new image, it will get posted on the top. As an exercise, you could make the display nicer by also showing the editor of the user for instance. The email is also available in the user data. In the next lesson I'm going to add location data to the post functionality. See you there.


