
 Lessons: 13Length: 1.2 hours
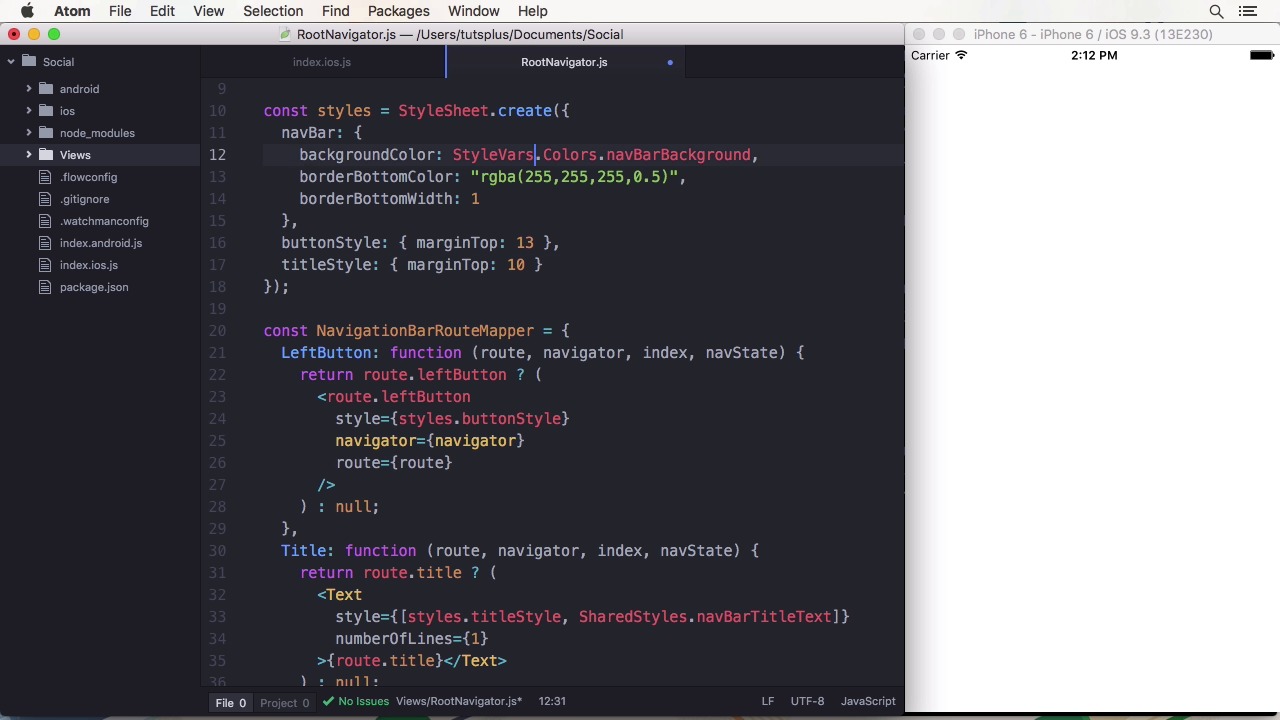
- Overview
- Transcript
2.2 Design Your UI With React Native Elements
One of the most tedious parts of coding a React Native app is styling the UI elements. In this lesson we’ll install React Native Elements, to have a consistent style throughout the app with very little effort.
Related Links
1.Introduction
1.1Introduction01:03
1.2Project Overview02:01
1.3Installation and Setup06:50
2.Set Up the Project
2.1Create a Firebase Back-End06:22
2.2Design Your UI With React Native Elements06:08
2.3Create a Navigator With React Navigation07:30
3.Create the App
3.1Create the Login Screen13:42
3.2Add a Sign-Up Screen07:30
3.3Follow Contacts From Your Address Book07:37
3.4Post Images to Firebase03:32
3.5Show the Timeline04:20
3.6Add Location to Posts03:54
4.Conclusion
4.1Conclusion01:29
2.2 Design Your UI With React Native Elements
Hi, and welcome back to Build a Social App With React Native. In this lesson, I'm going to introduce you to the UI library React Native Elements. One of the biggest hassles when creating React Native Aaps is to have a consistent and beautiful design. One way to do that is to use components for common elements like buttons and so on. The problem is that you have to create everything yourself from scratch. A button, for instance, will take a touchable highlight component and a text component. React Native provides you with a library of standard components that have a consistent look and feel across platforms. Let's have a look at my previous example, a button component, that you would normally create, and the one that is provided by React Native Elements. The difference is not as big right now as I've showed you. But what if you want to have an icon right next to it or a large button of the same style? Well, that's easy with Elements. Just add the icon name, entry attribute large and you're in business. Let's have a look at more specific components. They might only be useful in very specific situations, but I want to show you what's included with the library. We will use the basic components throughout the course when we build our project. So here is a complete pricing element, start consistently and easy to adapt. You can customize the appearance by just providing a different color. Okay, let's try it out in the cost project. I've created a new project, like in the setup lesson, just with a different name. I'm going to create a profile page that displays different data of the user and try to do it using React Native Elements. To do this, I'm going to create a new file called profile chess, In the index file. I can import it and for now replace the main component with it. Okay, let's start with the basics. Importing the React and React Native components and exporting a class to the extents Component. First, we are adding a profile image for the user, which we'll grab from Gravatar. To calculate the URL hash, we need an external library, blueimp-md5. Let's install it with yarn add blueimp-md5. After restarting the packager, it is available for importing. I'm going to create a separate method that returns the gravatarUrl by simply getting the md5 hash of an email, which right now is still static and then building the full URL. Okay, now that's displayed. To do this, we are going to use the avatar component from React Native Elements. By passing large and rounded, we can create a big circular image. And by passing the source as URI, we will fetch the image from Gravatar. Awesome, I want to have a little bit more structure here. So I'm also going to import the grid component, as well as the row and call components that come alongside it. The grid will wrap around everything, and the avatar will be wrapped with a row. Below the avatar, I'm going to create another row that holds two columns. Those columns will have text components that show the number of people the user follows and the number of posts the user has made. To make it look a little bit better, I also want to add some styling. First off, the row containing the avatar will get an alignItems: 'center', so the image is in the middle. To make this work, I also have to add a containerStyle to the avatar, because it's not sized properly and looks out of alignment. The large avatar has a width and height of 75. And I'm also adding a vertical margin of 10 to space it out properly. While it doesn't look right at the top for now, it will next lesson when we add navigation. Let's also add some text containing the name of the user, make it 18 points big and give it a bottom margin. Then I'm going to add some shared styles to the call as well as to the text components. Those styles contain some sizing and alignment as well as a font weight option that I used for the final app. That's it for now. Most components are very ease to use and have great documentation. To recap, React Native Elements is a UI framework that makes it easy to have a consistent style within your app. The library provides a lot of common components for you to use. Many components are built on top of existing ones, provided by React Native. In the next lesson, I'm going to add React Navigation to the project and teach you more about it. See you there.


