
 Lessons: 10Length: 1.2 hours
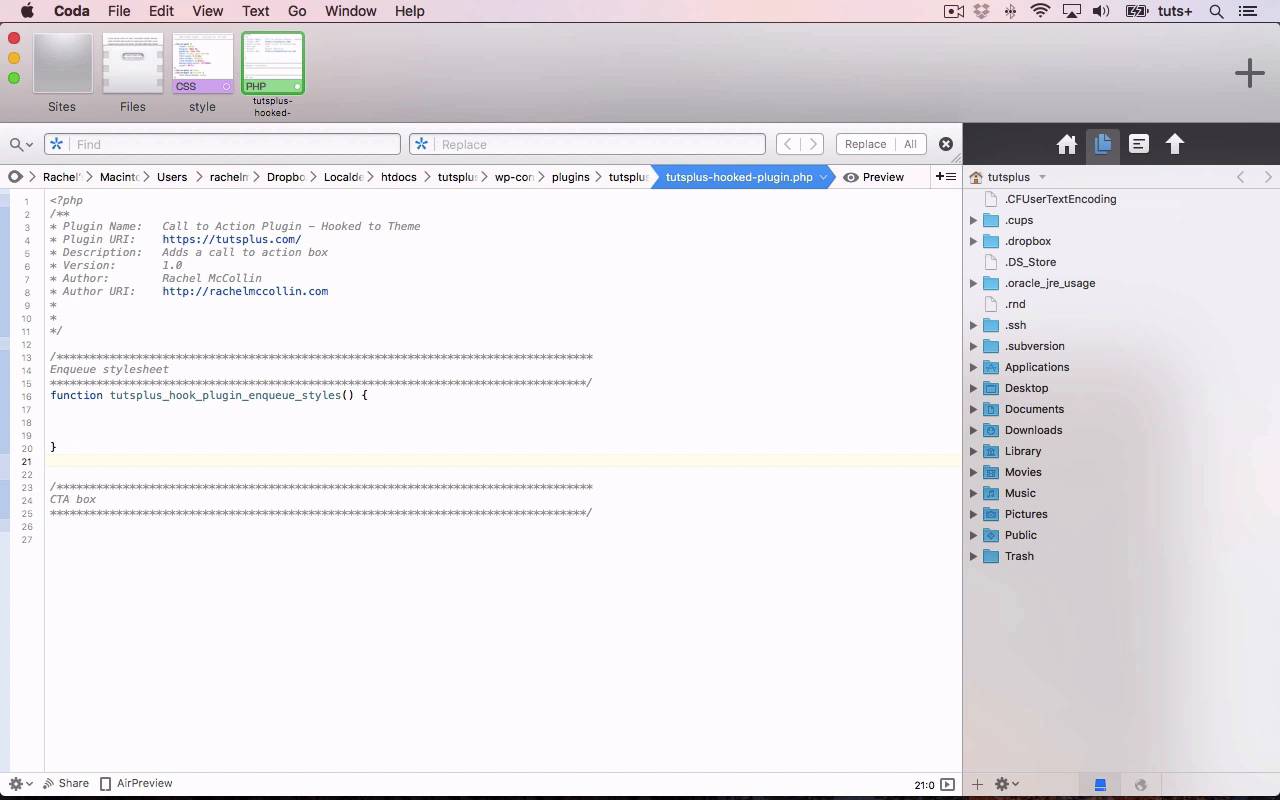
- Overview
- Transcript
3.2 Coding a Plugin for Activation With a Hook
In this lesson, you’ll learn how to write a plugin which will be activated via an action hook.
Related Links
1.Introduction
1.1Introduction00:59
2.Plugin Best Practice
2.1Best Practice for Coding Plugins06:48
3.Creating a Hook-Activation Plugin
3.1Action and Filter Hooks06:26
3.2Coding a Plugin for Activation With a Hook11:47
4.Creating a Shortcode Plugin
4.1Creating a Simple Shortcode06:23
4.2Creating a Shortcode With Editable Content05:40
4.3Creating a Shortcode With Editable Parameters10:21
5.Code a Widget Plugin
5.1Creating the Widget12:23
5.2Save User Edits to the Widget10:30
6.Conclusion
6.1Conclusion02:52
3.2 Coding a Plugin for Activation With a Hook
Hello, and welcome back to this Tuts+ plus course on practical projects to learn to code plugins. In this part of the course, I'm gonna show you how to create a simple call to action box and then hook that to an action hook in your theme. And as we work through the course, we'll take that call to action box and activate it via different types of plugin which you'll see as we get along, but first, the simplest way. Activating a plugin via a hook is the most common way to do it. And the most common way within that is to use a hook that already exists within WordPress. And WordPress includes a whole range of hooks which you'll have seen in the previous part of the course. But in this part of the course, I'm gonna show you how to add your own hook to your theme and then hook your code to that. And what that does is output the code exactly where you put your hook. So what I want to do is create a call to action box which will go underneath the content of my post. So it'll go down here. So instead of manually coding that into every single post, I'll create an action hook that goes in that point in the loop and then I'll code my function and I'll hook that to that action hook. And I'm only gonna add it to single posts so I'll include a conditional tag in there. Now before we start, it's worth mentioning that I'm using a custom theme that I've developed especially for this project. Now it's aptly the theme that I created for our advanced theme development course which I'll include a link to in the notes for this course. And the reason I'm doing this is because if you want to add custom code to a theme, it has to be your own theme. If you add an action hook to a third party theme, you'll lose that when the theme is updated. So if you want to do that, what you need to do is create a child theme and create a duplicate of the relevant template file and add your action hook into that duplicate. I'm not gonna go into that in too much detail at the moment because this course isn't about parent and child themes, it's about plugins. So firstly, let me show you how we add an action hook to our theme. So here's a template file in the theme, and this is the single.php file which outputs all single posts and pages and other content types. Now I'm gonna be adding the hook to every template file in the theme, not just the single one. And that's because I want to give users of the theme the opportunity to attach code to that hook, wherever they are in the theme. What I'm gonna do is add this code inside the content div and before the closing div tag. So I'll open my php tags, and I use the function do_action. And then I need to give my action a unique name. So I'll call it tutsplus_after_content. I'll close my php text again. So that creates an action called tutsplus_after_content that I can then hook any code to and have it output at that point in my theme. The reason I've called it tutsplus_after_content is because the prefix here tutsplus shows me that I'm developing this for Tuts+, and then after content tells me where it is in my theme. So if you're working with your own theme, you'll need to add something similar to this, but maybe add your own prefix with your name or your initials instead of tutsplus. So I'll save that and then just take a quick look at my theme because I'd already added that code to other files in the theme. So you can see here I've got do_action tutsplus_after_content in my index file. I've also got it in my page file and I've got it in my archive file. So those are the theme template files in my theme and I've added that action after each of them. Now if you wanted to, you could add an action just in one template file, and it could just be for that content type. I prefer to add them to all my files and then use conditional code, conditional tags to select when my code will be output because I think that reduces any confusion. So let's close all those. And then I'll open my plugin file. So I've created this plug in file already in my plug in directory as you'll see and it's called tutsplus-hooked-plugin and I've already created a style sheet for this. So I've created styles for my call to action box which includes layout styling and also the font and the colors and I've also done that for links. So you could use whatever styling you want for your own plugin. Now let's go back to the actual plugin file. So I've opened up my plugin file already, I've called it Call to Action Plugin -hook to theme. And the reason I've done that is because I'll be creating multiple plugins called call to action plugin, but each of them needs to have a unique bit here so I know which one is which. Because we're gonna be creating more with short codes and widgets as well. The first thing I need to do is enqueue that style sheet that you already saw. And we covered enqueuing and including files a little bit earlier on in the course, so you'll be familiar with that. But let me just take you through the code. So firstly, I'm gonna create a function which will enqueue that. So that's my function, I'll open my braces for it where the code will go and then I'm gonna add the hook. So this will be hooked to the wp_enqueue_scripts hook. And the second parameter for add_action is the name of my function, so that's tutsplus_hook_plugin_enqueue_styles. I know that seems a bit lengthy, but because I'm running multiple plugins with similar names here, I've gotta make them as unique as possible. Now we need to populate our function. So that's the first part of my function which is registering that style, which I've called hook_cta_css. And the file for that is relative to the URL of this particular file, this plugin file. So you can see, let me show you the structure again in my plugin css and then style.css. So you can see plugins_url which is the URL where this plugin file can be found, and then css/style.css. And I'm missing a comma there, just add that there. Okay, so the next line of my code is where I enqueue that style. Making sure that I've done it correctly. So I'm gonna copy this hook_cta.css. Sorry, hook_cta_css, so I know it's the same. So I'm registering it here and then I'm enqueuing it. And that's my function which is hooked to the wp_enqueue script hook. So that's my style sheet enqueued, let me just save that and then I'll add the code for the actual call to action box. So again, I need to open a function. And I'm gonna call this one tutsplus_CTA_BelowPosts. So the code of my function will go inside those braces and then I'm gonna hook it to that action hook I already created. So the second parameter is the name of my function. And the first one is my hook, widgets tutsplus_after_content. So that's now set up, now I need to populate that function as well. First, I'm gonna add a conditional tag because I just want this call to action box to display below single posts. So I'm checking here if it's a single post using the is_singular conditional tag provided by WordPress, and then I'm gonna create some HTML. So firstly, I'm gonna close my PHP there and then reopen it here, so I can add HTML inside there. So that's my text inside a link and I'll add that thing later on. You need to either link to whatever page in your site that you collect people's email addresses on and then I'll close that div. So you can see here, if we're on a single post, I'm opening this div, I'm adding some text inside a link, and then closing the div, so that's my call to action box function. Now, let's check it out on the site. So here's my single blog post. So now I refresh the screen and let's scroll down and here's my nice great big call to action box. Now you might want yours a little bit more subtle than that, I've got big text and I've got it in orange. But you wanna draw people's eye with a call to action box. The one thing I don't like at the moment is the color of this text, so let's change that to white. And now I realize it should be white, but the reason for that is that that is inside a link. So it's pulling through the link styling from the rest of the themes. You see up here, the color here. And I wanted to use this, so I'll move this from CTA imposed to CTA imposed link or visited. So now if we go back to our post and refresh as I've already done, you can see it's got white text. And if I hover over it, we still got the color on the hover state. So that's how you create a simple plugin that adds some code hooked to an action hook in your theme. If you're working with your own theme you can add your own action hooks like this or alternatively you might be working with a theme framework that has built in action hooks. In the next part of the course, we'll move on from hooking our code to adding it via a short code. And I'll show you how to create a simple short code for use in your WordPress posts. See you next time, and thanks for watching.


