
 Lessons: 12Length: 1.4 hours
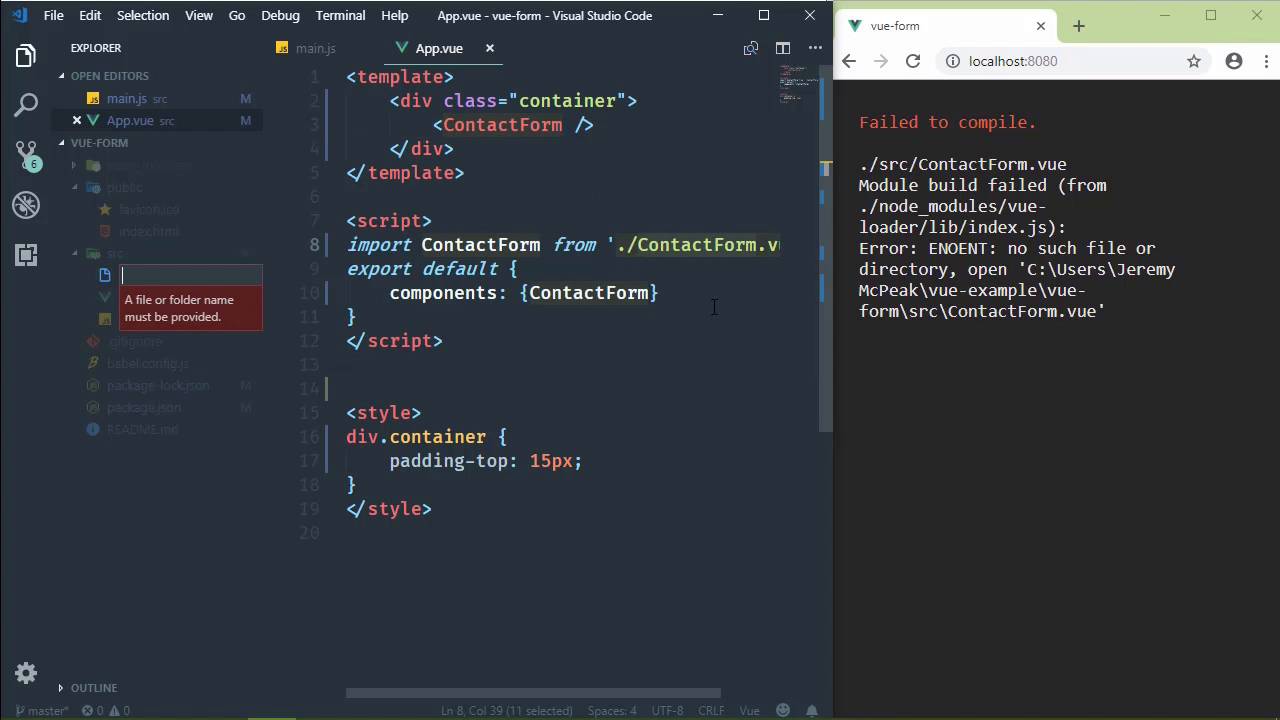
- Overview
- Transcript
4.1 Building the Form
In this lesson, we'll simply create our contact form component. Nothing else... we'll save that for the next few lessons.
1.Introduction
1.1Introduction01:48
2.The Obligatory "Hello World" Example
2.1Basic Structure04:55
2.2Single-File Component Structure09:51
3.The List Example
3.1Passing Props and Iterating a Collection12:41
3.2Displaying More Data08:56
3.3Using External Data11:41
4.The Contact Form Example
4.1Building the Form08:45
4.2Handling Events08:42
4.3Binding Form Controls to Component Data06:07
4.4Defining Computed Properties04:40
4.5Manipulating Style05:48
5.Conclusion
5.1Conclusion00:58
4.1 Building the Form
Our last and final example is going to be a contact form. And I like working with forms with Vue because it gives us an environment for looking at several different concepts. We get to look at binding data to form controls, events. We also get to look at working with style. And we will be covering all of these things over the next few lessons. So let's just jump right in and get started, because we have a lot of ground to cover. We're going to create a new project, so let's say vue create. And I'm going to call this vue-form. And this is going to, once again, take us through that process of setting up our project. So I'm going to manually select the features. I'm going to deselect the linter. And I'm going to choose to put the configurations inside of package.json. I'm not going to save this, although in hindsight, I probably should have, since we used it again. And after our project is created, going to cd into vue-form. And I'm going to install Bootstrap, and I'm going to save it to the project. This is so that we can have something a little nicer looking than just the default styles from the browser. So once that's done, we will then fire up our code editor and we'll start manipulating our project. Once again, we're going to clear out everything that we don't need, and we will start with a fresh app component. Now, do be sure to run the serve script so that that will get the web server up and running so that we can make our changes and see them in the browser. All right, so let's look at our files. We don't need assets or components. We will delete the app view, so that we can recreate it. And we're going to start with the main file, because we want to import the bootstrap CSS here. So this is very simple to do. We simply say import, then we have a string. And it's going to be the path to the minimized bootstrap. So thankfully, you can see that Visual Studio Code is actually prompting me with the different path segments, so that makes it easy to find. And inside of CSS, we'll have bootstrap.min.css. So that will give us bootstrap, so that we can see that in the browser. And now, let's just create our new file called App.vue. This is going to be very simple. So let's just have a template, and let's just have a div element with a class of container. And we're going to need some styling, because our form is going to bump right at the top of the view port of the browser, and I want just a little bit of space between the top and then the top of our form. So let's add style to our app component, because we can. We can have a template, script, and a style as well. And our selector is going to be simply the div with the class container. We will set the top padding to 15 pixels, and that's going to be just fine. Now, as far as our contact form component is concerned, we can just call it contact form. And so, let's go ahead and put that in the template so that we have it. We're not going to pass any props to it because, really, this is a contact form, we don't need to pass props to it. And we, of course, are going to need to import that and register that component so that we can use it. So let's add our script, and let's go ahead and say components. And we will have ContactForm. I know I'm kinda doing this backwards, but we at least know that we are going to have to do this stuff. So since we are already in this file, it kind of makes sense to go ahead and do it. We want to import ContactForm from. And as far as the file name, we could call it Contact.vue, but let's call it ContactForm.vue. And whenever we say this, we'll probably see an error. We do, but that's okay. Because this just means that it can't find that contact form file. So let's go ahead and create it. And then that error will go away. So we are essentially done with the main JS file. We are done with the app component. So we can close that. And we will focus on the contact form. So let's just start with a template. And let's get our form up and running so that in the next lesson, we can just hit the ground and start adding some functionality here. So we are going to use the form element as our root element. It's not going to have an action attribute or anything like that. That kind of violates the rules of progressive web applications. But let's face it, if we are using Vue here, I mean, we could be concerned with progressive web apps, but I'm not. To me, if somebody doesn't have JavaScript enabled, well, that's their problem. So [LAUGH] inside of the form, we're going to have two fields, one for the e-mail address and one for the message. So let's go ahead and write those. We will have a div elements with a class of form-group to contain those. So let's copy and paste that three times. One is for the Submit button, that's what the third one is for. And let's have a label. This is for the e-mail field, so we'll call that sender-email. And then, the text will be Email. And then we will have an input element. Let's go ahead and define the class. It will be form-control. Now, as far as the type is concerned, let's use email since this is one of the nice new features of HTML5. Well, it's not new, it's newish. If you consider newish several years. But this way, later on, if we wanted to hook into the built-in form validation API, we could do that if we wanted to. We're not, but that option would be there. And I'm also going to organize these elements, so that each attribute is on its own line. Because you're going to see that we use many different Vue directives, especially within a form. So it makes things much more easier to read and organize, and especially with no horizontal scrolling, if you put each attribute on its own line. Now, as far as the input element, we just need to set the ID to sender-email so that if the user clicks on the label, then it will focus the input element. But other than that, we're good to go. Let's just copy that and paste it for the message. But the message is going to be a text area, so we need to make that change. We also need a closing tag because we can't have a self-closing textarea element. The type is, of course, not going to be needed. The ID we will call sender-message. And we, of course, need to change the label so that that says message as well. Let's also set the rows just so that we have enough vertical space for a message. And let's just use 10 as the value there. Hopefully, we should see something pop up. And we aren't. So we have an error somewhere, but we will fix that in a minute. For now, we'll have our button. Let's give it a class of btn and btn-primary. Once again, we're going to put the attributes on their own lines because we will be adding some Vue directives to the button as well. And the text, we could just say Send Message. Okay, so with this, let's first of all just do a refresh and make sure, no, we didn't have any errors. So we have our form, and that's a step in the right direction. So let's go ahead and add our script, because we're going to need that. Let's go ahead and add a style element, because we will be adding some style here. And this is a good place to stop so that in the next lesson we will talk about handling events. Because that's really the first thing we want to do. Whenever we submit a form, we're going to click on the Send Message button. That is, of course, going to initiate a click event. And we want to execute code when that occurs.


