
 Lessons: 10Length: 51 minutes
- Overview
- Transcript
3.1 Creating a Field Group and Adding Fields
In this lesson, you'll create a field group in ACF and add fields to use in your block.
Related Links
1.Introduction
1.1Introduction00:48
1.2Why Create Blocks Without JavaScript?03:25
2.Registering a Block
2.1Setting Up the ACF Plugin04:43
2.2Registering a Gutenberg Block With the ACF API06:17
3.Adding Fields to the Block
3.1Creating a Field Group and Adding Fields04:16
3.2Adding Block Settings03:49
4.Outputting the Block
4.1Setting Up the Block Class and Values08:17
4.2Writing the HTML06:14
4.3Adding the Block to a Post or Page10:49
5.Conclusion
5.1Conclusion02:16
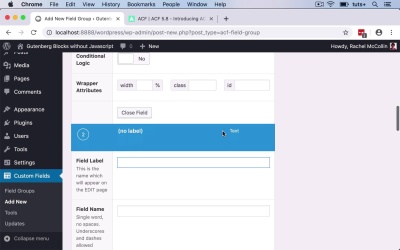
3.1 Creating a Field Group and Adding Fields
Hello, and welcome back to this test plus course on creating Gutenberg Blocks in WordPress without JavaScript. In this part of the course, we're going to move on to creating a field group for our block. Now, we've already created the block type CTA or Call to Action, but what we need to do is create some individual custom fields now, that we can then use in our posts or pages. So I've not got any field groups yet in my site, so I click Add New to add one. And now I need to add my field group. So I'll start by calling it CTA. Actually now, I'm going to call it something more specific, I'll call it Buy the book CTA. So I'll imagine it's on a website that's about buying books. And now I need to select a location. I could add fields first if I wanted to, but I'm gonna select the location because this is the bit that specifically relates to Gutenberg. So here in locations, we find Block as an option is equal to Call to Action. So that is selecting that Call to Action block that we've already registered in our plugin, and that means this field group will create a block. So now let's add some fields to it. So you may remember when I was setting up the code, I already added to the description, that it had a title, an image, text, and a link. So those, are what I'm gonna add. So I'll start with a label for it and I'll call it Book CTA. And then the field name will be automatically generated for me. The field type for this one is text, I'll add some instructions for people using this block, telling them more what this particular field is. It's not required, so I won't check that. I don't need any additional default or placeholder text, so that's just done. Now I'll add another field. And this second field will be for an image. So I'll call it cta_image and the field type will be image. And again, it will be optional, and I'll add some instructions to it. But adding an image makes our call to action box come to life and not much more arresting on the page. So the preview size at medium is fine for my needs. I'm not gonna limit the media library, and that's good as defaults. So let's add another field, and this will be the text. So we'll call that Body Text and that's a text field type so we can leave that as it is. And again, I'll add some instructions Making sure I type it correctly. This one is required because our call to action box won't be much use without any text in it. And then we'll add another field, which will be the link. And that will be a URL as the field type. Again, I'll type in some instructions for users. And this one is also required because again, there's not a lot of point in the call to action without it actually leading anywhere. So those are all my fields. I don't need to worry about positioning and so forth because it's a block. I don't need to worry about where it goes on the screen because that relates to the classic editor. So I'll publish that to save my field group and then it's added to my site. So I now have the fields in my field group setup. So I've got a title, I've got an image, the text and a link. But what I also need to do is add some settings for styling, and I'm gonna do that in the next part of the course. See you next time, and thanks for watching.


