
 Lessons: 10Length: 51 minutes
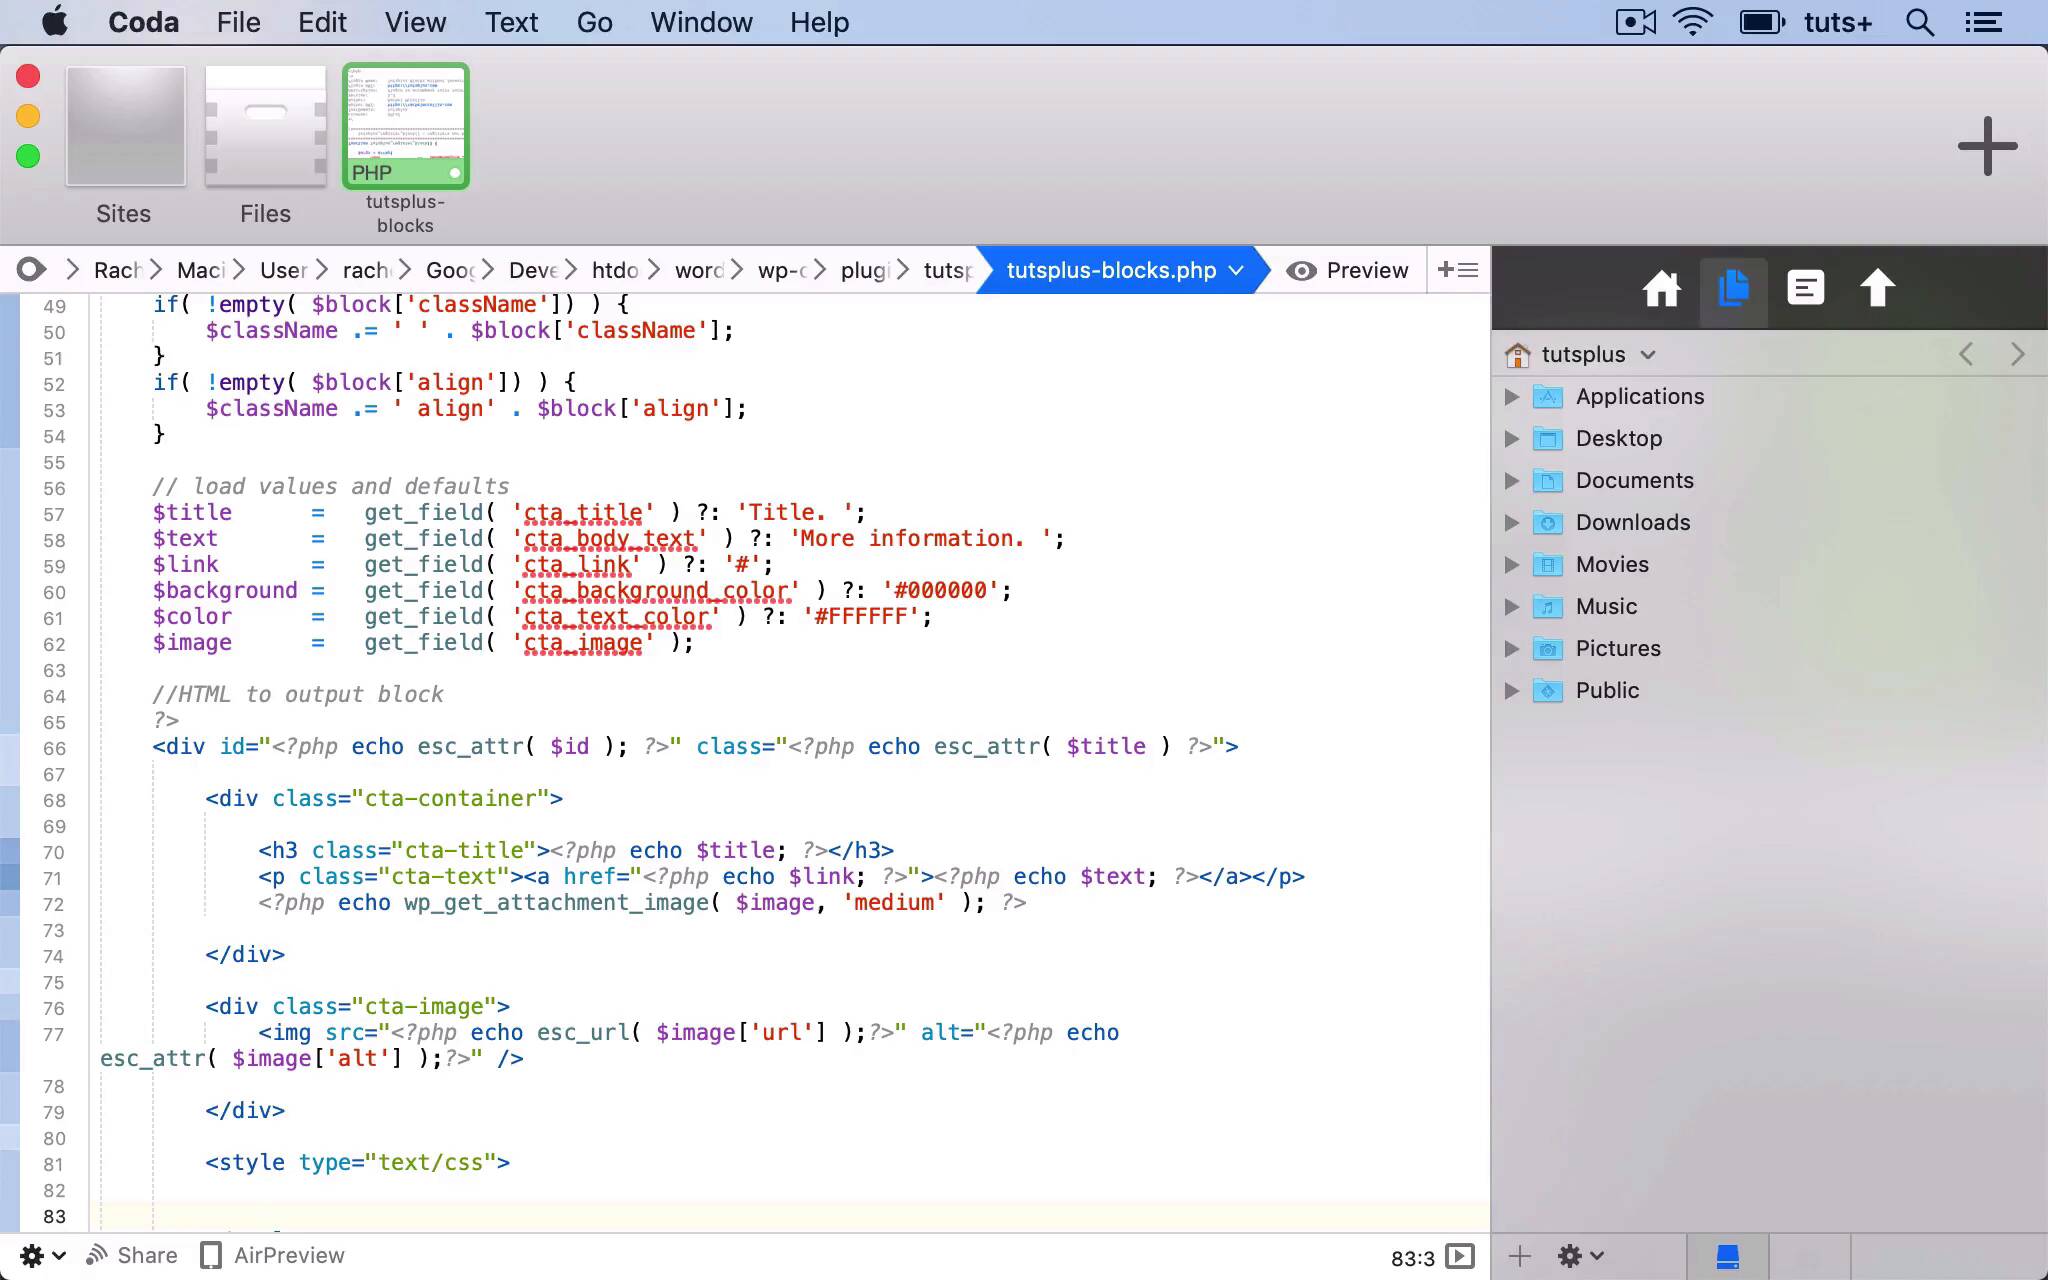
- Overview
- Transcript
4.3 Adding the Block to a Post or Page
Let's try it all out! In this lesson, we'll add the block to our site and configure its settings.
Related Links
1.Introduction
1.1Introduction00:48
1.2Why Create Blocks Without JavaScript?03:25
2.Registering a Block
2.1Setting Up the ACF Plugin04:43
2.2Registering a Gutenberg Block With the ACF API06:17
3.Adding Fields to the Block
3.1Creating a Field Group and Adding Fields04:16
3.2Adding Block Settings03:49
4.Outputting the Block
4.1Setting Up the Block Class and Values08:17
4.2Writing the HTML06:14
4.3Adding the Block to a Post or Page10:49
5.Conclusion
5.1Conclusion02:16
4.3 Adding the Block to a Post or Page
Hello, and welcome back to this Tuts+ course on creating Gutenberg blocks in WordPress without JavaScript. In this part of the course, we're going to add our block to a page. Now I've called the field group Buy the book CTA because I'm thinking I'll put it on a book site. But to be honest, it could just be called Call to Action. So let's change that and update the field group. So now let's try adding it to a page. So I have a few pages on this demo site and I'm gonna add it to my Home page. And this has got some dummy text in it at the moment, but let's add my Call to Action in between a couple of paragraphs that are already there. So I'll add this new block, which is a Call to Action block. And now you can see we've got a dummy block. So we've got our h3 title, and we've got our link and our text. And you can see that not only have we got those, we've got that placeholder text that we added to the function. So let's create a new title, Find Out More. Add some content to the body text, put some text in there. I'm gonna add a link, I will take you to the Tuts+ site if you click on this, or Envato. And then we also need to add an image. So I'll click on the Add Image button, and I'll select this rather grumpy cat image that I've got in my media library. I'll add a description for that and Alt Text. Select it and then that becomes the image in my block. Now that cat image isn't being displayed right now, let's take a look at it in the front end, see if that's just in the admin screen. No, the image isn't there, so there's obviously something wrong with the code for that image. So let's go back into our plugin and fix it. So I've spent a bit of time looking at the code and digging through the codecs, to find out what the problem is. And I've discovered that this image variable here is actually an array. So I need to use a different function, not wp_get_attachment_image, because that just pulls in one value, not a value from an array. So I'm going to echo out the URL of the image, using a value within my array of variables. So I use echo esc_url, and then for my image, I want the URL value from that array of variables. And I use something similar for the Alt Text for this, instead of using esc_url I use esc_attr and use alt from that image rather than url. So I'm echoing out the image with Alt Text added to it for accessibility. So let's save that and take a look at how it works on the site. So here we are back in the editing screen and here's my lovely grumpy cat, he's showing up. So now the image is pulling through correctly, I've got my image, I've got my link, and I've got my title. But what I want to do now is style it, because I want to be the cat to be right aligned compared to the rest of the content. So let's go back into our code and take a look at what we need to do. So earlier on, you might remember I used this enqueue_style argument within my register block function. But as I've been working through this course and through this code, I've been thinking about that option. And I've realized that I need to actually put the styling in my plugin, and that's because I need to echo out variables in a function. Because I can't do that in a style sheet, cuz the style sheet won't pull variables in from my PHP. So instead, I'll add a style tag to my div here. And then I'll use those variables to style the id, this particular block, using the colors that have been defined by the user when setting up the block. So, we use style type="text/css", and then we add our styling. So I want to specifically style this instance of the block using the id that I've already defined above. So I'll find that id, which is up here, this id variable. So I'm starting out by echoing the id, so I use a # and then that id. And then within that block with that id, I want the cta-container element, which I've added in my HTML above. And I use background-color to set the background color for that. And again, I'm using php and echoing the background variable to get my background color for my block. So that uses this field that I've set using the color picker. And now I'll do the same for some other bits of styling as well. So first there's the color of my text, which I use the color variable for, which again is pulling in from my color picker. And then that's my cta-container, and I'll copy that, and I style the text within it. So I want to style my links, so they don't get styled according to any styling from the style sheet. So I want to overall the styling that's in the theme style sheet, within this block. So let's take a look at that now. So you can see we've got the color and it hasn't carried through to the h3 so I need to add it to that h3 in my code as well. Refresh my screen, and scroll down to my block, and that's now white on black, which is the default, because I haven't actually set that up in the editing screen. So now if we take a look at the page and the layout, I want the cat to be over on the right hand side. So let's amend the styling for that. Here I don't need to use the id, because the layout for the cat will be the same on every iteration. Or the layout for the image rather, not always cats, will be the same for every iteration of the block, not just this specific block. So my cat is now right aligned, but he's underneath, he's floating next to the paragraph and not next to the text and the block. So I need to rejig the CSS and the HTML a little bit more comprehensively to get it just as I'm looking. So I've been experimenting a little bit with the layout of my markup and I'll show you the changes that I've now made to get it to work correctly. So I change the structure of the HTML here, so the image is no longer in a separate div from the text. So we've got this one div, cta-container, within that we have an image using the exact same code we used before. We've got our h3 and our p, and I'll delete that old reference to the image. We close that div, and then we close the containing div. Now we could actually remove that internal div, because we've got a div within a div here. But I'm not gonna do that, because I've set up the styling for that, and I just want to show you how that works. And obviously the way you style your block may well be different from the way I've chosen to style mine. Now we've got a background color for the entire element. I've added some padding which you can see on the left hand side over there. I've added overflow: auto to get my floats to work. I've got the color of the text. I've got floating CSS. So I've got clears and floats on the container and the image. And I've styled a margin, making that tight around that image. And I've also styled the h3. And that's how you create a block without writing any JavaScript using the advanced custom fields plugin. In the next part of the course, I'll wrap up by recapping on what we've covered in this course, and reminding you of what you've learned. See you next time and thanks for watching.


